
# Dualbooting with Linux
# Method A: OpenLinuxBoot
OpenCore now includes a driver OpenLinuxBoot.efi which should make dualbooting with Linux much easier.
The steps to using it are:
- Install Linux as you normally would e.g. by booting from an .iso image burnt to a removable USB drive - OpenLinuxBoot.efi is not involved in this stage
- Add
OpenLinuxBoot.efiandext4_x64.efito yourconfig.plistDriverssection - Make sure
RequestBootVarRoutingandLauncherOptionare enabled inconfig.plist; it is also recommended to enableHideAuxiliaryin order to hide older Linux kernels except when you need to see them (which you would do by pressing SPACE to show auxiliary entries in the OpenCore boot menu) - Reboot into OpenCore, installed Linux should now just appear
- Never use Grub again
If you previously used method B or C below, you will need to remove those settings in order not to see your Linux distro twice in the OpenCore boot menu.
For further information on how OpenLinuxBoot works and additional trouble-shooting guidance, see the OpenLinuxBoot section in OpenCore’s Configuration.pdf document.
# Method B: Chainloading a EFI Bootloader (GRUB2, Systemd-boot)
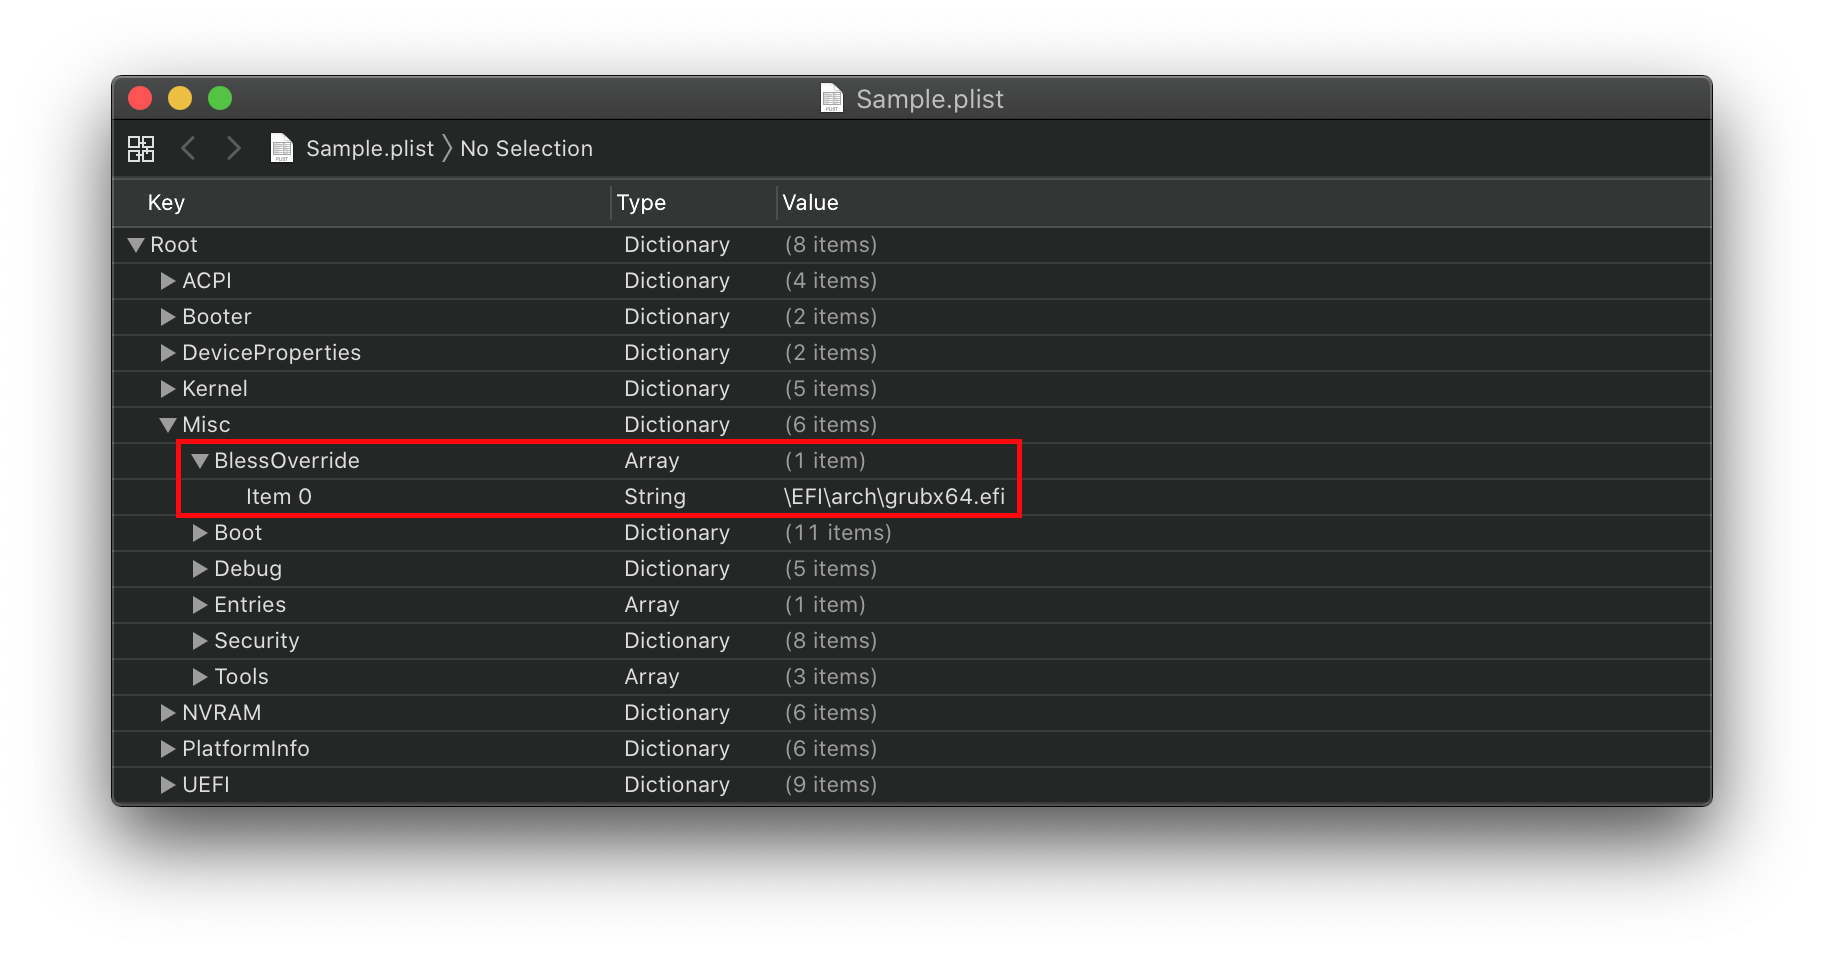
# Method 1: Using BlessOverride
If Linux is not picked up automagically, add the following to your config.plist:
Misc -> BlessOverride -> \EFI\arch\grubx64.efi
Some common Linux bootloader paths:
\EFI\arch\grubx64.efi\EFI\ubuntu\grubx64.efi\EFI\systemd\systemd\systemd-bootx64.efi- Check your distribution ¯\_(ツ)_/¯
# Method 2: Using efibootmgr (recommended)
efibootmgr is a program that manipulates the EFI Boot Manager in your UEFI Firmware (ex-BIOS). With it, you can create new entries and add your linux boot manager (GRUB2, systemd-boot,...) in a way that will make it appear on OpenCore and can be selected and set as default too by OC (using Ctrl + Enter when you highlight it). To do that:
Know which bootloader/manager you're using (GRUB2 or systemd-boot or anything else)
Boot to linux through OpenCore, you may want to use UEFI Shell to execute the EFI Application for your bootloader/manager
Find out your bootloader/manager's path, usually it's in the EFI (if you properly set it up)
In a terminal window on your linux install, run
lsblk(available in most distributions)$ lsblk NAME MAJ:MIN RM SIZE RO TYPE MOUNTPOINT ... sda 8:0 0 223.6G 0 disk ├─sda1 8:1 0 200M 0 part /boot/efi ├─sda2 8:2 0 116.3G 0 part └─sda3 8:3 0 107G 0 part / ...- Check for the mount point section to get your system root
/partition (heresda3) /boot/efihas my EFI partition mounted in it (if you properly added it in fstab, which you should)- the bootloader/manager is in
/boot/efi /boot/efipartition number is1in this case (it could besda1ornvme0nXp1or anything else), if you have your EFI in another partition please remember which number it is
- Check for the mount point section to get your system root
Change the directory to where your EFI partition is mounted by running
cd /path/to/efi(for examplecd /boot/efi)Once you're in, you'll usually find a folder named
EFIwhich containsBOOTand other folders, one of these folders may contain your bootloader/manager EFI Application binary, commonly found inEFI/arch/grubx64.efi- for Arch with grub2EFI/ubuntu/grubx64.efi- for Ubuntu with grub2EFI/systemd/systemd-bootx64.efi- for systemd-boot (path used with Arch)EFI/fedora/grubx64.efi- for Fedora with grub2- or run
find . -iname "grubx64.efi"orfind . -iname "systemd-bootx64.efi"in your EFI folder (you can change the file name to whatever you're using)
Keep note of:
- the binary path
- the binary's partition number
- the binary's disk path (
/dev/sdaor/dev/nvme0nX)
Install
efibootmgrin your linux system (usually it comes built-in in ubuntu, but requires install on arch for example)Once installed, run as sudoer/superuser (or use sudo)
efibootmgr -c -L "Linux" -l "\EFI\pathto\filex64.efi" -d "/dev/sda" -p 1-c: Create-L "Linux": Label the boot entry (you can change it to whatever you want)-l "\EFI\pathto\filex64.efi": loader file path, must be in a format the UEFI Firmware can use, which means\for pathing instead of/you find in unix-d "/dev/sda": disk path so thatefibootmgrknow which disk the UEFI firmware should read the file from, it can be/dev/nvme0nX(with X as a number) if you're using NVMe-p 1: point the partition number we found earlier, in case your EFI partition is the first one, this can be omitted
Reboot and check OpenCore, you will find a new entry named
EFI, there can be many as it can also point to other boot entries, that's by design by OpenCore, not a bug.
Note:
This can be used for any EFI application you want to add to the UEFI Boot Manager.
# Method C: Chainloading the kernel (must support EFISTUB)
Some linux kernels are built with EFISTUB enabled in their configuration, which makes them loadable by the UEFI firmware like a regular UEFI application (neat, right?), we can use this feature with OpenCore and let it load the kernel as an EFI application while also passing boot arguments and other information.
# 1. Identifying your root partition
We first need to determine your root partition and its UUID/PARTUUID, this information will help us point to the proper partition for the kernel/system root.
# 1. Your kernel and system root are in the same partition: (using Arch in this example)
In a terminal window on your linux install, run
lsblk(available in most distributions)$ lsblk NAME MAJ:MIN RM SIZE RO TYPE MOUNTPOINT ... sda 8:0 0 223.6G 0 disk ├─sda1 8:1 0 200M 0 part /boot/efi ├─sda2 8:2 0 116.3G 0 part └─sda3 8:3 0 107G 0 part / ...- Check for the mount point section to get your system root
/partition (heresda3) /boot/efihas my EFI partition mounted in it (if you properly added it in fstab, which you should)- the kernel and initramfs are stored in
/bootwhich is part of my main system root partition
- Check for the mount point section to get your system root
Now we need to know which UUID/PARTUUID, run
blkid | grep -i <system_root_partition>, eg:blkid | grep -i sda3(must be root user)# blkid | grep -i sda3 /dev/sda3: UUID="3d4768d7-d33e-4f9f-a821-e80eba22ca62" BLOCK_SIZE="4096" TYPE="ext4" PARTUUID="a1073e53-c768-4ce5-89ad-b558669bdb89"- You'll get both your UUID/PARTUUID, save these somewhere.
Explore
/bootand list your files, you should find your kernel and initramfs$ cd /boot $ ls -l total 51698 drwxr-xr-x 7 root root 34304 Jan 1 1970 efi drwxr-xr-x 6 root root 4096 Sep 18 19:42 grub -rw-r--r-- 1 root root 10144696 Sep 22 23:31 initramfs-linux.img -rw-r--r-- 1 root root 32047033 Sep 22 23:32 initramfs-linux-fallback.img -rw-r--r-- 1 root root 3161088 Jun 16 17:50 intel-ucode.img -rw-r--r-- 1 root root 7541344 Sep 22 23:31 vmlinuz-linux- You see my kernel is named
vmlinuz-linuxwithinitramfs-linux.imgas its initramfs, with a fallback img, but alsointel-ucode.imgfor the trash intel mitigation- In case you're using AMD, you might also find
amd-ucode.img - Some other distributions may have these images stored somewhere else, check your distribution and how it handles CPU ucode firmware
- In case you're using AMD, you might also find
- You see my kernel is named
Reboot to OpenCore, and press Space, it should show more options, one of them should be OpenShell.efi. In case you do not have it, download the OpenCore zip, and take it from OC/Tools, and add it to your config.plist, ProperTree can do that with OC Snapshot.
# 2. Your kernel is in your EFI partition
In case you're using systemd-boot, make sure you install the kernel in your EFI partition where systemd UEFI bootloader can detect and load your kernel: basically make sure it's in a FAT32 partition which your EFI partition should already be.
# 2. Identifying your UEFI paths and devices
In the shell
run
map -r -bto list all your devices (-b to break the scroll)BLKX:are all the partitions/disks scannedFSX:are all the explorable filesystemsPciRoot(0x0)/Pci(AxB,CxD)/SataorNvmeare your drives types (nvme or ahci)HD(X,GPT,<PARTUUID>,...)orHD(X,MBR)are your drive partitions whereXis a number, GPT/MBR the disk partition scheme then followed with PARTUUIDExample:
Mapping table FS0: Alias(s):HD0a0a1:;BLK1: PciRoot(0x0)/Pci(0x1F,0x2)/Sata(0x0,0x0,0x0)/HD(1,GPT,4C86153F-3A91-4328-878A-807A8FA944A1,0x28,0x64000) FS1: Alias(s):HD0a0a2:;BLK3: PciRoot(0x0)/Pci(0x1F,0x2)/Sata(0x0,0x0,0x0)/HD(2,GPT,B186A074-AE41-495C-BAF3-04AD655A73FB,0x64028,0xE8B0C90)/VenMedia(BE74FCF7-0B7C-49F3-9147-01F4042E6842,1D89CBABD1BB094B87762CDCDC3168F6) FS2: Alias(s):HD0a0a2:;BLK4: PciRoot(0x0)/Pci(0x1F,0x2)/Sata(0x0,0x0,0x0)/HD(2,GPT,B186A074-AE41-495C-BAF3-04AD655A73FB,0x64028,0xE8B0C90)/VenMedia(BE74FCF7-0B7C-49F3-9147-01F4042E6842,43B537EA89133A48A9640D5A373D2982) FS4: Alias(s):HD0a0a2:;BLK6: PciRoot(0x0)/Pci(0x1F,0x2)/Sata(0x0,0x0,0x0)/HD(2,GPT,B186A074-AE41-495C-BAF3-04AD655A73FB,0x64028,0xE8B0C90)/VenMedia(BE74FCF7-0B7C-49F3-9147-01F4042E6842,9FEEB42E4604B44BB4CB39A9D6F41DB8) FS5: Alias(s):HD0a0a2:;BLK7: PciRoot(0x0)/Pci(0x1F,0x2)/Sata(0x0,0x0,0x0)/HD(2,GPT,B186A074-AE41-495C-BAF3-04AD655A73FB,0x64028,0xE8B0C90)/VenMedia(BE74FCF7-0B7C-49F3-9147-01F4042E6842,EDB22B3A8A95AC4B9A66E4E287559689) FS6: Alias(s):HD0a0a2:;BLK8: PciRoot(0x0)/Pci(0x1F,0x2)/Sata(0x0,0x0,0x0)/HD(2,GPT,B186A074-AE41-495C-BAF3-04AD655A73FB,0x64028,0xE8B0C90)/VenMedia(BE74FCF7-0B7C-49F3-9147-01F4042E6842,FA8B4C241BA35347B093F2E560B563EA) FS3: Alias(s):HD0a0a2:;BLK5: PciRoot(0x0)/Pci(0x1F,0x2)/Sata(0x0,0x0,0x0)/HD(2,GPT,B186A074-AE41-495C-BAF3-04AD655A73FB,0x64028,0xE8B0C90)/VenMedia(BE74FCF7-0B7C-49F3-9147-01F4042E6842,93DFEA9BE3D44D4CBE5A8A4F978348D2) BLK0: Alias(s): PciRoot(0x0)/Pci(0x1F,0x2)/Sata(0x0,0x0,0x0) BLK2: Alias(s): PciRoot(0x0)/Pci(0x1F,0x2)/Sata(0x0,0x0,0x0)/HD(2,GPT,B186A074-AE41-495C-BAF3-04AD655A73FB,0x64028,0xE8B0C90) BLK9: Alias(s): PciRoot(0x0)/Pci(0x1F,0x2)/Sata(0x0,0x0,0x0)/HD(3,GPT,A1073E53-C768-4CE5-89AD-B558669BDB89,0xE914CB8,0xE8B0C90)BLK0seems to be the disk BLK as its path does not show any partition numbering or UUID- This is logical as the first thing your firmware will look for is the disk, not its partitions
- I have BLK1/BLK2/BLK9 which are my 3 main partitions
- Because I have APFS driver loaded from OpenCore, there are new BLK devices shown because of that and thus added more partitions, which are actually just APFS container partitions, those can be ignored
- The reason why they can be ignored is because you can see that they have the same PARTUUID, also we're not here for those partitions
- FS0 seems to be BLK1, which is my EFI partition which is also FAT32 formatted, where OC lives
- In a multi-disk setup, FS0: can be whatever the UEFI firmware detects first, it does not mean that OC is always in FS0, in these cases FS0: could point to a USB device or SATA device. Usually, most firmware will follow this setup to read/find partitions: USB > SATA > NVME, this is not a norm as some other firmware could do something else (it can also depend on the boot order setting).
- Check if your linux kernel is there (in case of systemdboot)
cd FSX:ls- Use your eyes and a brain cell
- Just make sure you're properly reading the partition location before doing any actions
- FS0/BLK2/BLK9 all live in a SATA drive (which is my main boot drive for this example device)
- This matches linux reading the device as
sdXand notnvmeXnX - In the case of a NVMe drive, you would be seeing
Nvmeinstead ofSata
- This matches linux reading the device as
- BLK9's PARTUUID matches my root filesystem
a1073e53-c768-4ce5-89ad-b558669bdb89- But remember that it's in capital letters!
- BLK1 and BLK2 have their explorable
FSX, which means the UEFI firmware can explore and read files from them, however BLK9 which is an ext4 partition isn't, this means the UEFI requires a suitable driver to load its contents.
Identify your EFI partition (in this example it's FS0:)
- run
map -r > FSX:\drives_map.txt- This will run
mapand save the output to FSX: in a file nameddrives_map.txt - Note that UEFI Firmware use Windows-style path slash
\not/
- This will run
- run
Reboot to macOS/Linux distribution with ProperTree in it
# 3. Adding the boot entry to OpenCore's configuration file
In case:
- Your kernel is in the system partition:
- Download a suitable UEFI driver for your filesystem in use:
- Download rEFInd (opens new window)
- Extract the zip
- Explore the extracted zip > refind > drivers_x64
- You'll find these drivers:
- ext4
- ext2
- btrfs
- Pick the UEFI driver that you want and copy it to OC > Drivers
- Add it to your config.plist (you can use ProperTree > File > OC Snapshot)
- Download rEFInd (opens new window)
- Download a suitable UEFI driver for your filesystem in use:
- Your kernel is in your EFI partition (systemdboot), you don't need to set up any fs drivers
- Your kernel is in the system partition:
(Optional) In case you're using GRUB2, make sure you get a copy of
grub.cfgto get your kernel argumentsOpen config.plist in your plist editor (recommend ProperTree), under Misc > Entries, make a new child with type
Dictionary:Key Type Value Notes Comment String Whatever you want to write here, it's just a comment I guess lol - Enabled Boolean True/ON/1- Name String Name of the OS you want Can be anything you want Path String Template:
PciRoot(your_ids)/Pci(your_ids)/.../Type(your_ids)/HD(X,SCH,PARTUUID,stuff,from_map)/\path\to\kernel
Example:
PciRoot(0x0)/Pci(0x1D,0x0)/Pci(0x0,0x0)/NVMe(0x1,9B-64-50-F1-5C-38-25-00)/HD(6,GPT,608DA4F8-DA9E-4792-829F-A4CF4E5B8B82,0x2C431800,0x3B10800)/\boot\vmlinuz-linuxcheck below Arguments String Template:
initrd=\path\to\rd.img\if\used other_kernel_arguments
Example:
initrd=\boot\intel_ucode.img initrd=\boot\initramfs-linux.img root=PARTUUID=608da4f8-da9e-4792-829f-a4cf4e5b8b82 ro quiet intel_iommu=on iommu=ptcheck below Auxiliary Boolean False/NO/0- False: Always shown
- True: Hidden until you press space
- Requires Misc\Boot\HideAuxiliary=True if this is set to True- Path Notes:
- your_ids: from the map text file
- Type: NVMe/SATA
- X: partition number
- SCH: disk scheme (GPT/MBR)
- PARTUUID
- stuff,from_map: get them from the map
- \path\to\kernel: it's the path to the kernel binary
- TL;DR: Copy the path of the partition from the map text file.
- Note1: use backslash
\for kernel path, that's how UEFI firmware handles file paths - Note2: use regular slash
/for the PciRoot path, like shown in the example and template
- Note1: use backslash
- Arguments Notes:
- You can add as much
initrd=as you want (if you're using linux, you should know why and how) - Your other arguments are the same as in any other bootloader, you can add/remove/modify in the config directly
- You can add as much
- Path Notes:
Notes
- You can use the same scheme as above to add other efi files or uefi-loadable files (like systemdboot efi, Windows bootmgfw.efi...)
- You will NOT be able to set it as the default boot option with Ctrl+Enter, so you'll have to select it each time you want to boot it