
# Optimizing Power Management
# Enabling X86PlatformPlugin
So before we can fine tune power management to our liking, we need to first make sure Apple's XCPM core is loaded. Note that this is supported only on Haswell and newer, consumer Sandy, Ivy Bridge and AMD CPUs should refer to the following:
Ivy Bridge and Ivy Bridge-E note
Apple dropped support for XCPM on these models back in macOS Sierra, so XCPM is only supported between 10.8.5 and 10.11.6. You will still need ssdtPRgen.
To enable XCPM in 10.11 and older on these models, simply add -xcpm to your boot-args.
To start, grab IORegistryExplorer (opens new window) and look for AppleACPICPU (Note that if you use search, IORegistryExplorer won't show the children of any services found. Be sure to clear the search box once you've found the entry):
| XCPM Present | Missing XCPM |
|---|---|
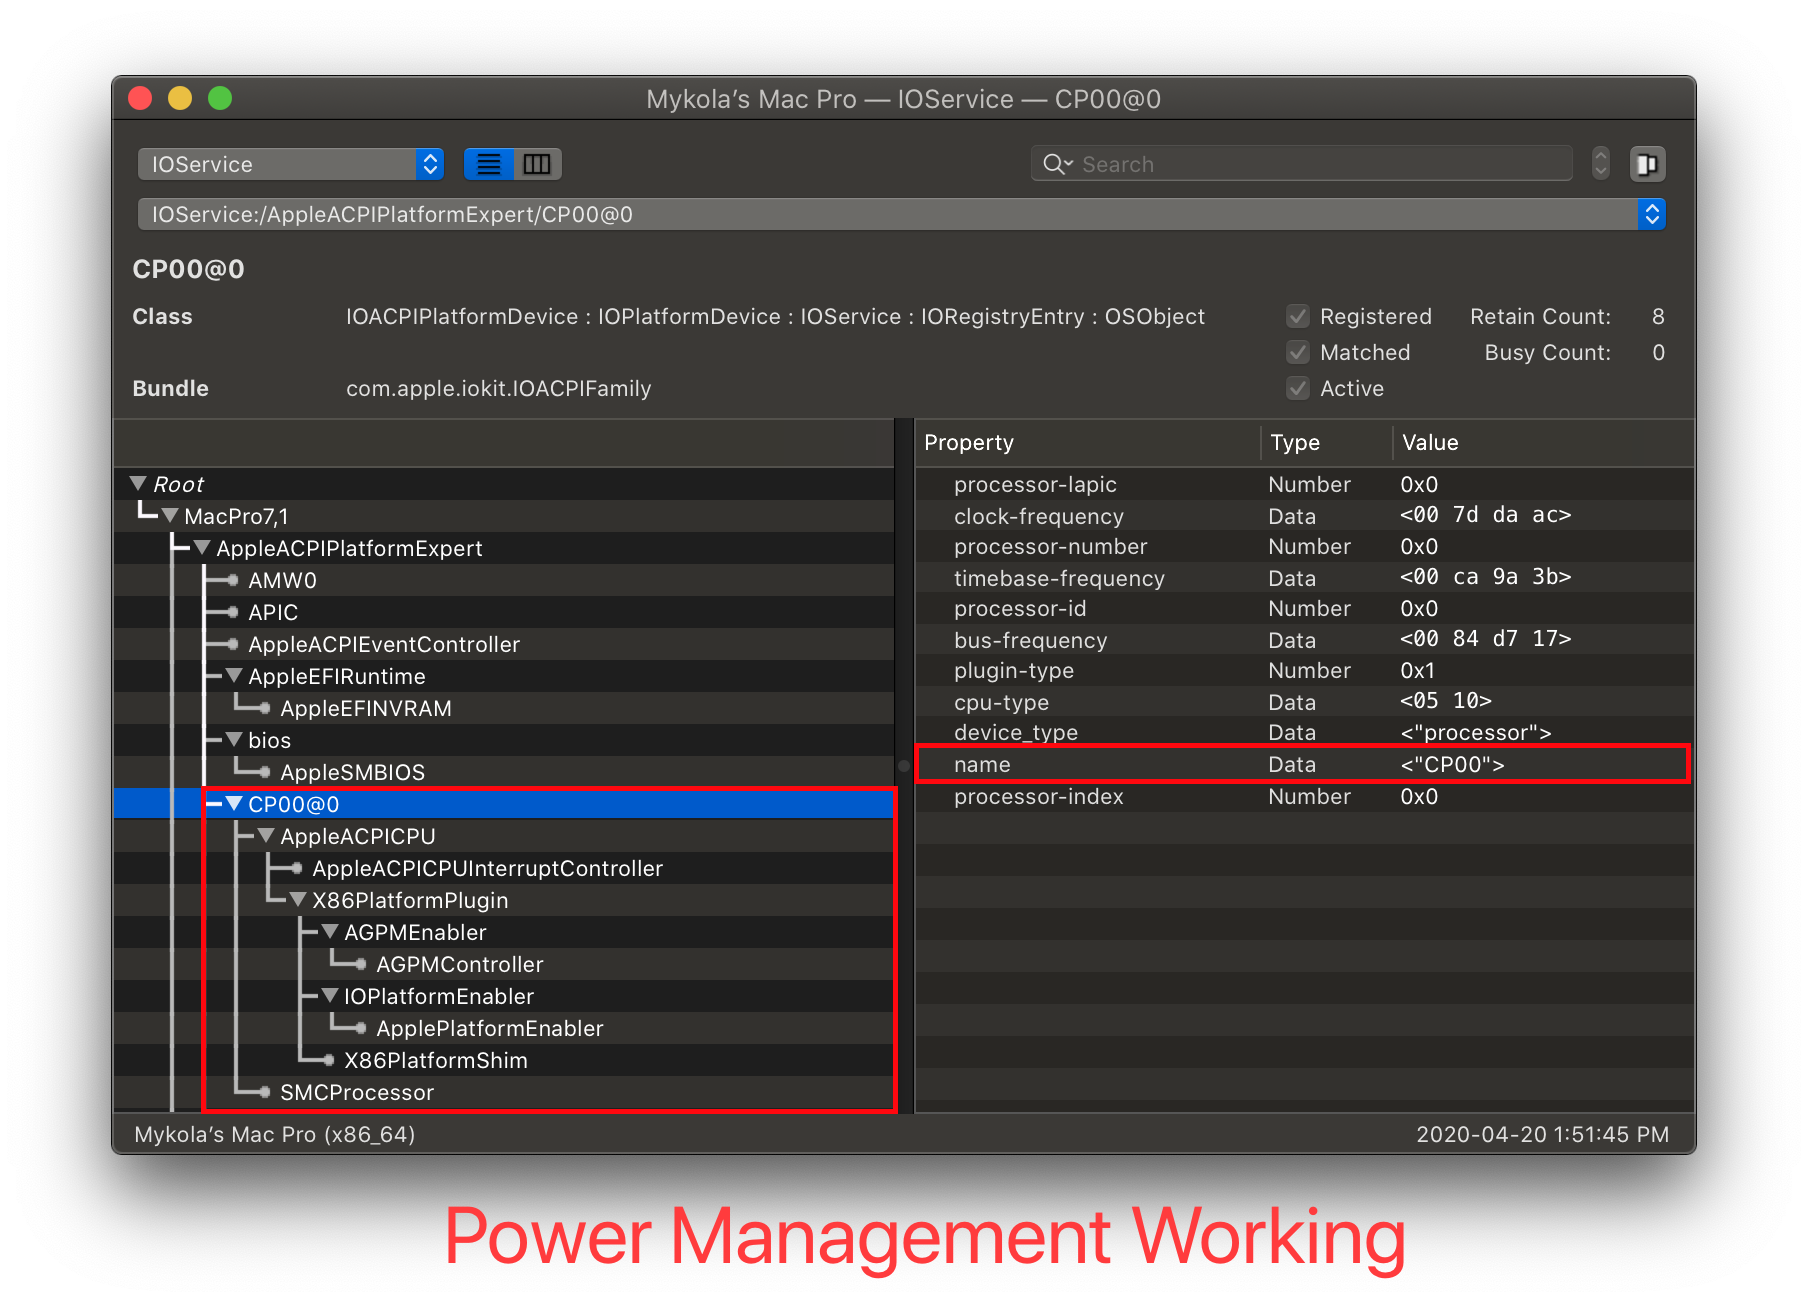 | 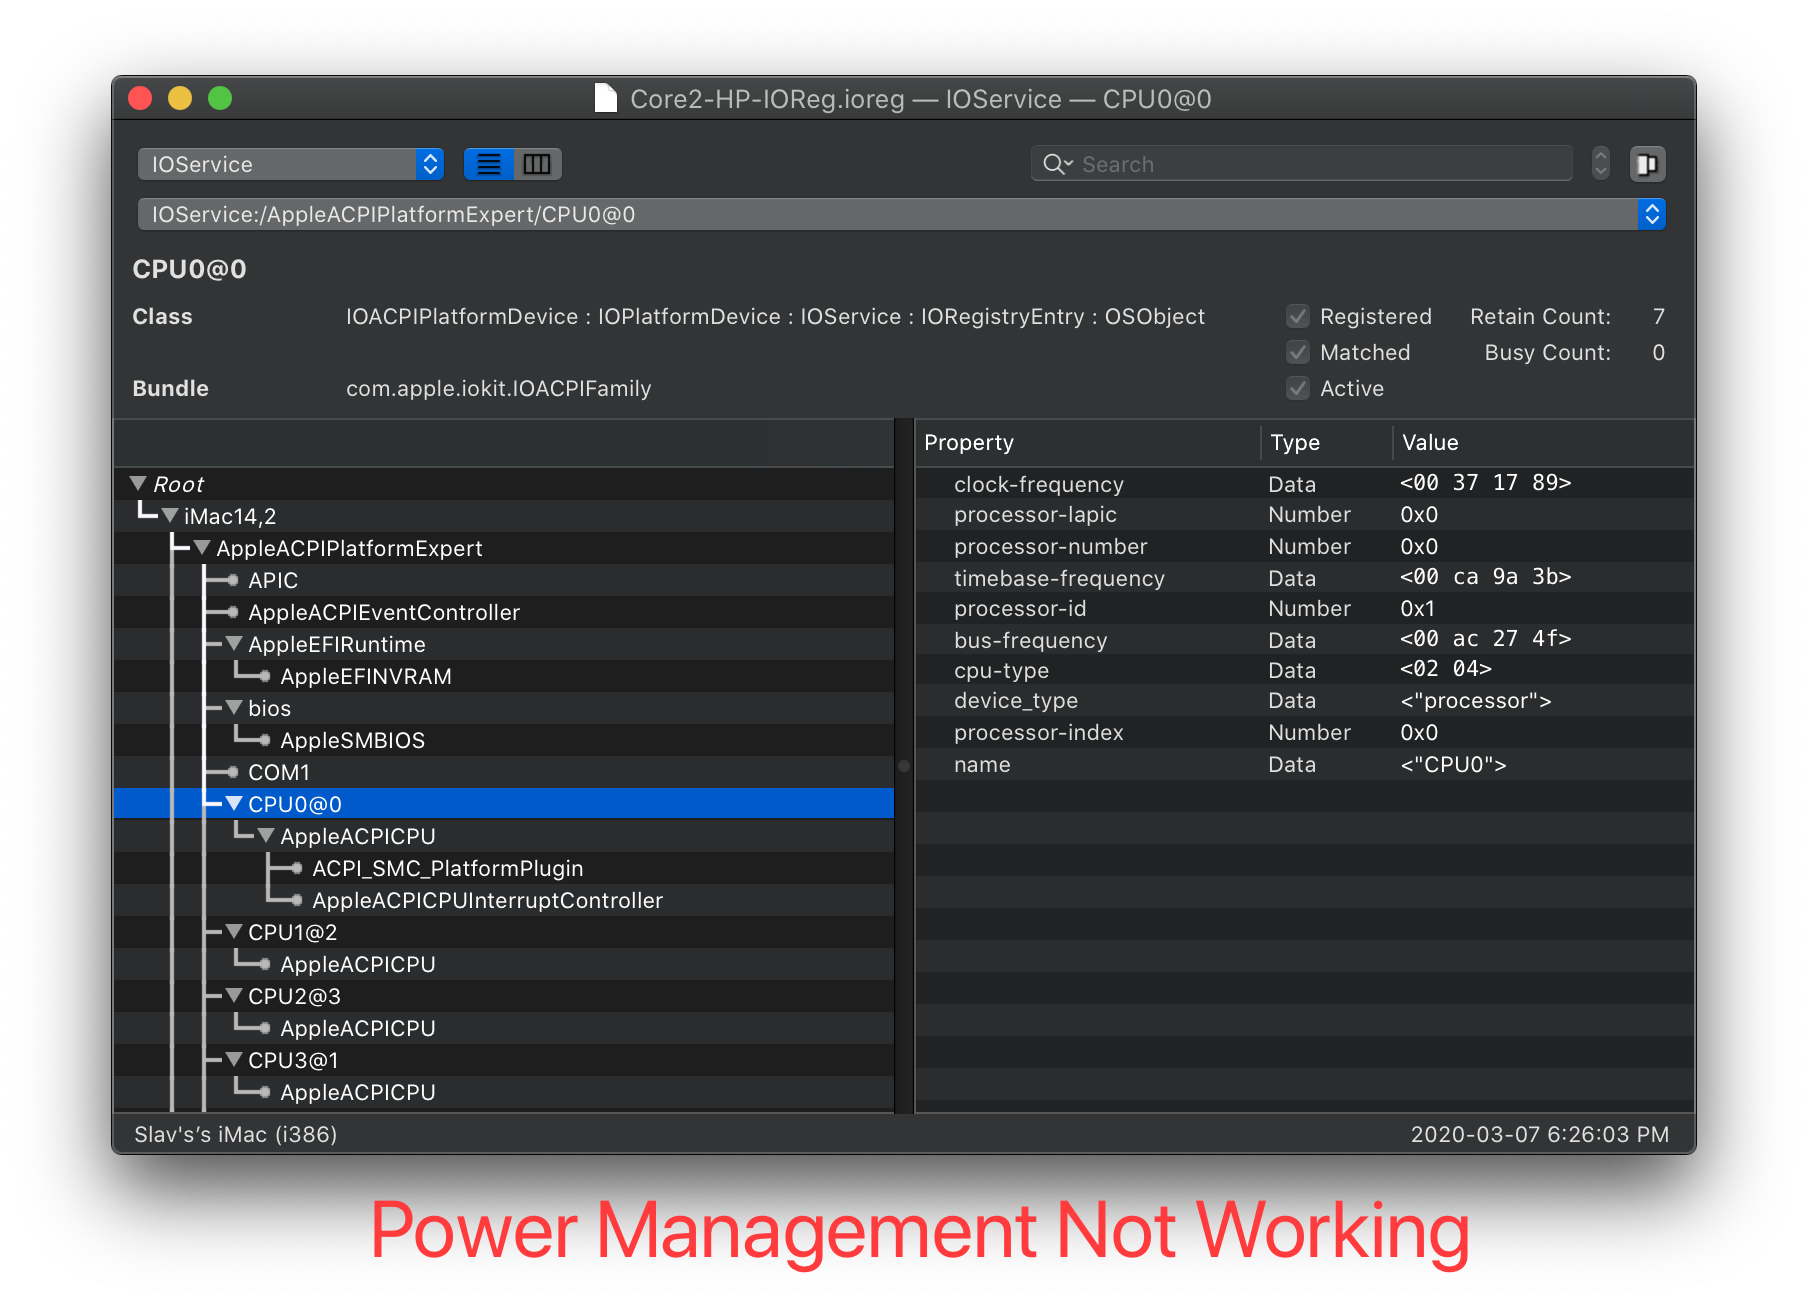 |
As you can see from the image on the left, we have X86PlatformPlugin attached. This means that Apple's CPU power management drivers are working (the name of the CPU does not matter). If you see something similar to the image on the right, then there's likely an issue. Make sure to check the following:
- SSDT-PLUG.aml is both present and enabled in your config.plist and EFI/OC/ACPI
- If you're missing this, head to Getting Started With ACPI (opens new window) on how to make this
- SSDT-PLUG is set to the first thread of your CPU. You can check by selecting the first CPU listed (
CP00for our example) and make sure you see this in the properties:
TIP
SSDT-PLUG is not required on macOS 12.3 and up.
plugin-type | Number | 0x1
X99 Note
XCPM does not natively support Haswell-E and Broadwell-E, this means we need to spoof the CPU ID into a model that does supports XCPM:
Haswell-E:
Kernel -> Emulate:- Cpuid1Data:
C3060300 00000000 00000000 00000000 - Cpuid1Mask:
FFFFFFFF 00000000 00000000 00000000
- Cpuid1Data:
Broadwell-E:
Kernel -> Emulate:- Cpuid1Data:
D4060300 00000000 00000000 00000000 - Cpuid1Mask:
FFFFFFFF 00000000 00000000 00000000
- Cpuid1Data:
# Manually Modifying Power Management Data
In most cases, the native CPU power management data shipped with macOS work out of the box. If you're experiencing issues, changing your SMBIOS to something more appropriate to your system will provide different data and may be better for your usecase. In the cases where manual tuning is required, you can use CPUFriend to inject modified power management data, but if you don't know what you're doing, you can severely break power management.
WARNING
In most cases, you do not have to do this. Change your SMBIOS instead.
TIP
This is an example on how to change some parts of power management data. For more information, you should check out CPUFriend's documentation (opens new window).
# Using CPUFriend
To start, we're gonna need a couple things:
- X86PlatformPlugin loaded
- This means Sandy Bridge and AMD CPUs are not supported
- CPUFriend (opens new window)
- CPUFriendFriend (opens new window)
# LFM: Low Frequency Mode
Now let's run CPUFriendFriend.command:
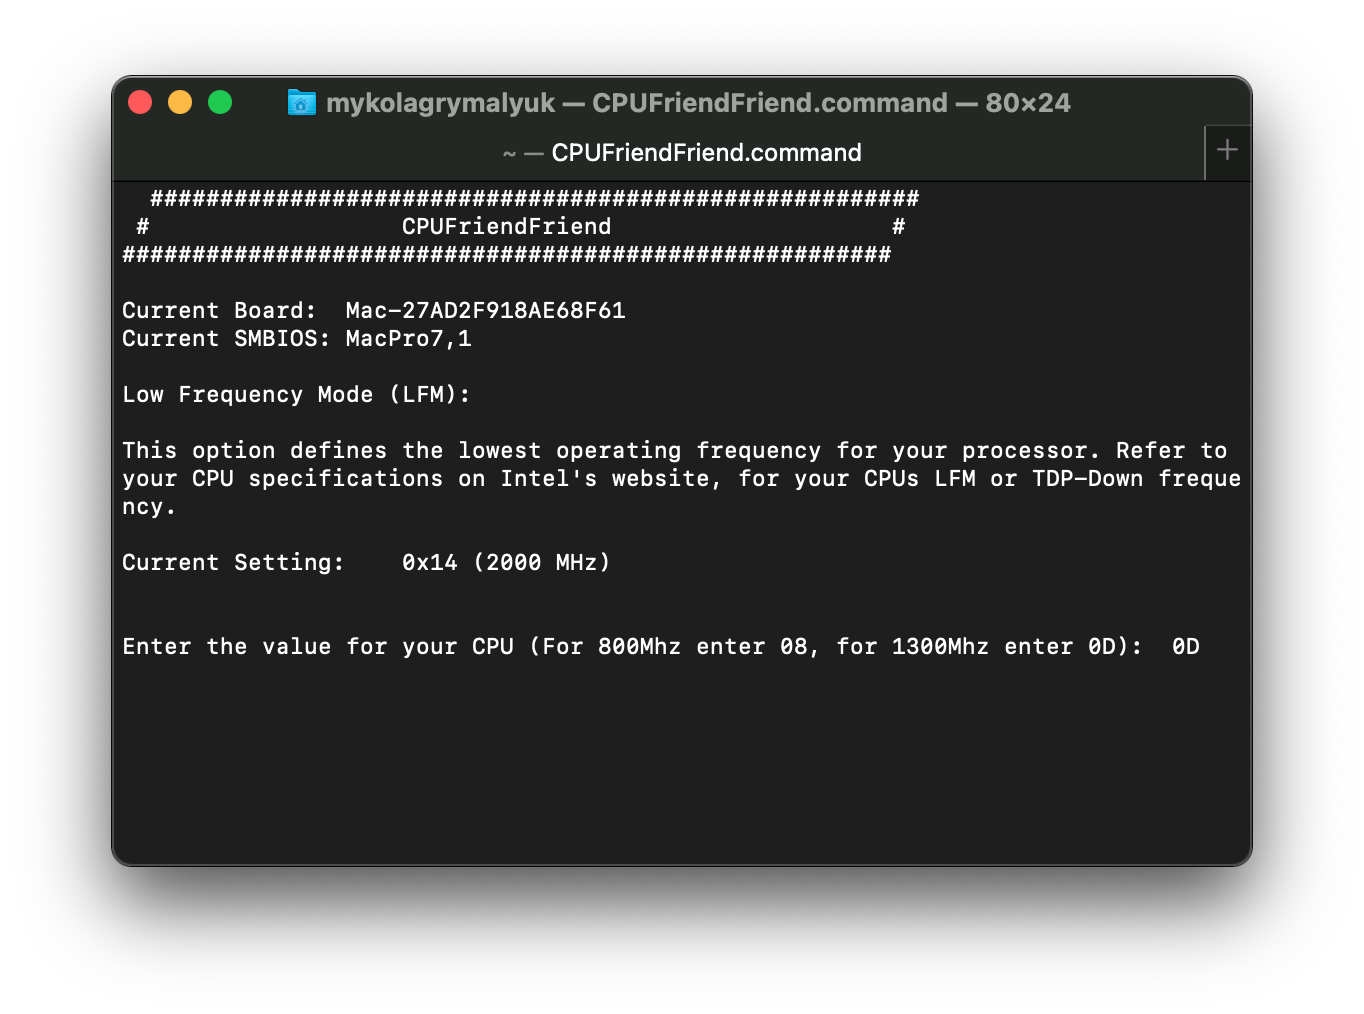
When you first open up CPUFriendFriend, you'll be greeted with a prompt for choosing your LFM value. This can be seen as the floor of your CPU, or the lowest value it'll idle at. This value can greatly help with sleep functioning correctly as macOS needs to be able to transition from S3(sleep) to S0(wake) easily.
To determine your LFM value, you can either:
- Look for the
TDP-down Frequencyon Intel's ARK site (opens new window)- Note most CPUs do not have a listed value, so you'll need to determine yourself
- Or choose recommended values:
| Generation | LFM Value | Comment |
|---|---|---|
| Broadwell+ Laptops | 08 | Equivalent of 800Mhz |
| Broadwell+ Desktops | 0A | Equivalent of 1000Mhz |
| Haswell/Broadwell HEDT/Server(ie. X99) | 0D | Equivalent of 1300Mhz |
| Skylake+ HEDT/Server(ie. X299) | 0C | Equivalent of 1200Mhz |
- Note: LFM value is only available on Broadwell and newer SMBIOS
- Note 2: these values are not set in stone, each machine will have unique characteristics and so you'll need to experiment what works best for your hardware
For this example we'll be using the i9 7920x (opens new window) which has a base clock of 2.9 GHz but no LFM, so we'll choose 1.3 GHz(ie. 1300Mhz) and work our way up/down until we find stability.
- Note that the LFM value is simply the CPU's multiplier, so you'll need to trim your value appropriately
- ie. Divide by 100, then convert to hexadecimal
echo "obase=16; 13" | bc
- Pay close attention we used 13 for 1.3Ghz and not 1.3
# EPP: Energy Performance Preference
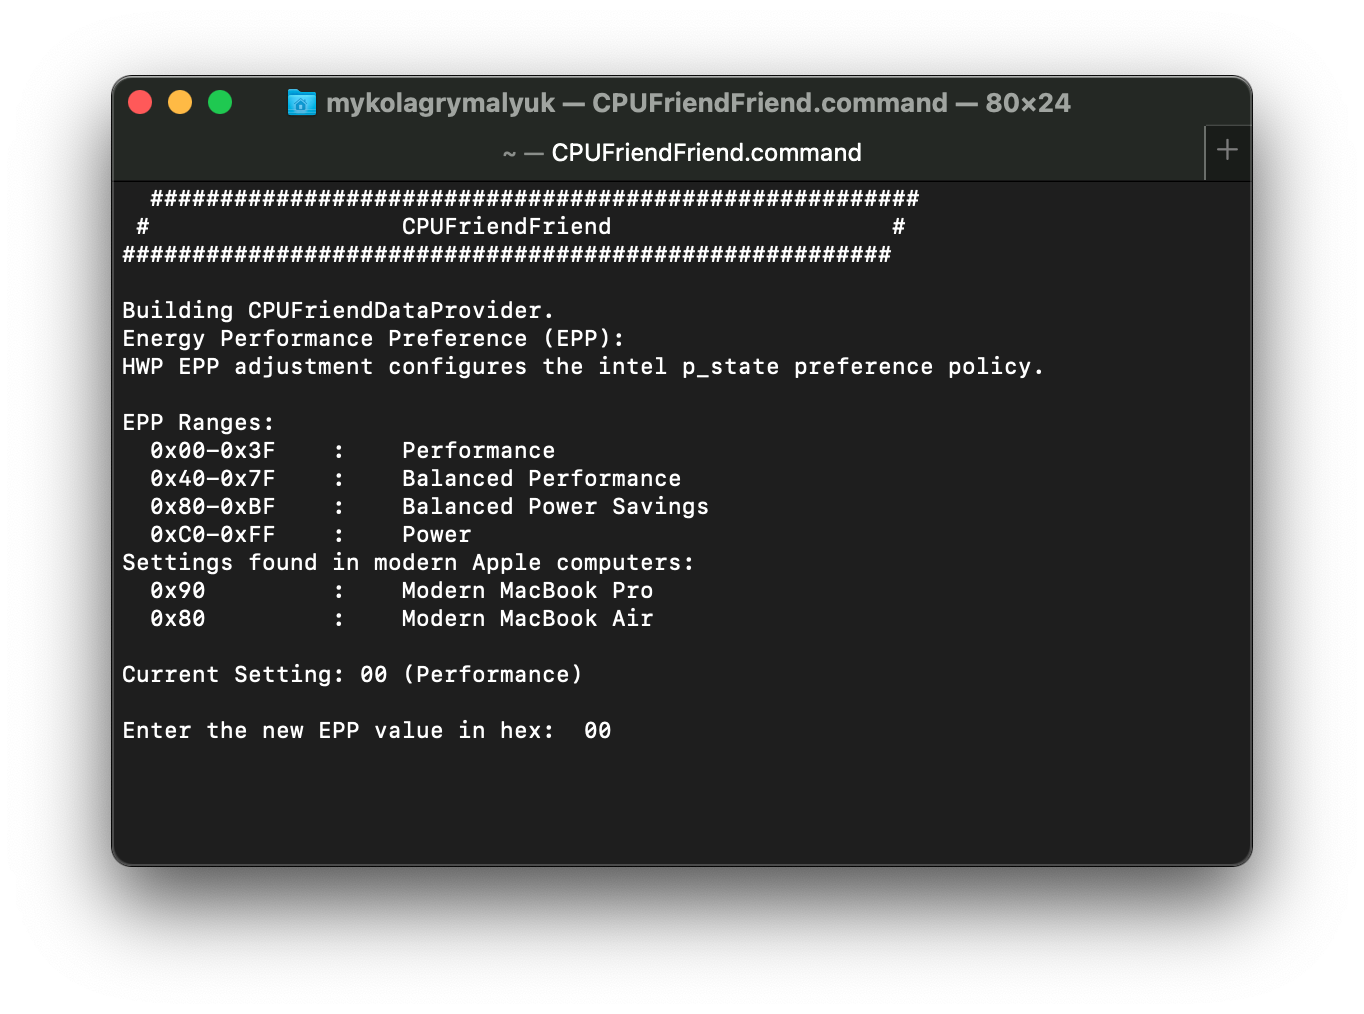
Next up is the Energy Performance Preference, EPP. This tells macOS how fast to turbo up the CPU to its full clock. 00 will tell macOS to let the CPU go as fast as it can as quickly as it can while FF will tell macOS to take things slowly and let the CPU ramp up over a much longer period of time. Depending on what you're doing and the cooling on your machine, you may want to set something in the middle. Below chart can help out a bit:
| EPP | Speed |
|---|---|
| 0x00-0x3F | Max Performance |
| 0x40-0x7F | Balance performance |
| 0x80-0xBF | Balance power |
| 0xC0-0xFF | Max Power Saving |
Note: Only Skylake and newer SMBIOS officially support EPP
# Performance Bias
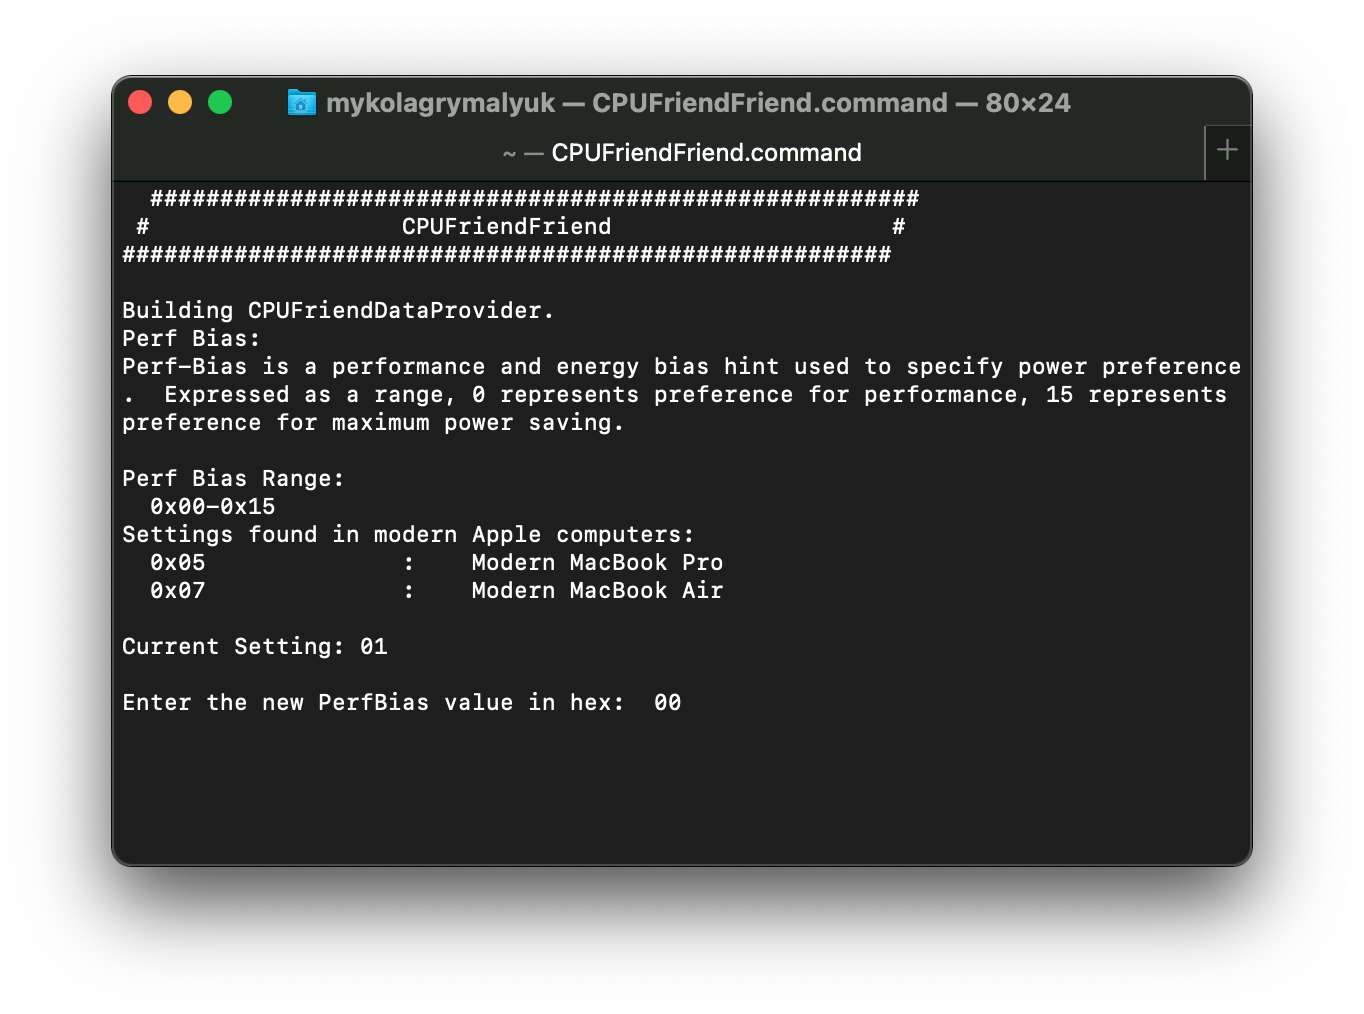
This final entry is to help macOS out what kind of overall performance you'd like from your CPU. The general recommendation depends on your exact setup, and experimenting does help figure out what's best for you.
# Cleaning up
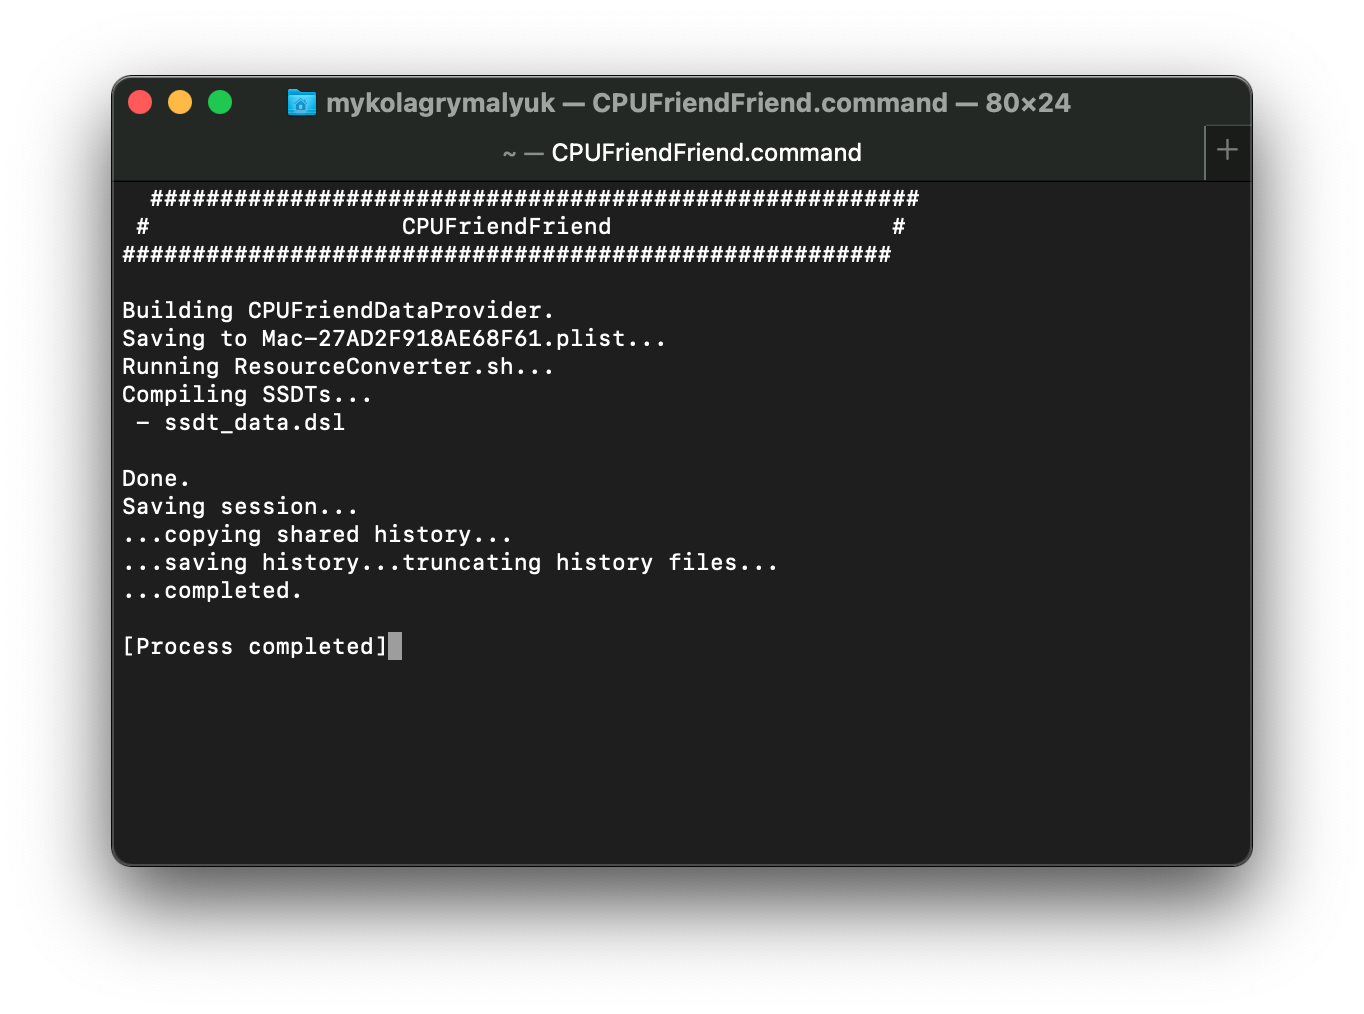
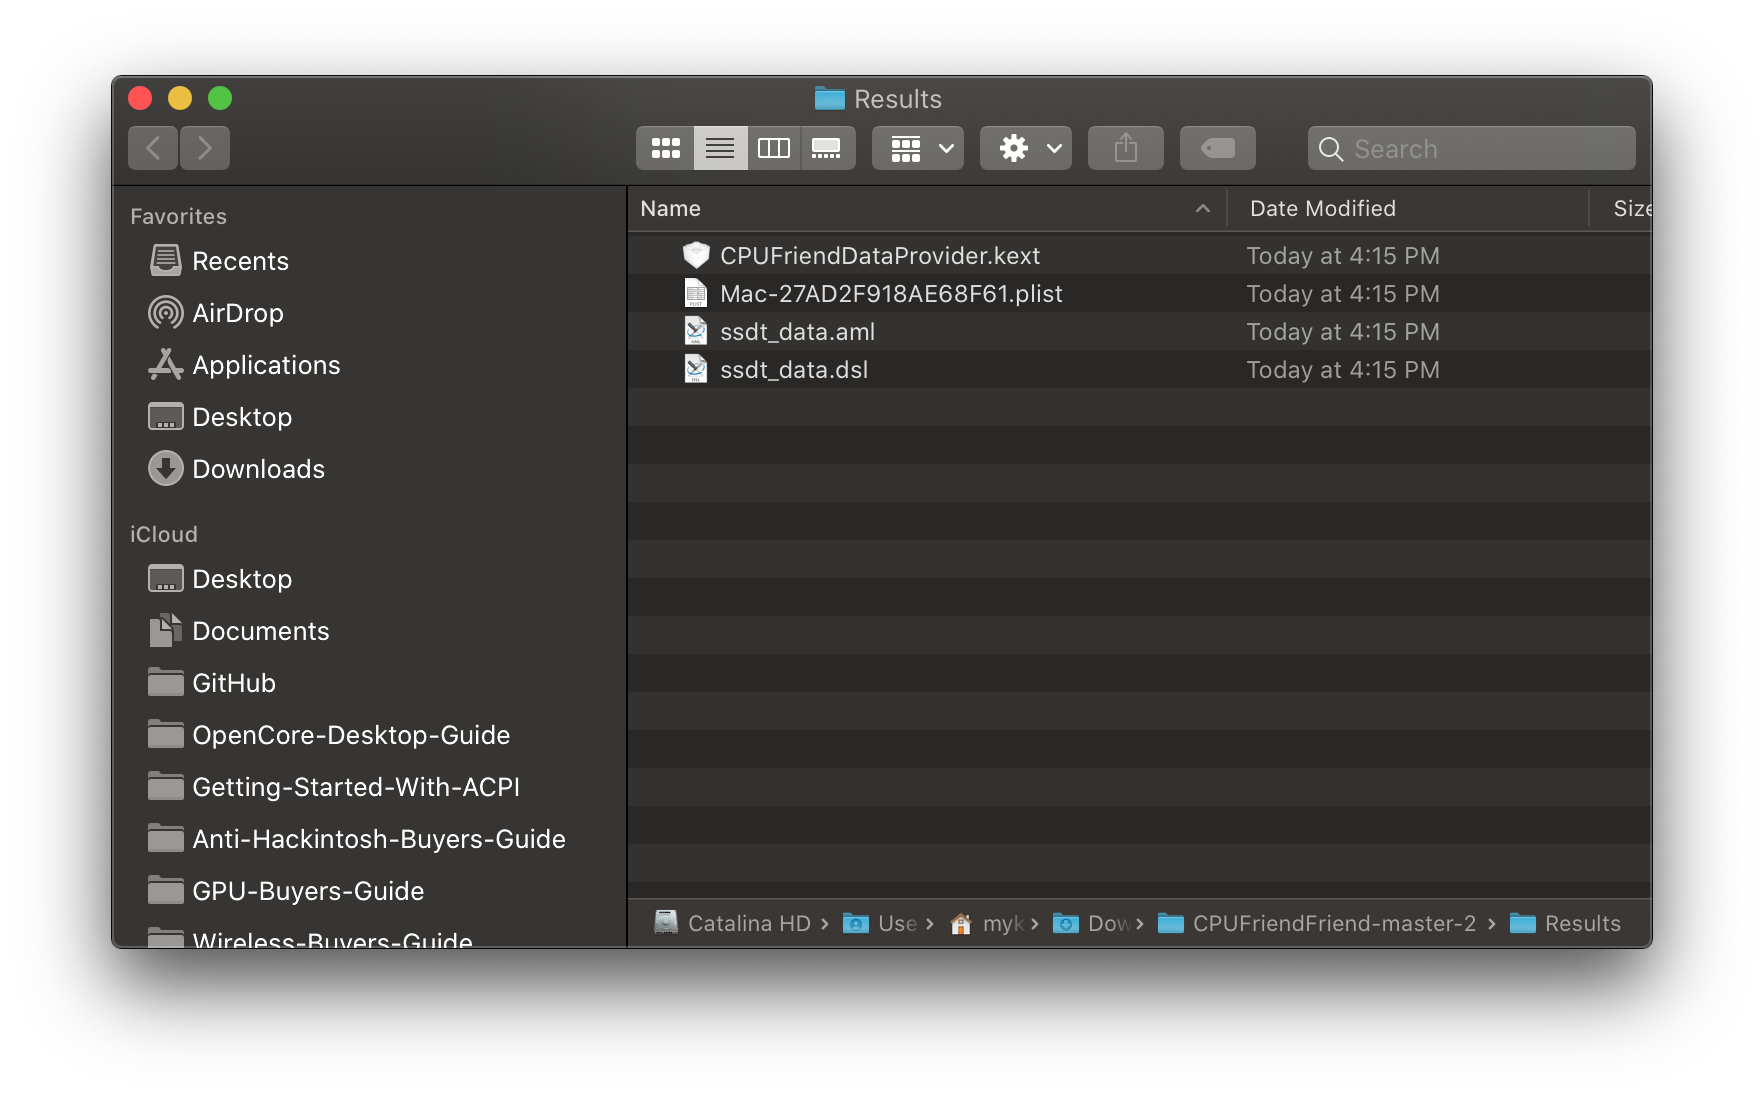
Once you're finished, you'll be provided with a CPUFriendDataProvider.kext and ssdt_data.aml. Which you choose is your preference but I recommend the kext variant to avoid any headaches with data injection into Windows and Linux.
- Note: Load order does not matter with the CPUFriendDataProvider as it's just a plist-only kext
- Note 2: Wake issues resulting from CPUFriend are likely due to incorrect power management data. Every system is unique so you'll need to play around until you get a stable config. Kernel panics will have
Sleep Wake failure in efi. Reusing power management data from old macOS versions can also cause issues, so recreate your data provider if you update macOS. You can create multiple data providers and use OpenCore's MinKernel/MaxKernel feature in order to load different power management data for each macOS version. - Note 3: If you do choose to use ssdt_data.aml, note that SSDT-PLUG is no longer needed. However the setup for this SSDT is broken on HEDT platforms like X99 and X299, so we highly recommend SSDT-PLUG with CPUFriendDataProvider.kext instead.
# Sandy and Ivy Bridge Power Management
With Sandy and Ivy Bridge, consumer PCs have issues connecting to Apple's XCPM. So to get around this we need to create our own Power Management Table.
What we'll need:
- Ensure CpuPm and Cpu0Ist tables are NOT dropped
- ssdtPRGen (opens new window)
Initially with the setup in the Ivy Bridge section, we recommended users drop their CpuPm and Cpu0Ist to avoid any issues with AppleIntelCPUPowerManagement.kext. But dropping these tables has the adverse affect of breaking turbo boost in Windows. So to resolve this, we'll want to keep our OEM's table but we'll want to add a new table to supplement data only for macOS. So once we're done creating our CPU-PM table, we'll re-add our OEM's CPU SSDTs.
To start, grab your config.plist then head to ACPI -> Delete and ensure both of these sections have Enabled set to YES:
| Key | Type | Value |
|---|---|---|
| All | Boolean | YES |
| Comment | String | Drop CpuPm |
| Enabled | Boolean | YES |
| OemTableId | Data | 437075506d000000 |
| TableLength | Number | 0 |
| TableSignature | Data | 53534454 |
| Key | Type | Value |
| :--- | :--- | :--- |
| All | Boolean | YES |
| Comment | String | Drop Cpu0Ist |
| Enabled | Boolean | YES |
| OemTableId | Data | 4370753049737400 |
| TableLength | Number | 0 |
| TableSignature | Data | 53534454 |
Once this is done, reboot, then grab ssdtPRGen and run it:
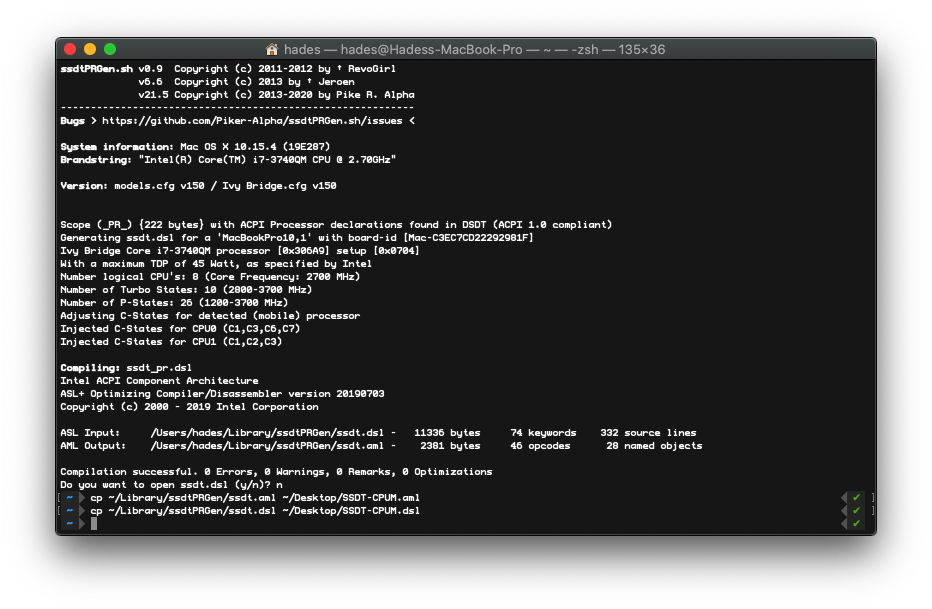
Once you're done, you'll be provided with an SSDT.aml under /Users/your-name>/Library/ssdtPRGen/ssdt.dsl, you can easily find it with the Cmd+Shift+G shortcut and pasting ~/Library/ssdtPRGen/
Remember to now add this to both EFI/OC/ACPI and your config.plist, I recommend renaming it to SSDT-PM to find it more easily.
Finally, we can disable our previous ACPI -> Delete entries (Enabled set to NO):
| Key | Type | Value |
|---|---|---|
| All | Boolean | YES |
| Comment | String | Drop CpuPm |
| Enabled | Boolean | NO |
| OemTableId | Data | 437075506d000000 |
| TableLength | Number | 0 |
| TableSignature | Data | 53534454 |
| Key | Type | Value |
| :--- | :--- | :--- |
| All | Boolean | YES |
| Comment | String | Drop Cpu0Ist |
| Enabled | Boolean | NO |
| OemTableId | Data | 4370753049737400 |
| TableLength | Number | 0 |
| TableSignature | Data | 53534454 |
# ssdtPRgen Troubleshooting
While ssdtPRgen tries to handle any incompatibility issues with your OEM's SSDT, you may find it still clashes on boot as your OEM has already declared certain devices or methods in sections like _INI or _DSM.
If you find during boot up you get errors such as this one from SSDT-PM:
ACPI Error: Method parse/execution failed [\_SB._INI] , AE_ALREADY_EXIST
This means there's some conflict, to resolve this, we recommend moving ssdtPRgen's info into a format like this:
DefinitionBlock ("ssdt.aml", "SSDT", 1, "APPLE ", "CpuPm", 0x00021500)
{
    External (\_PR_.CPU0, DeviceObj) // External Processor definition
    External (\_PR_.CPU1, DeviceObj) // External Processor definition

    Scope (\_PR_.CPU0) // Processor's scope
    {
        Name (APLF, Zero)
        Name (APSN, 0x04)
        Name (APSS, Package (0x20)
        {
            /*  … */
        })

        Method (ACST, 0, NotSerialized)
        {
            /*  … */
        }

        /*  … */
    }
Pay close attention to what we've done:
- Made sure the Processor object is moved to external
- Move all your methods into the Processor's scope
For editing and re-compiling the SSDT-PM, see here: Getting Started With ACPI (opens new window)
# BIOS Troubleshooting
For some boards, you may need to ensure the following BIOS options are set for CPU Power Management:
- C States:
True - P States Coordination:
SW_ALL
# AMD CPU Power Management
While macOS might not officially support AMD CPU power management, there are community efforts to add it, specifically being AMDRyzenCPUPowerManagement (opens new window).
Warning: This kext is known to be unstable, if you're receiving random kernel panics or issues booting do keep in mind this kext may be the culprit.