
# USB Mapping
So with the prerequisites out of the way, we can finally get to the meat of this guide. And now we get to finally read one of my favorite books before I go to bed each night: The Advanced Configuration and Power Interface (ACPI) Specification! (opens new window)
Now if you haven't read through this before(which I highly recommend you do, it's a thrilling tale), I'll point you to the meat of the USB situation:
- Section 9.14: _UPC (USB Port Capabilities)
Here we're greeted with all the possible USB ports in ACPI:
| Type | Info | Comments |
|---|---|---|
| 0 | USB 2.0 Type-A connector | This is what macOS will default all ports to when no map is present |
| 3 | USB 3.0 Type-A connector | 3.0, 3.1 and 3.2 ports share the same Type |
| 8 | Type C connector - USB 2.0-only | Mainly seen in phones |
| 9 | Type C connector - USB 2.0 and USB 3.0 with Switch | Flipping the device does not change the ACPI port |
| 10 | Type C connector - USB 2.0 and USB 3.0 without Switch | Flipping the device does change the ACPI port. generally seen on 3.1/2 motherboard headers |
| 255 | Proprietary connector | For Internal USB ports like Bluetooth |
# USB Mapping: The manual way
This section is for those who want to get down into the meats of their hackintosh, to really understand what it's doing and help if there's any issues with USBmap.py and other mapping tools. To start, we'll need a few things:
- Installed version of macOS
- This is due to how macOS enumerates ports, trying to map from other OSes makes this difficult
- Note: This guide will be focusing on OS X 10.11, El Capitan and newer. Older OSes shouldn't require any USB mapping
- Non-conflicting USB names
- See previous section: Checking what renames you need
- A USB 2.0 and USB 3.0 device to test with
- You must have 2 separate devices as to ensure no mix ups with personalities
- IORegistryExplorer.app (opens new window)
- To view the inner workings of macOS more easily
- If you plan to use Discord for troubleshooting, v2.1.0 (opens new window) is a bit easier on file size.
- USBInjectAll (opens new window)
- This is only required for older USB controllers like Broadwell and older, however some Coffee Lake systems may still require it
- Reminder this kext does not work on AMD
- Sample-USB-Map.kext (opens new window)
- ProperTree (opens new window)
- Or any other plist editor
Now with all this out of the way, lets get to USB mapping!
# Finding your USB ports
Lets open our previously downloaded IORegistryExplorer.app (opens new window) and search for our USB controller(s).
The 2 main search terms are XHC and EHC, but if you have a legacy board with UHCI or OHCI controllers you'll need to adjust. A blanket USB search may show too many entries and confuse you.
For this example, lets try and map an Asus X299-E Strix board:
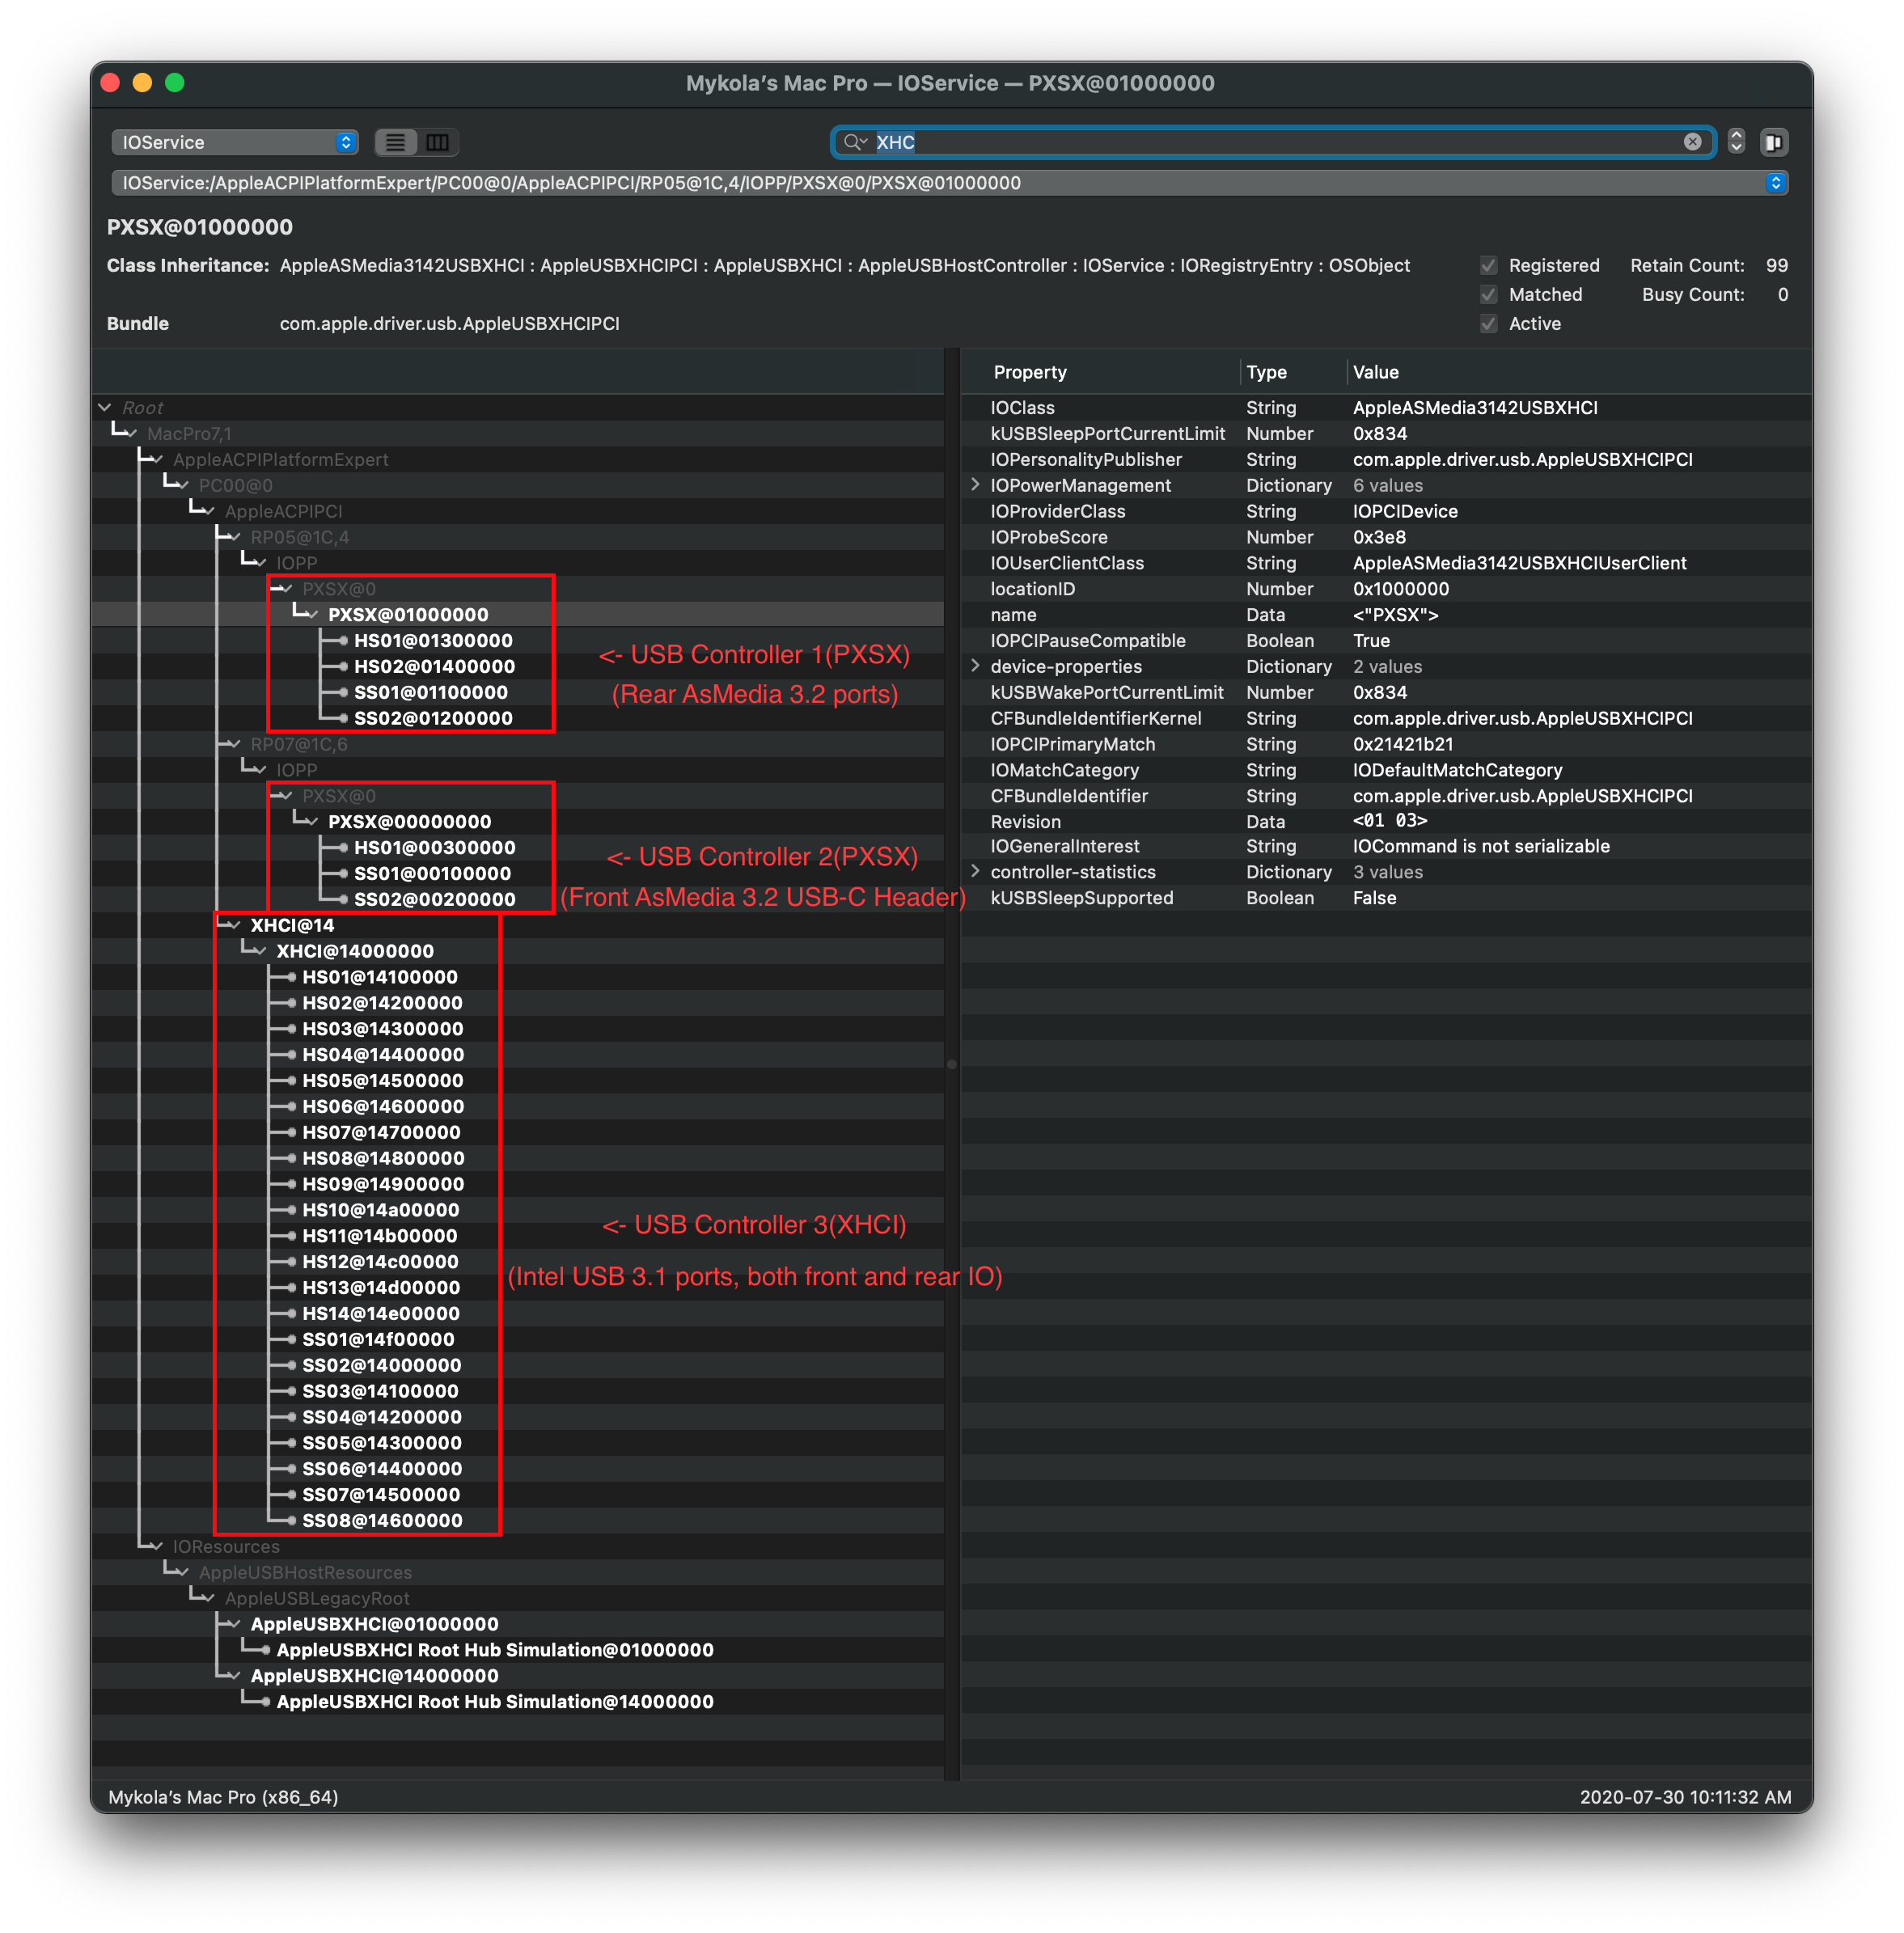
From the above image we can see 3 USB controllers:
- PXSX(1, Top)
- PXSX(2, Middle)
- XHCI(3, Bottom)
Pay attention that they're individual controllers, as this means each USB controller has it's own port limit. So you're not as starved for USB ports as you may think.
Now I personally know which USB controllers match up with which physical ports, problem is it's not always as obvious which ports match with which controllers. So lets try to figure out which is what.
Note: The AppleUSBLegacyRoot entry is an entry that lists all active USB controllers and ports, these are not USB controllers themselves so you can outright ignore them.
Note 2: Keep in mind every motherboard model will have a unique set of port combos, controller types and names. So while our example uses PXSX, yours might have the XHC0 or PTCP name. And quite common on older motherboards is that you may only have 1 controller, this is alright so don't stress about having the exact same setup as the example.
Common names you can check:
- USB 3.x controllers:
- XHC
- XHC0
- XHC1
- XHC2
- XHCI
- XHCX
- AS43
- PTXH
- Commonly associated with AMD Chipset controllers
- PTCP
- Found on AsRock X399
- PXSX
- This is a generic PCIe device, double check it's a USB device as NVMe controllers and other devices can use the same name.
- USB 2.x controllers:
- EHCI
- EHC1
- EHC2
- EUSB
- USBE
# Finding which ports match with which controller
To start, I'm going to plug a USB device into my front USB 3.1(Type-A) and 3.2(Type-C):
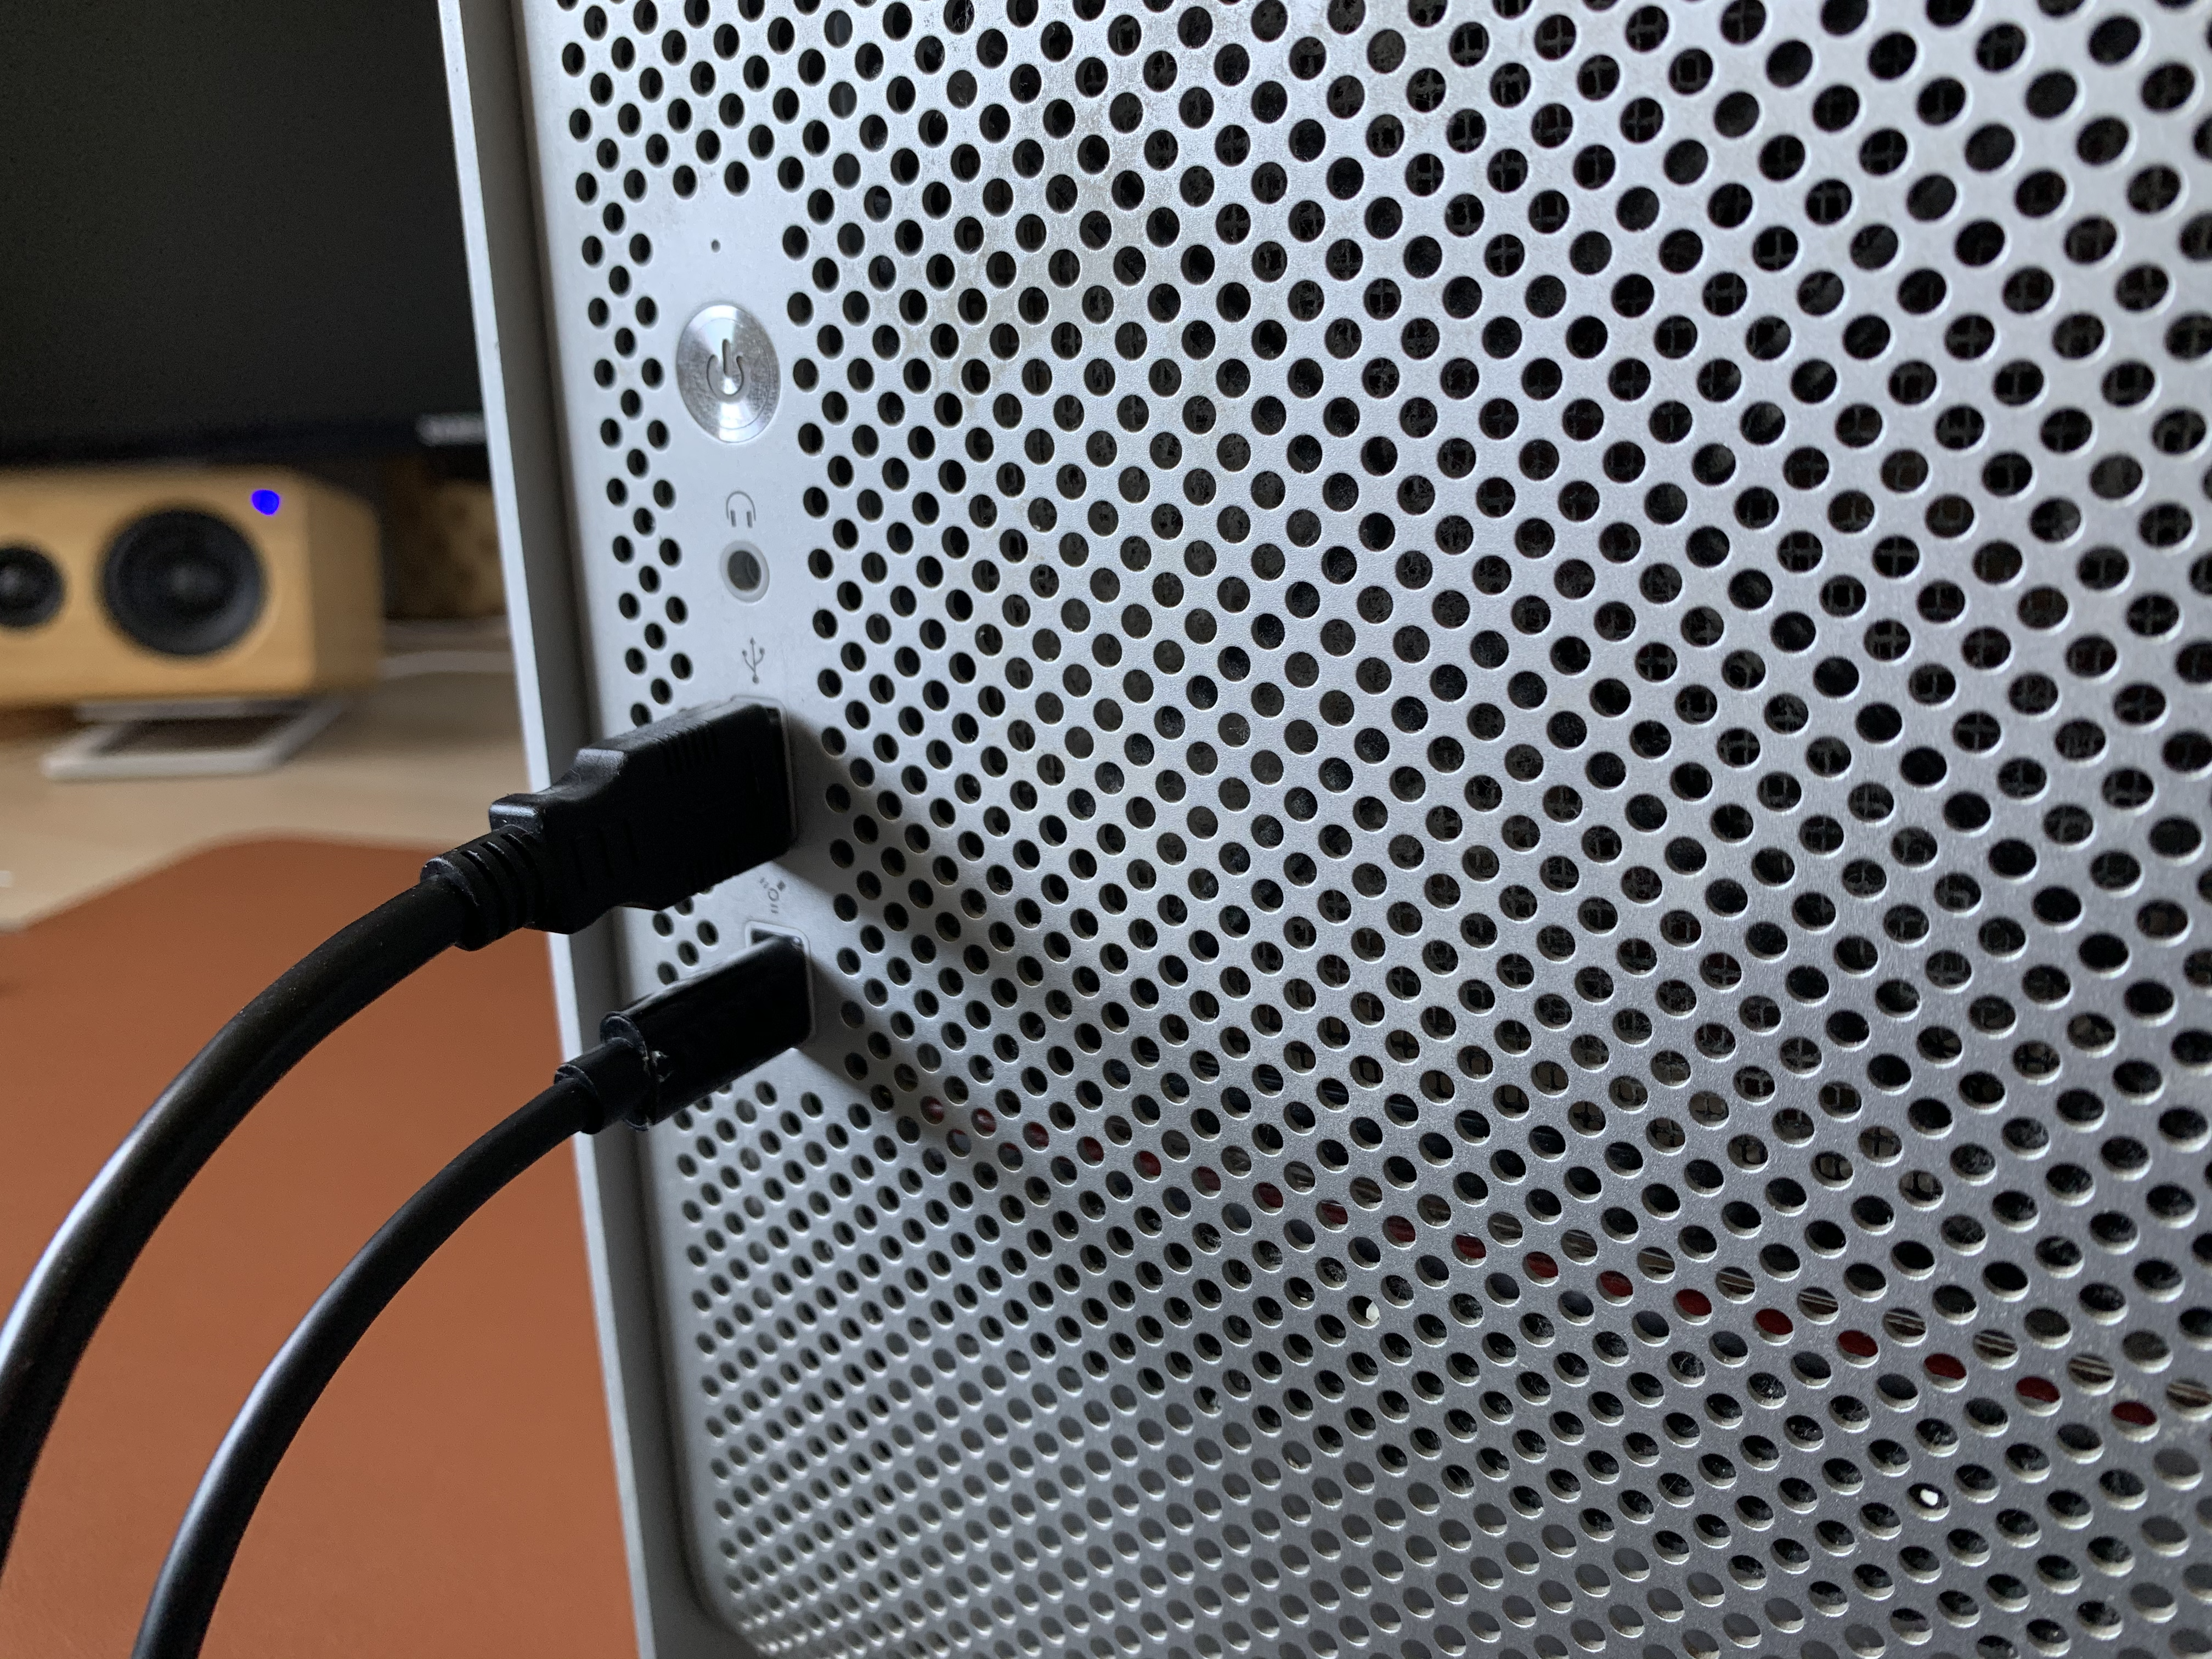
Next lets look at IOReg, and we can see where our USB devices fell:
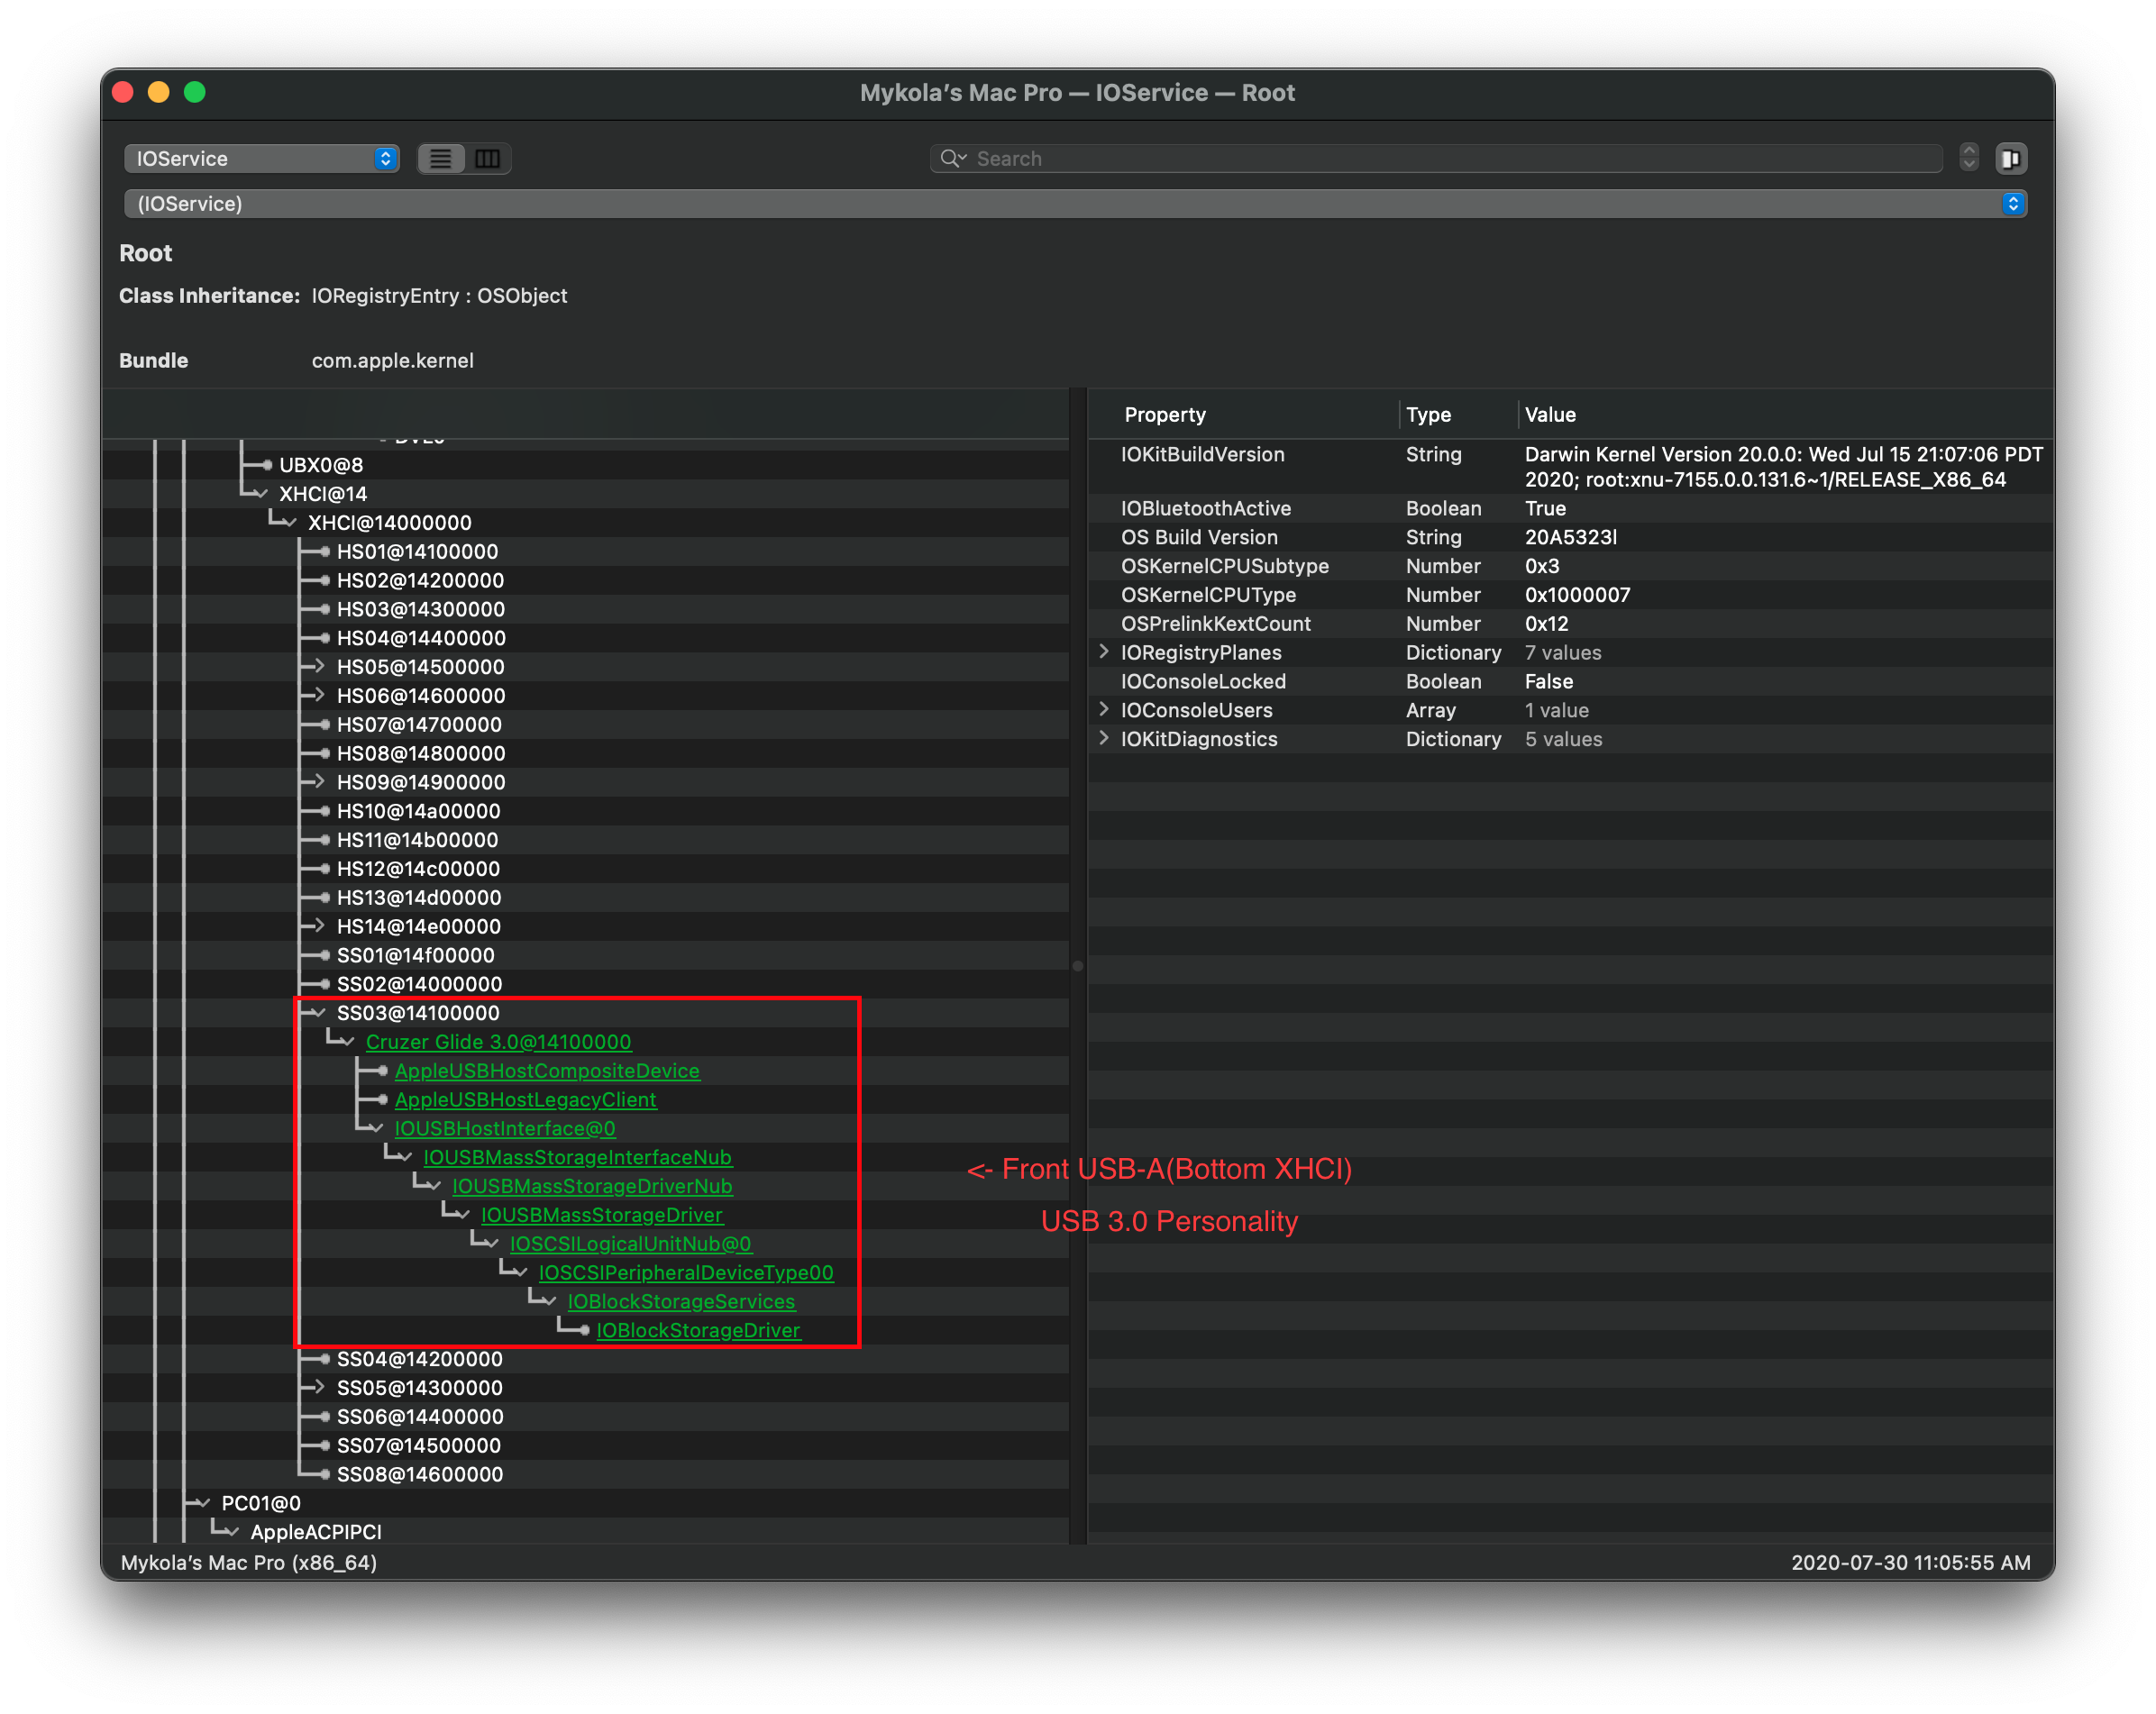
| USB-C | USB-A |
|---|---|
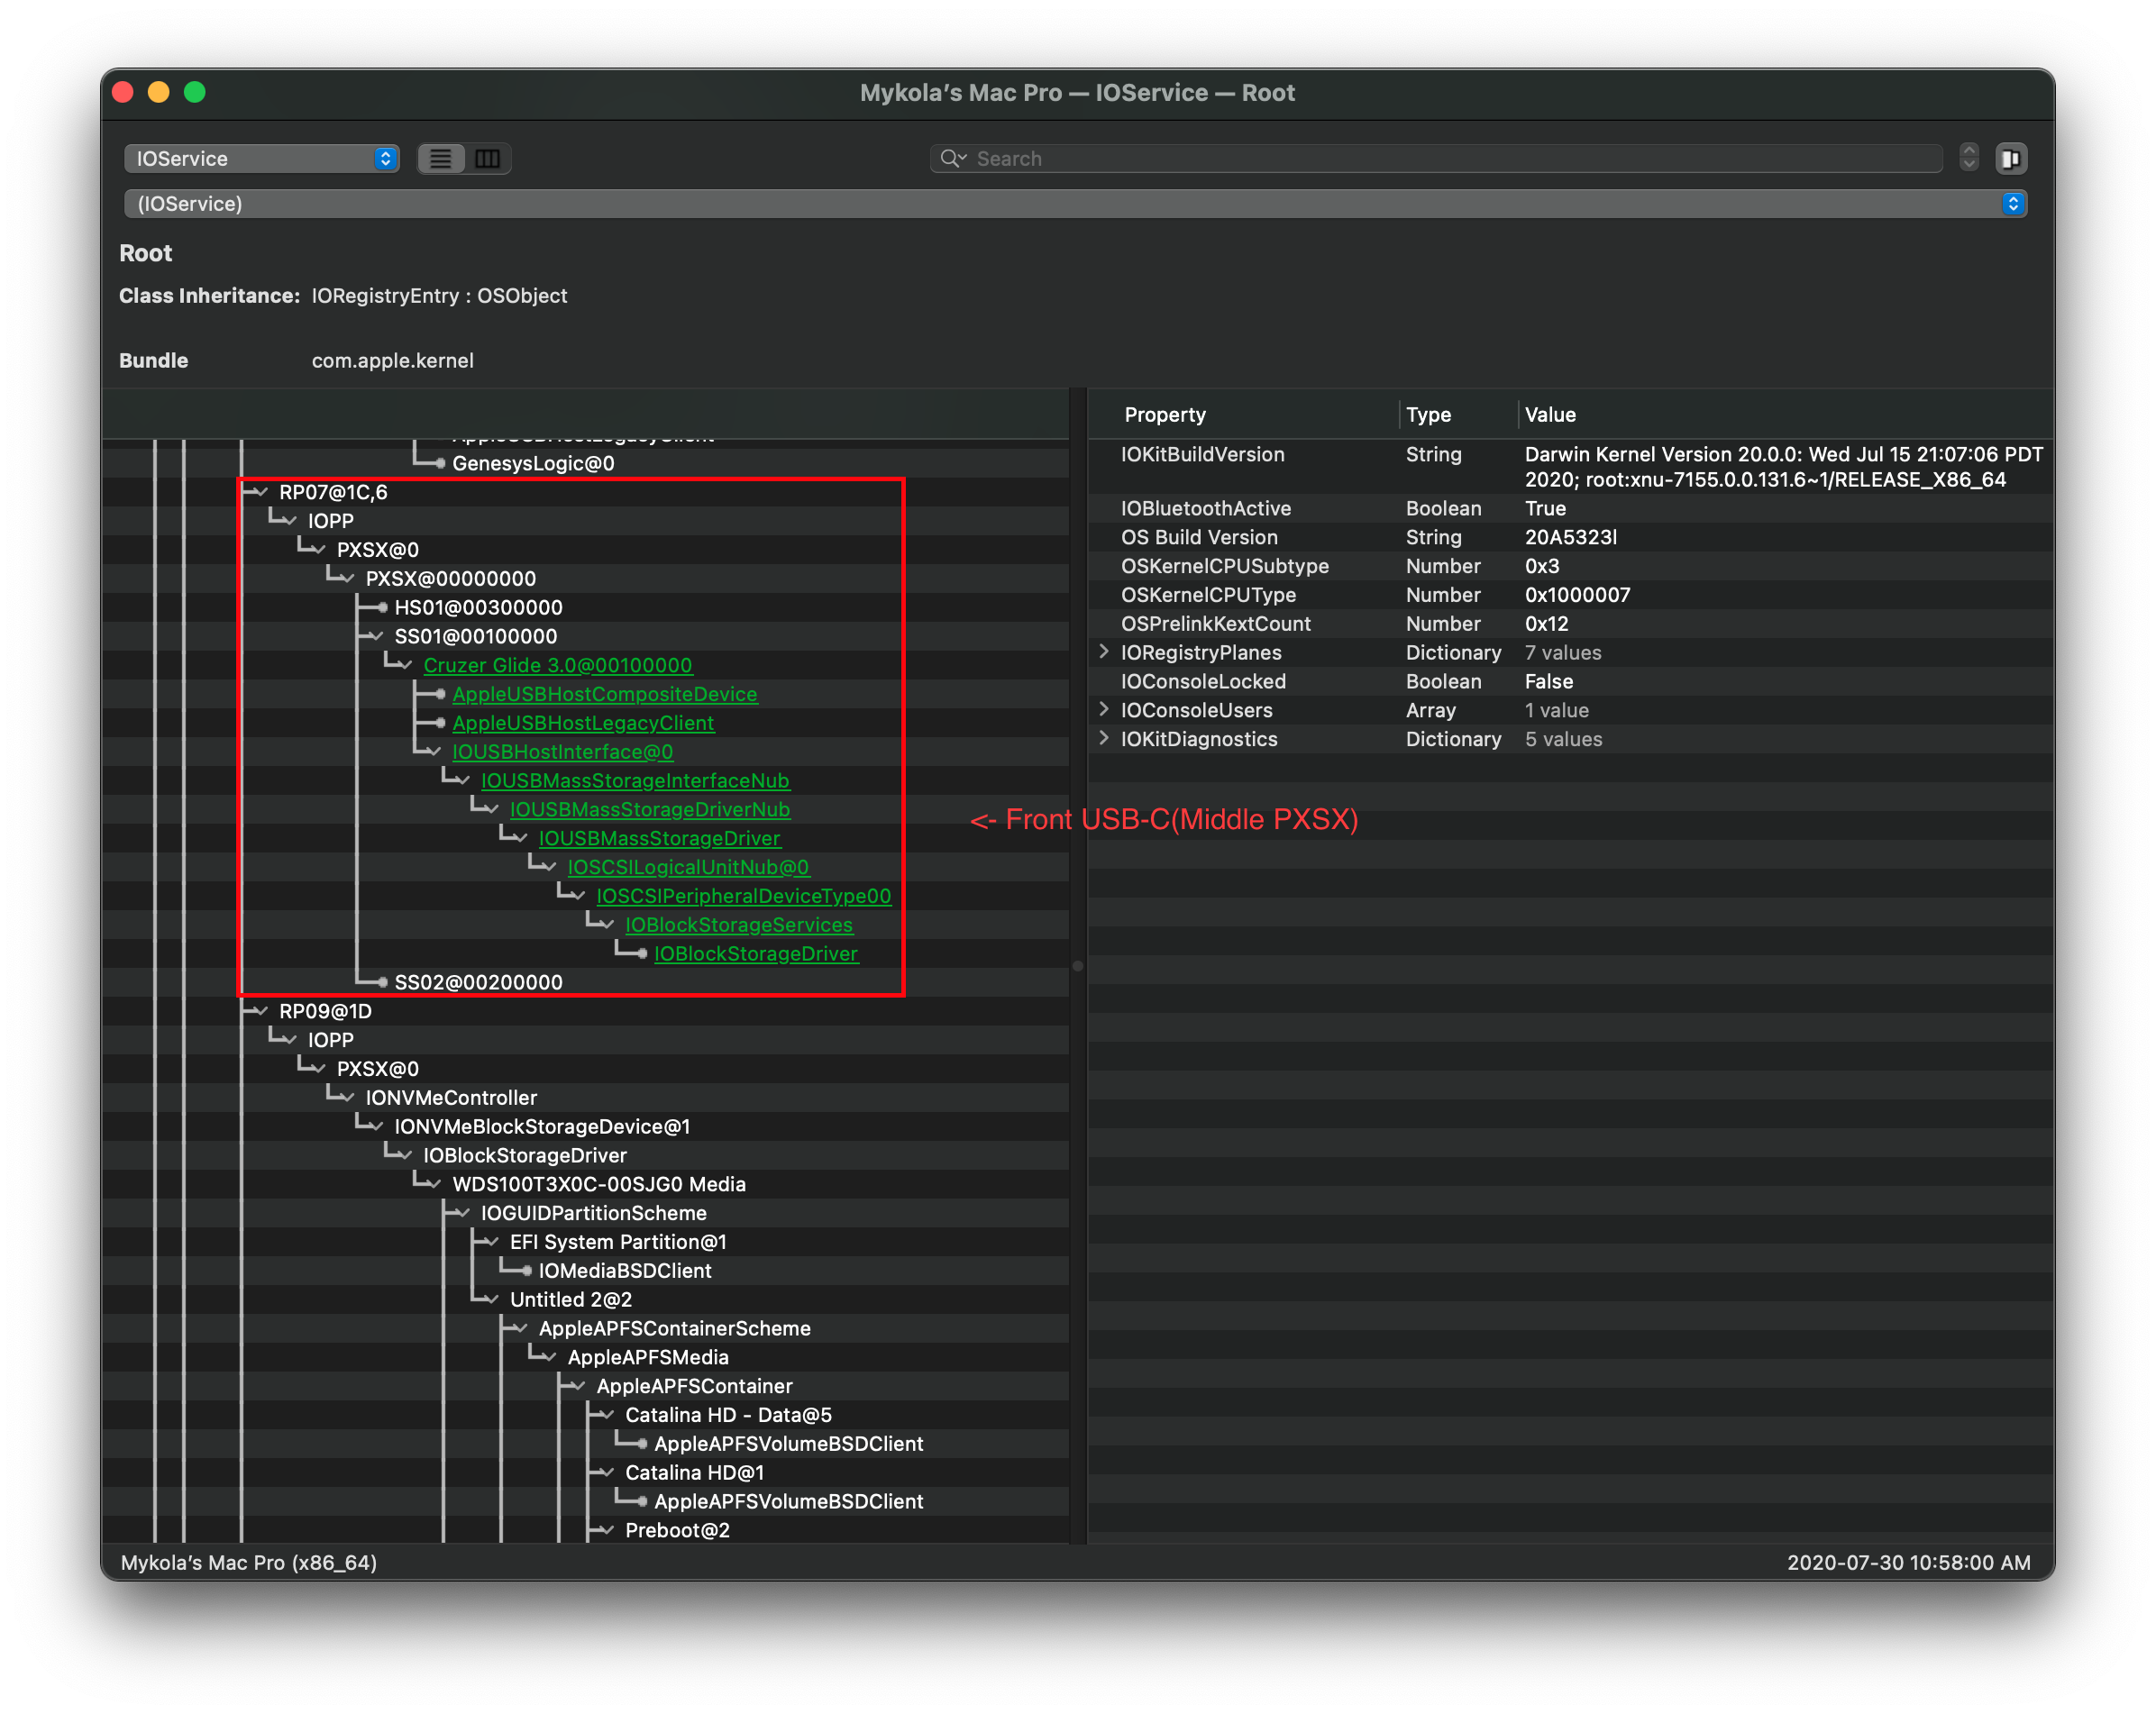 |  |
Here we see a few things:
- Front 3.2 Type-C is on the PXSX(2, middle) Controller
- Front 3.1 Type-A is on the XHCI(3, Bottom) Controller
Now that we have an idea of which ports go to which controller, can can now look into how we USB map.
# USB-A mapping
As mentioned before, USB 3.x ports are split into 2 personalities: USB 2.0 and USB 3.0. This is to ensure backwards compatibility but macOS itself has difficulties determining which personalities match up to which ports. That's where we come in to help.
So lets take our USB-A port, when we plug in a USB 3.0 device into it we see XHCI -> SS03 light up. This is the USB 3.0 personality of the port. Now we'll want to plug a USB 2.0 device into that port:
| 3.0 Personality | 2.0 Personality |
|---|---|
 | 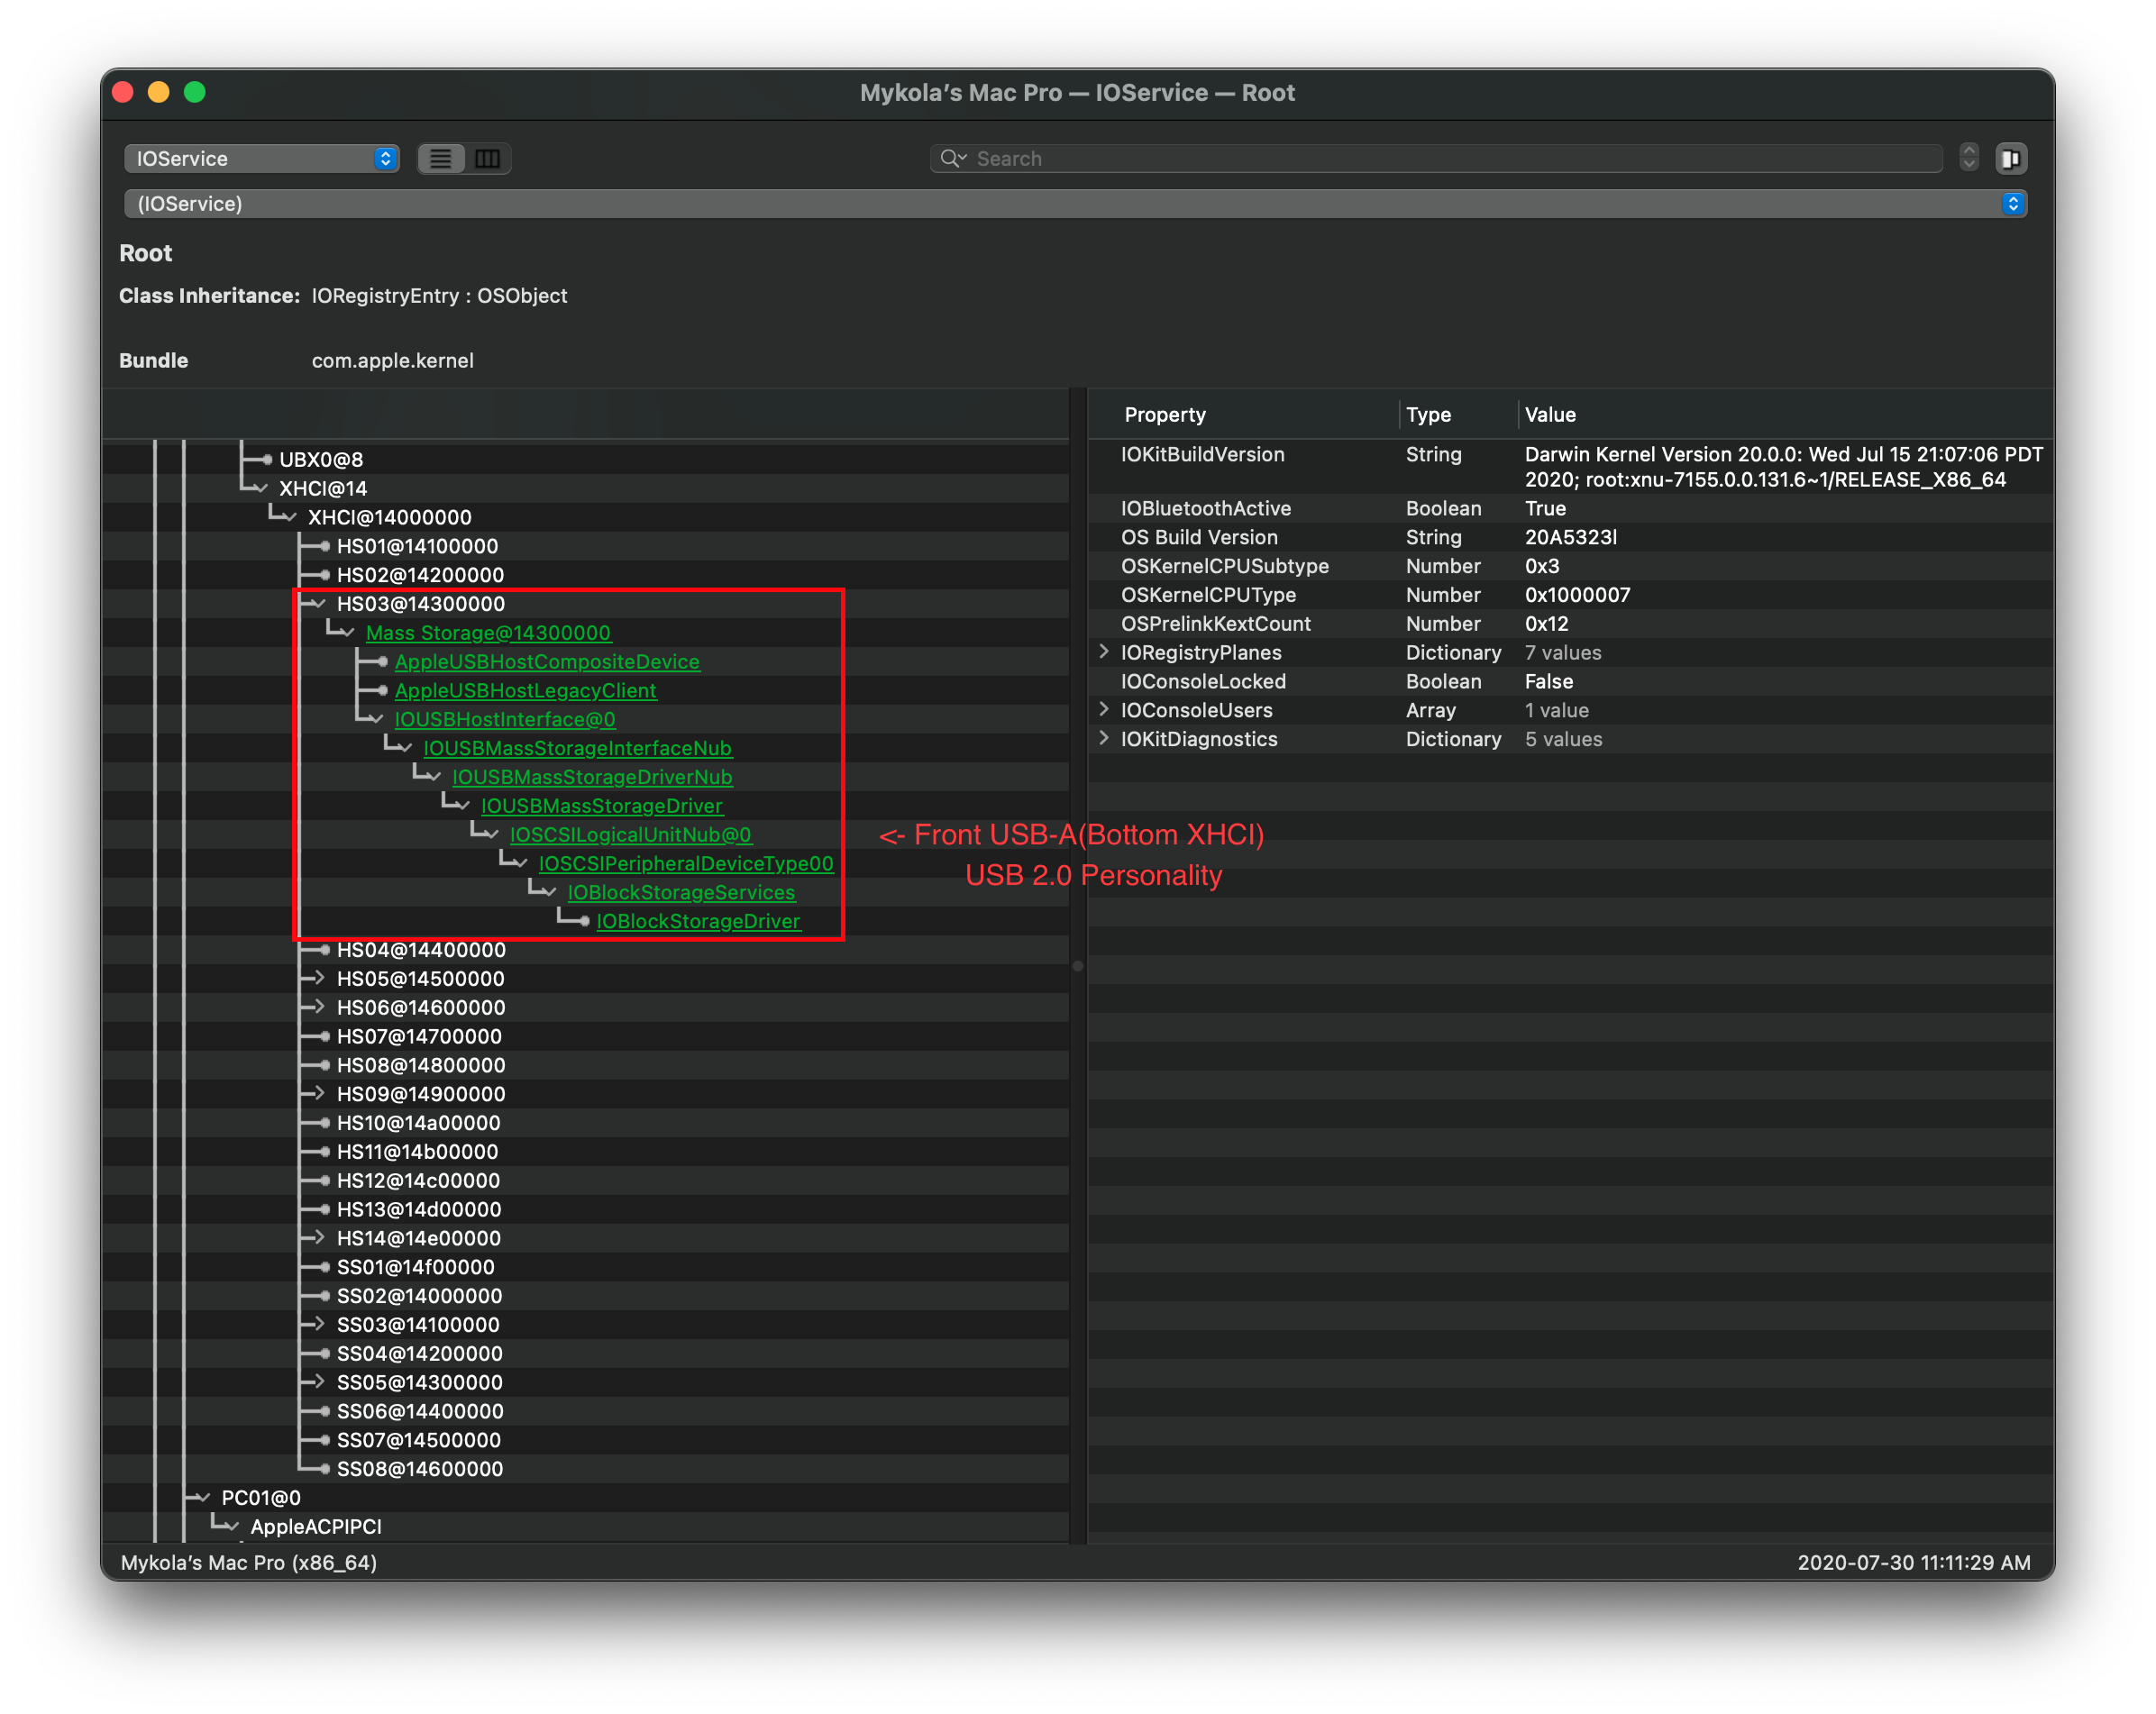 |
We see that the USB 2.0 personality of our 3.0 port is XHCI -> HS03, now you should be able to get an idea of what we're trying to do:
- Front Type-A:
- HS03: 2.0 Personality
- SS03: 3.0 Personality
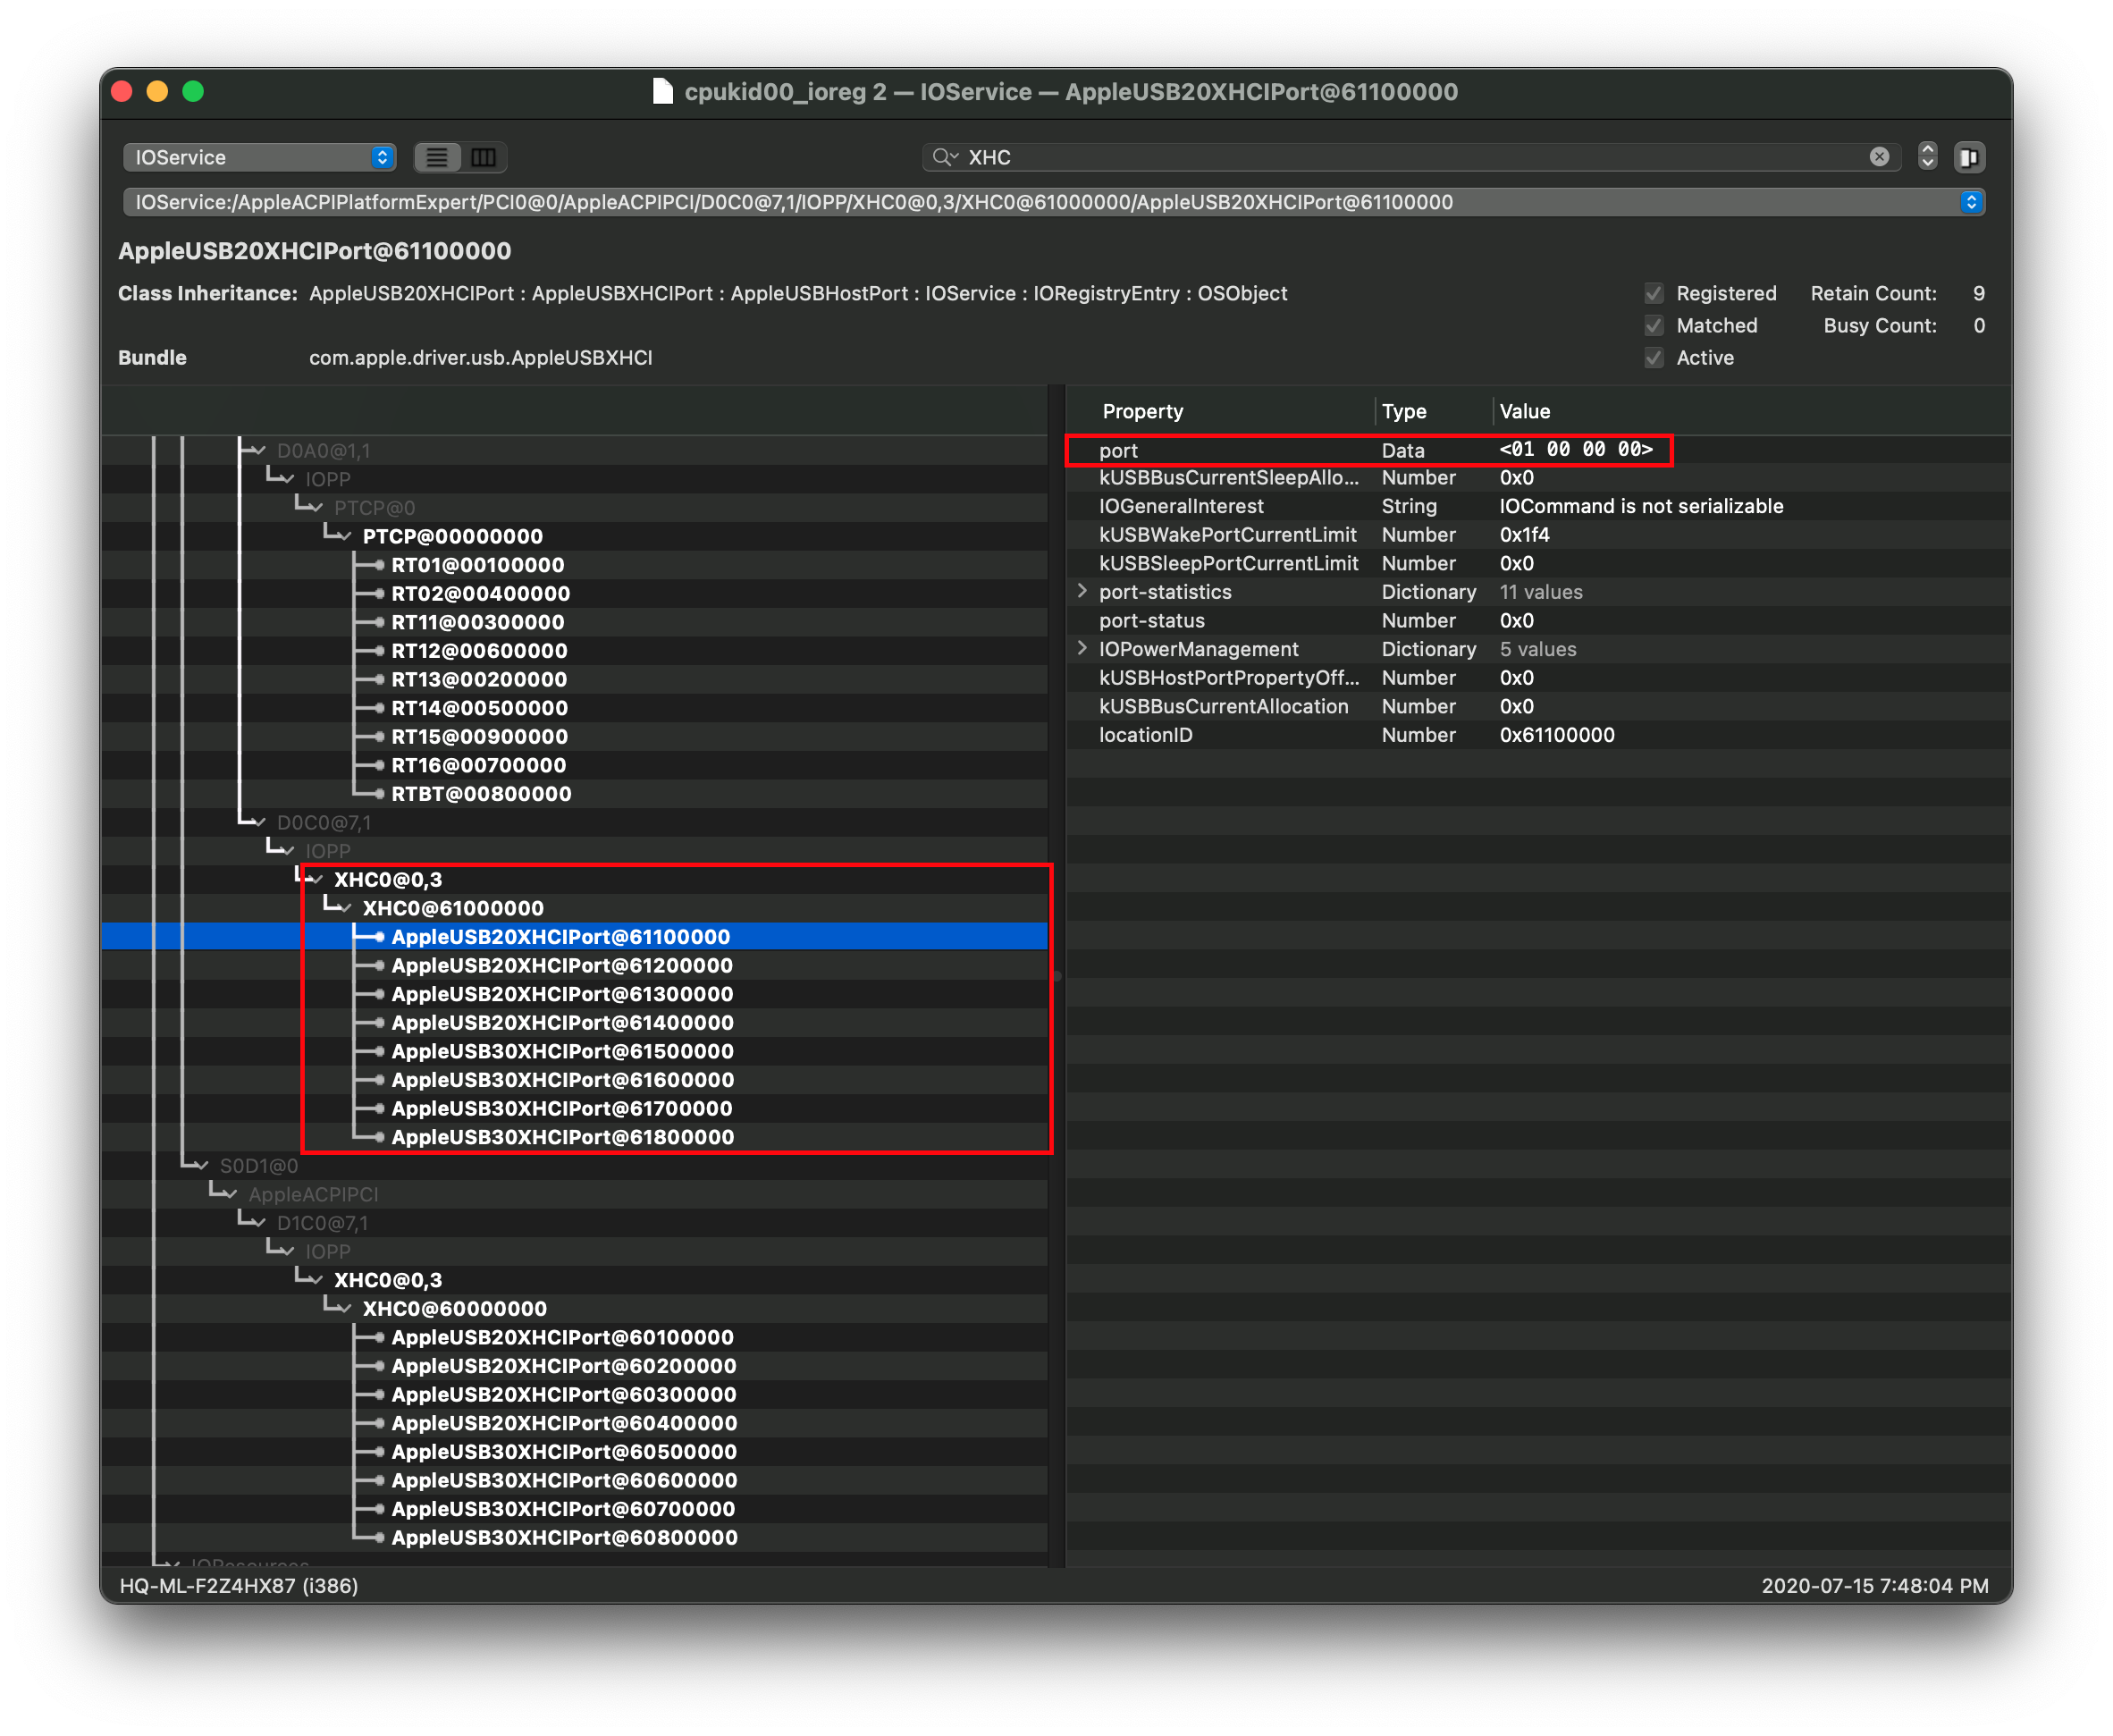
Note: If your USB ports show up as either AppleUSB20XHCIPort or AppleUSB30XHCIPort, you can still map however it will be a bit more difficult. Instead of writing down the names, pay very close attention to the port property on the right hand side:
# Creating a personal map
This is where we pull out pen and paper, and start to write down which ports physically match up with which digital ports. An example of what your map can look like:
| Name Mapping | Property Mapping |
|---|---|
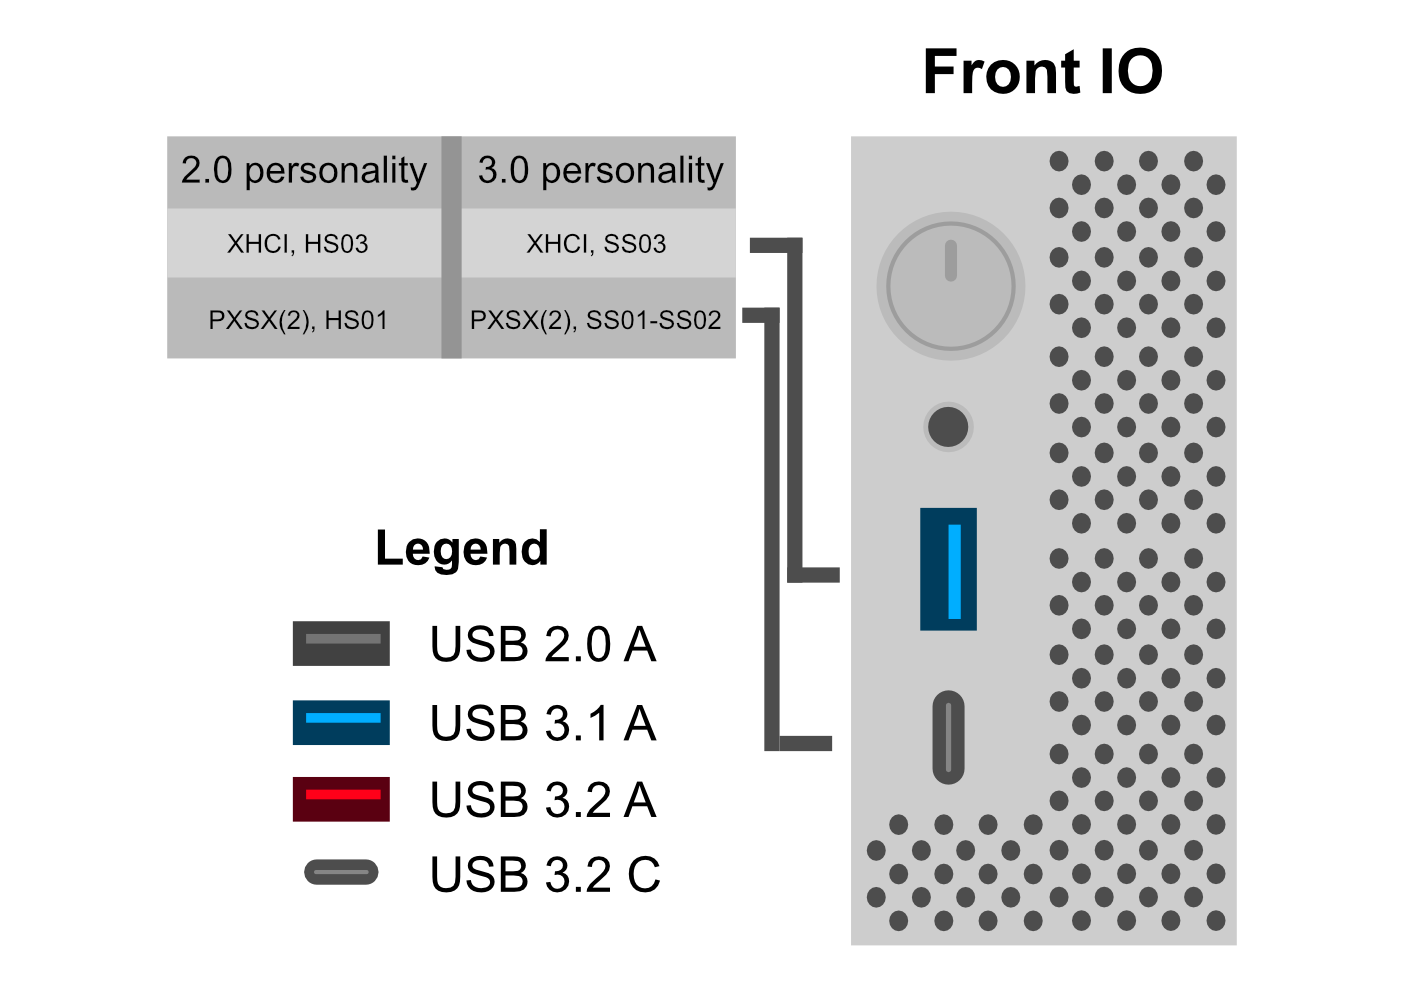 |  |
Your own map doesn't need to look exactly like this, however you'll want something that you can easily understand and refer to down the line.
Note:
- Name Mapping: When a proper name shows up in IOReg(ie. HS01)
- Property Mapping: When no proper name is given(ie. AppleUSB30XHCIPort)
# USB-C mapping
Next lets map our USB-C port, this is where it gets quite tricky as you may have noticed earlier:
| Type | Info | Comments |
|---|---|---|
| 8 | Type C connector - USB 2.0-only | Mainly seen in phones |
| 9 | Type C connector - USB 2.0 and USB 3.0 with Switch | Flipping the device does not change the ACPI port |
| 10 | Type C connector - USB 2.0 and USB 3.0 without Switch | Flipping the device does change the ACPI port. generally seen on 3.1/2 motherboard headers |
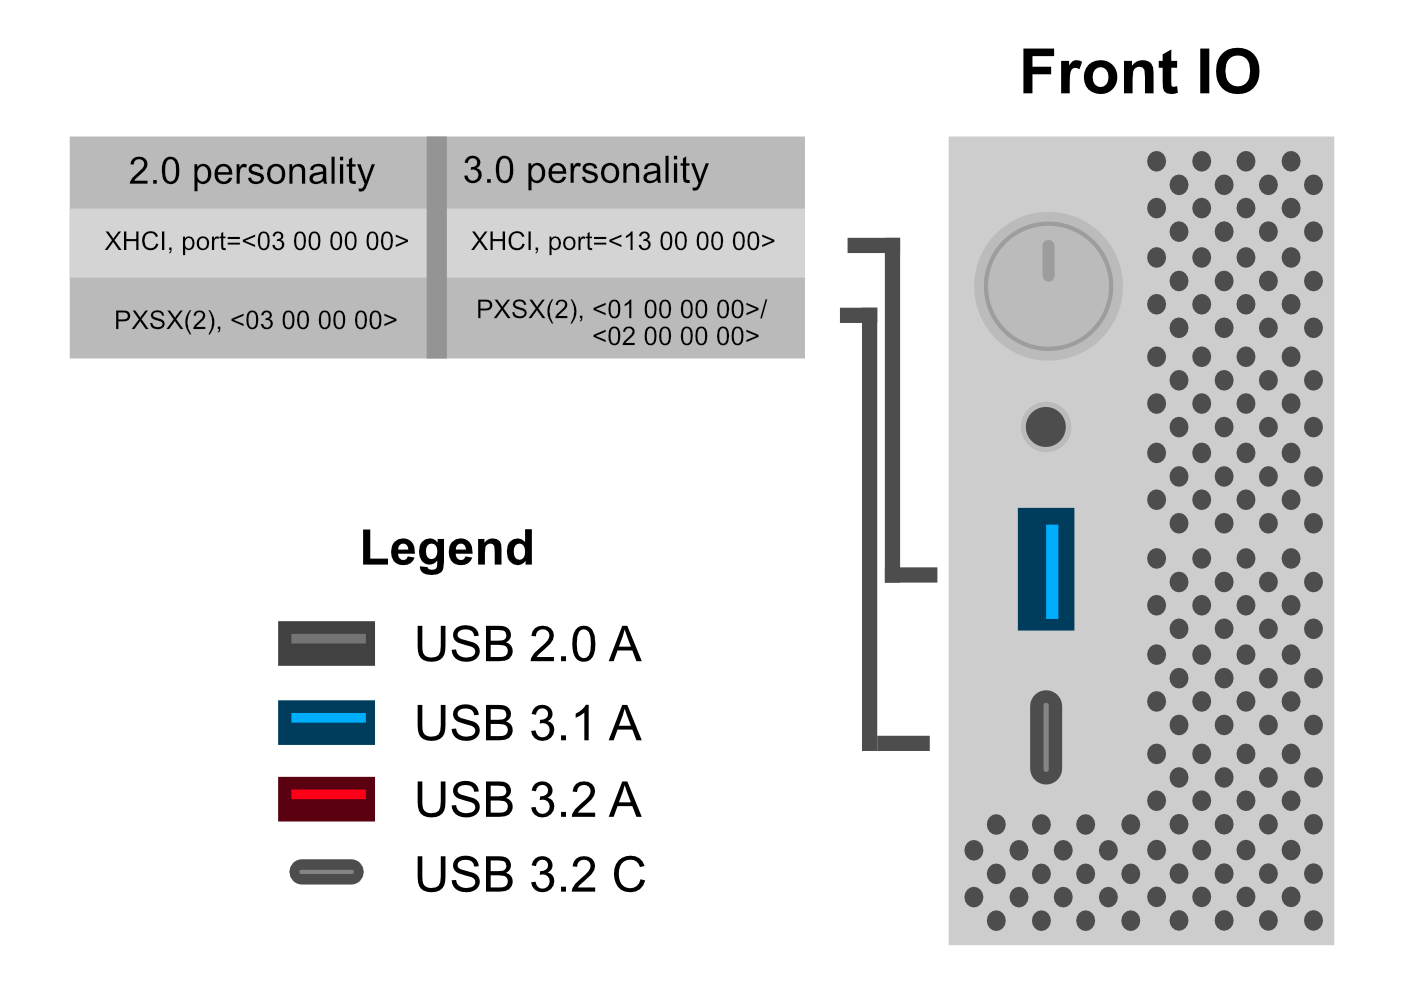
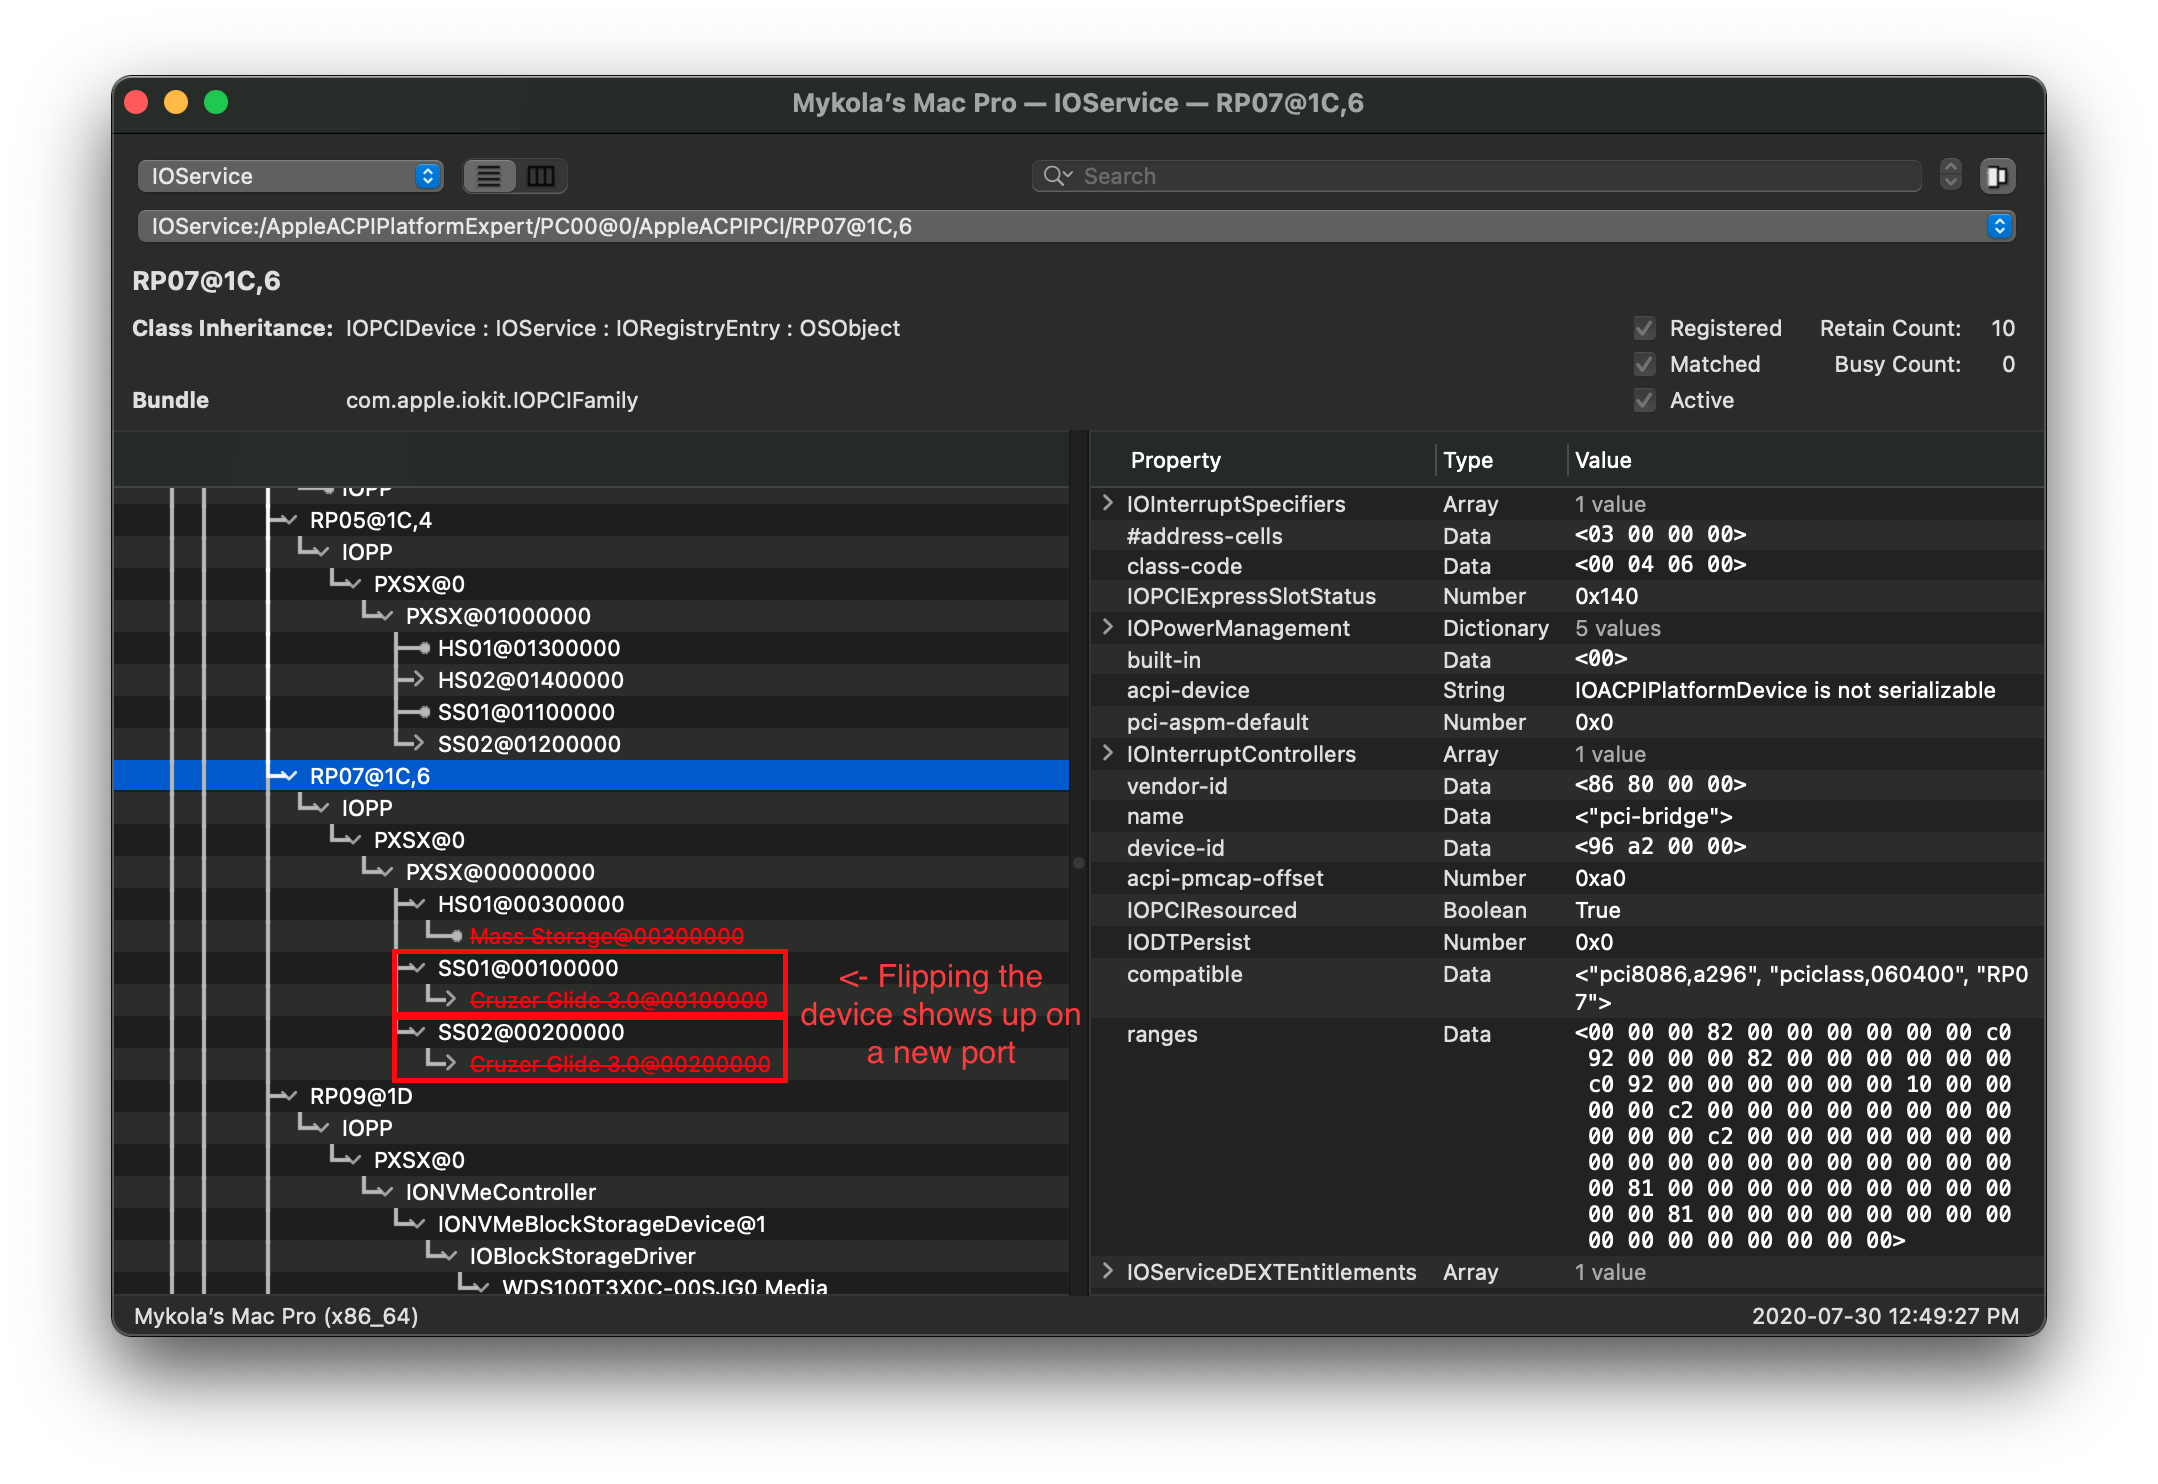
So when we map our USB-C header, we notice it occupies the SS01 port. But when we flip it, we actually populate it on the SS02 port. When this happens, you'll want to write this down for when we apply the port type.
- Note: All personalities from this port will be put under the Type 10
- Note 2: Not all USB-C headers will be Type 10, double check yours
# Continuing mapping
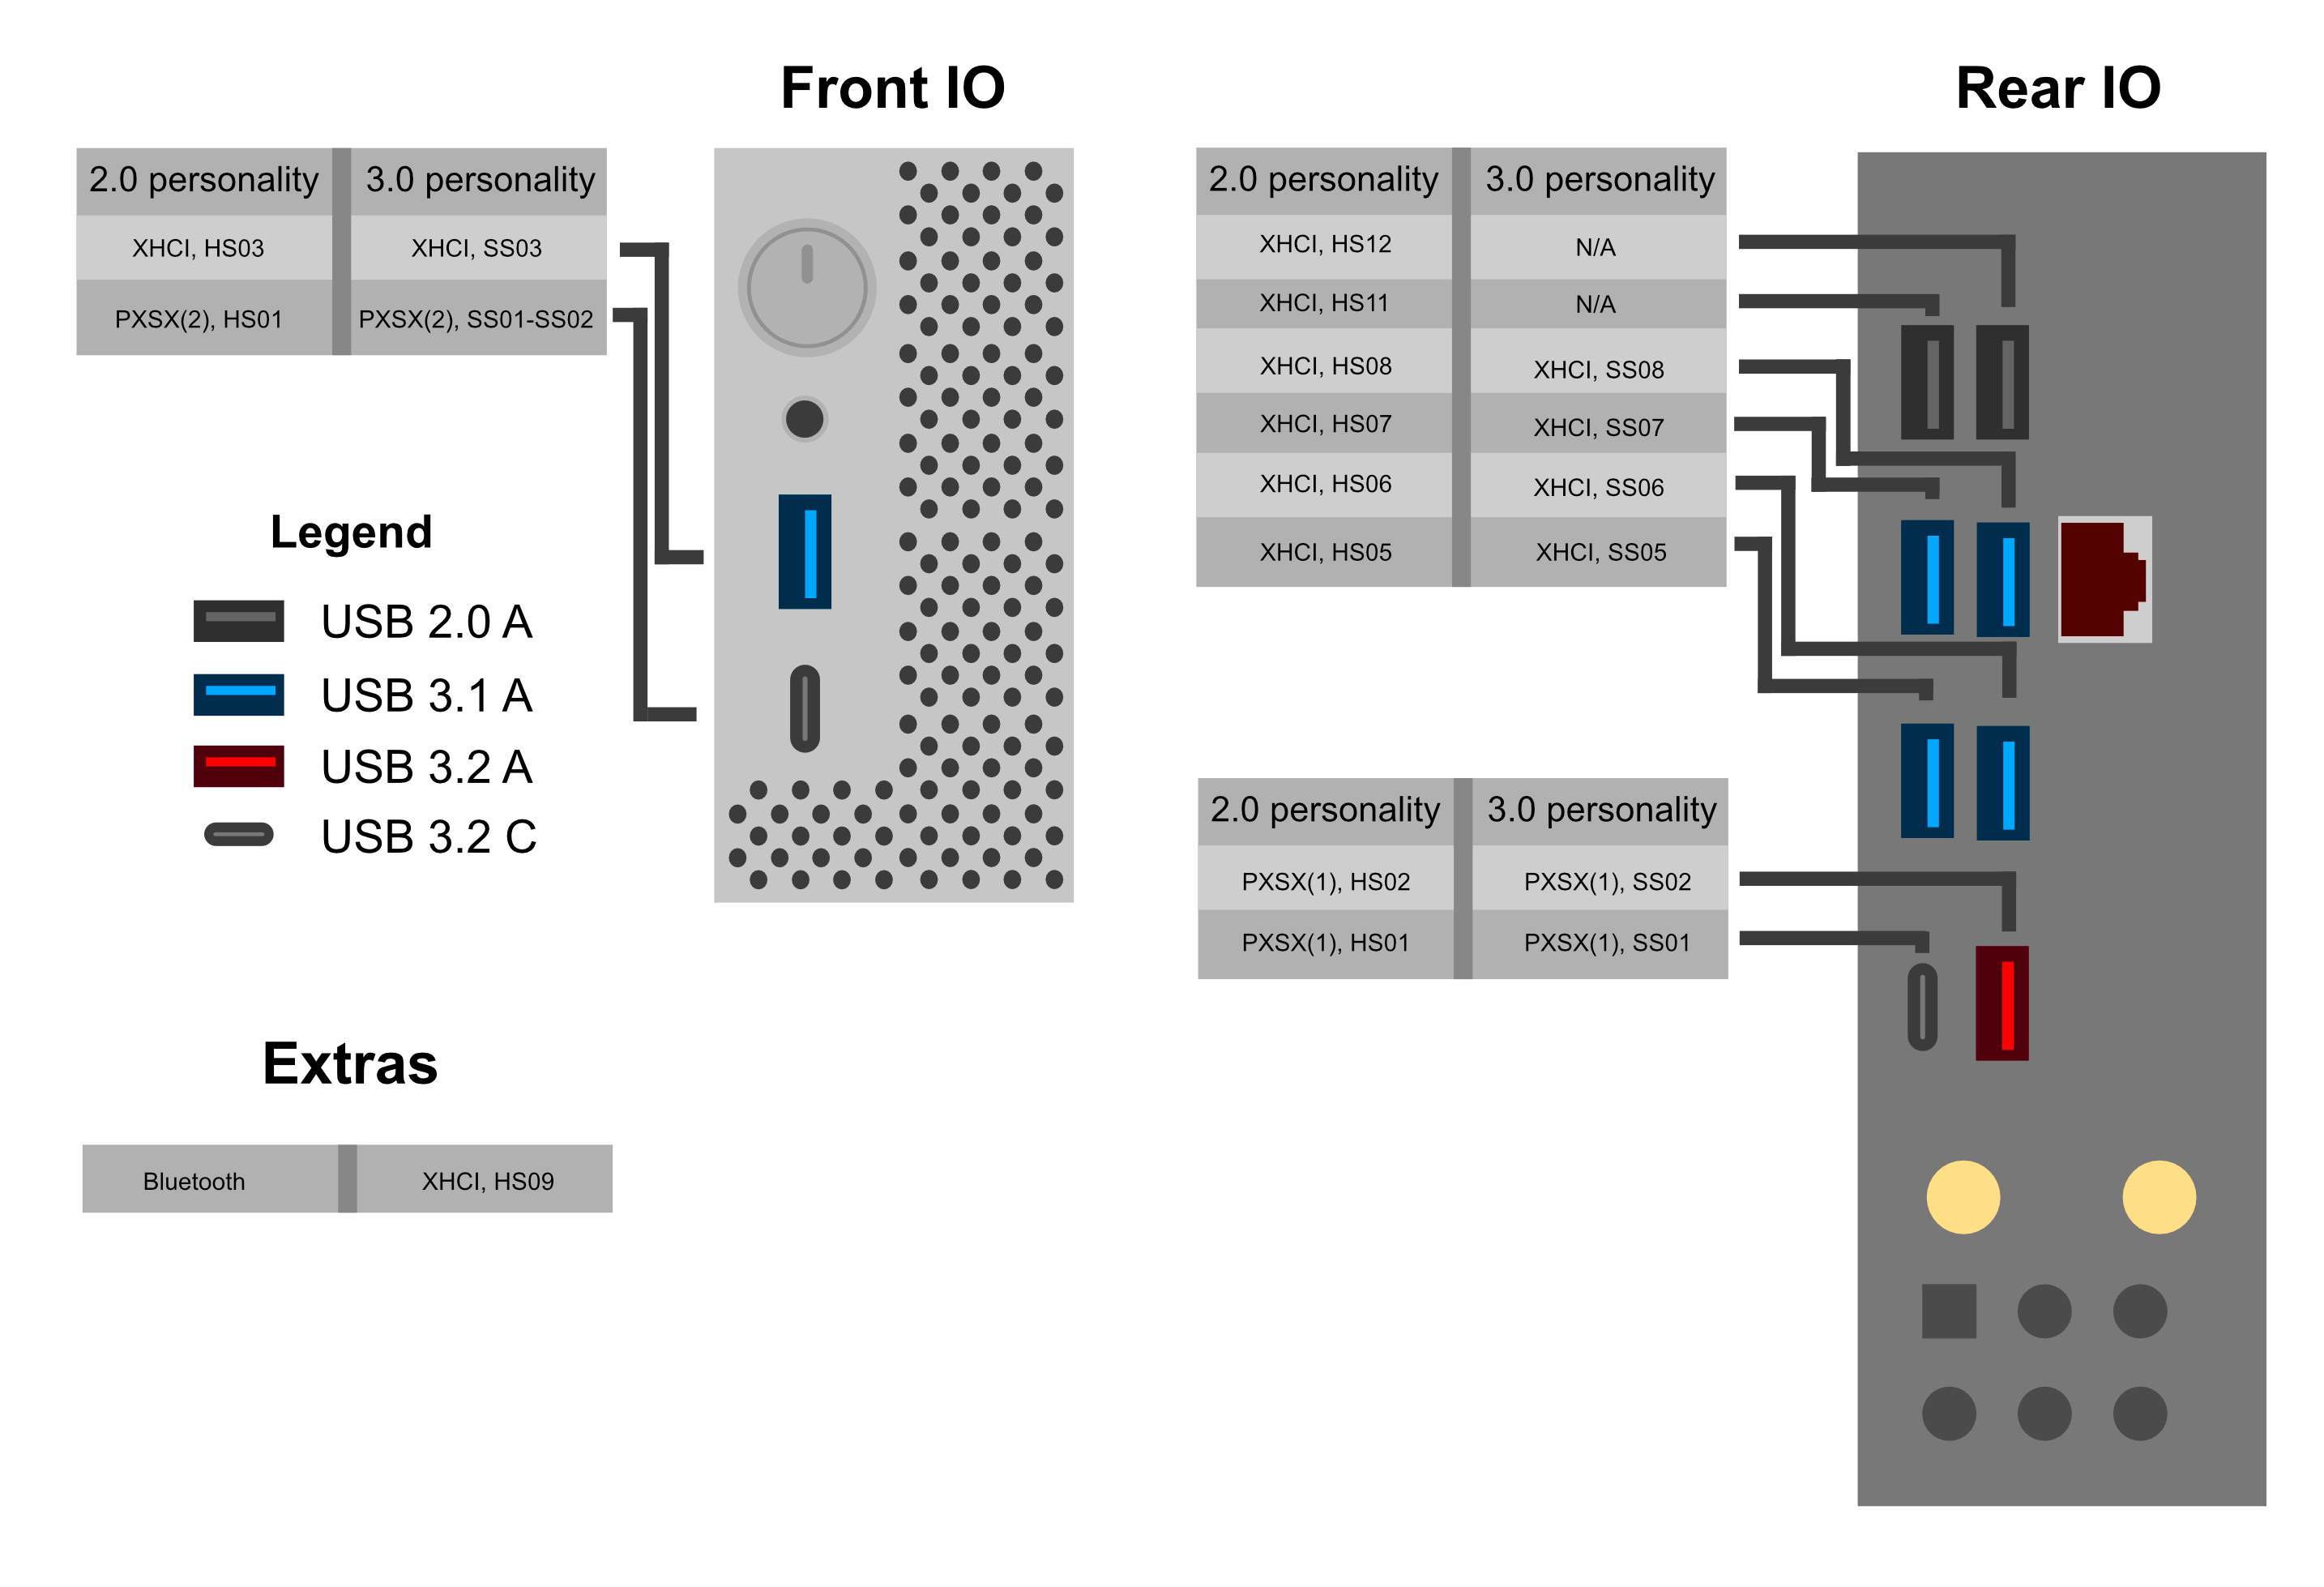
Now that you have the basic idea, you'll want to go around with every USB port and map it out. This will take time, and don't forget to write it down. Your final diagram should look similar to this:
# Special Notes
# Bluetooth
So while not obvious to many, Bluetooth actually runs over the USB interface internally. This means that when mapping, you'll need to pay close attention to devices that already show up in IOReg:
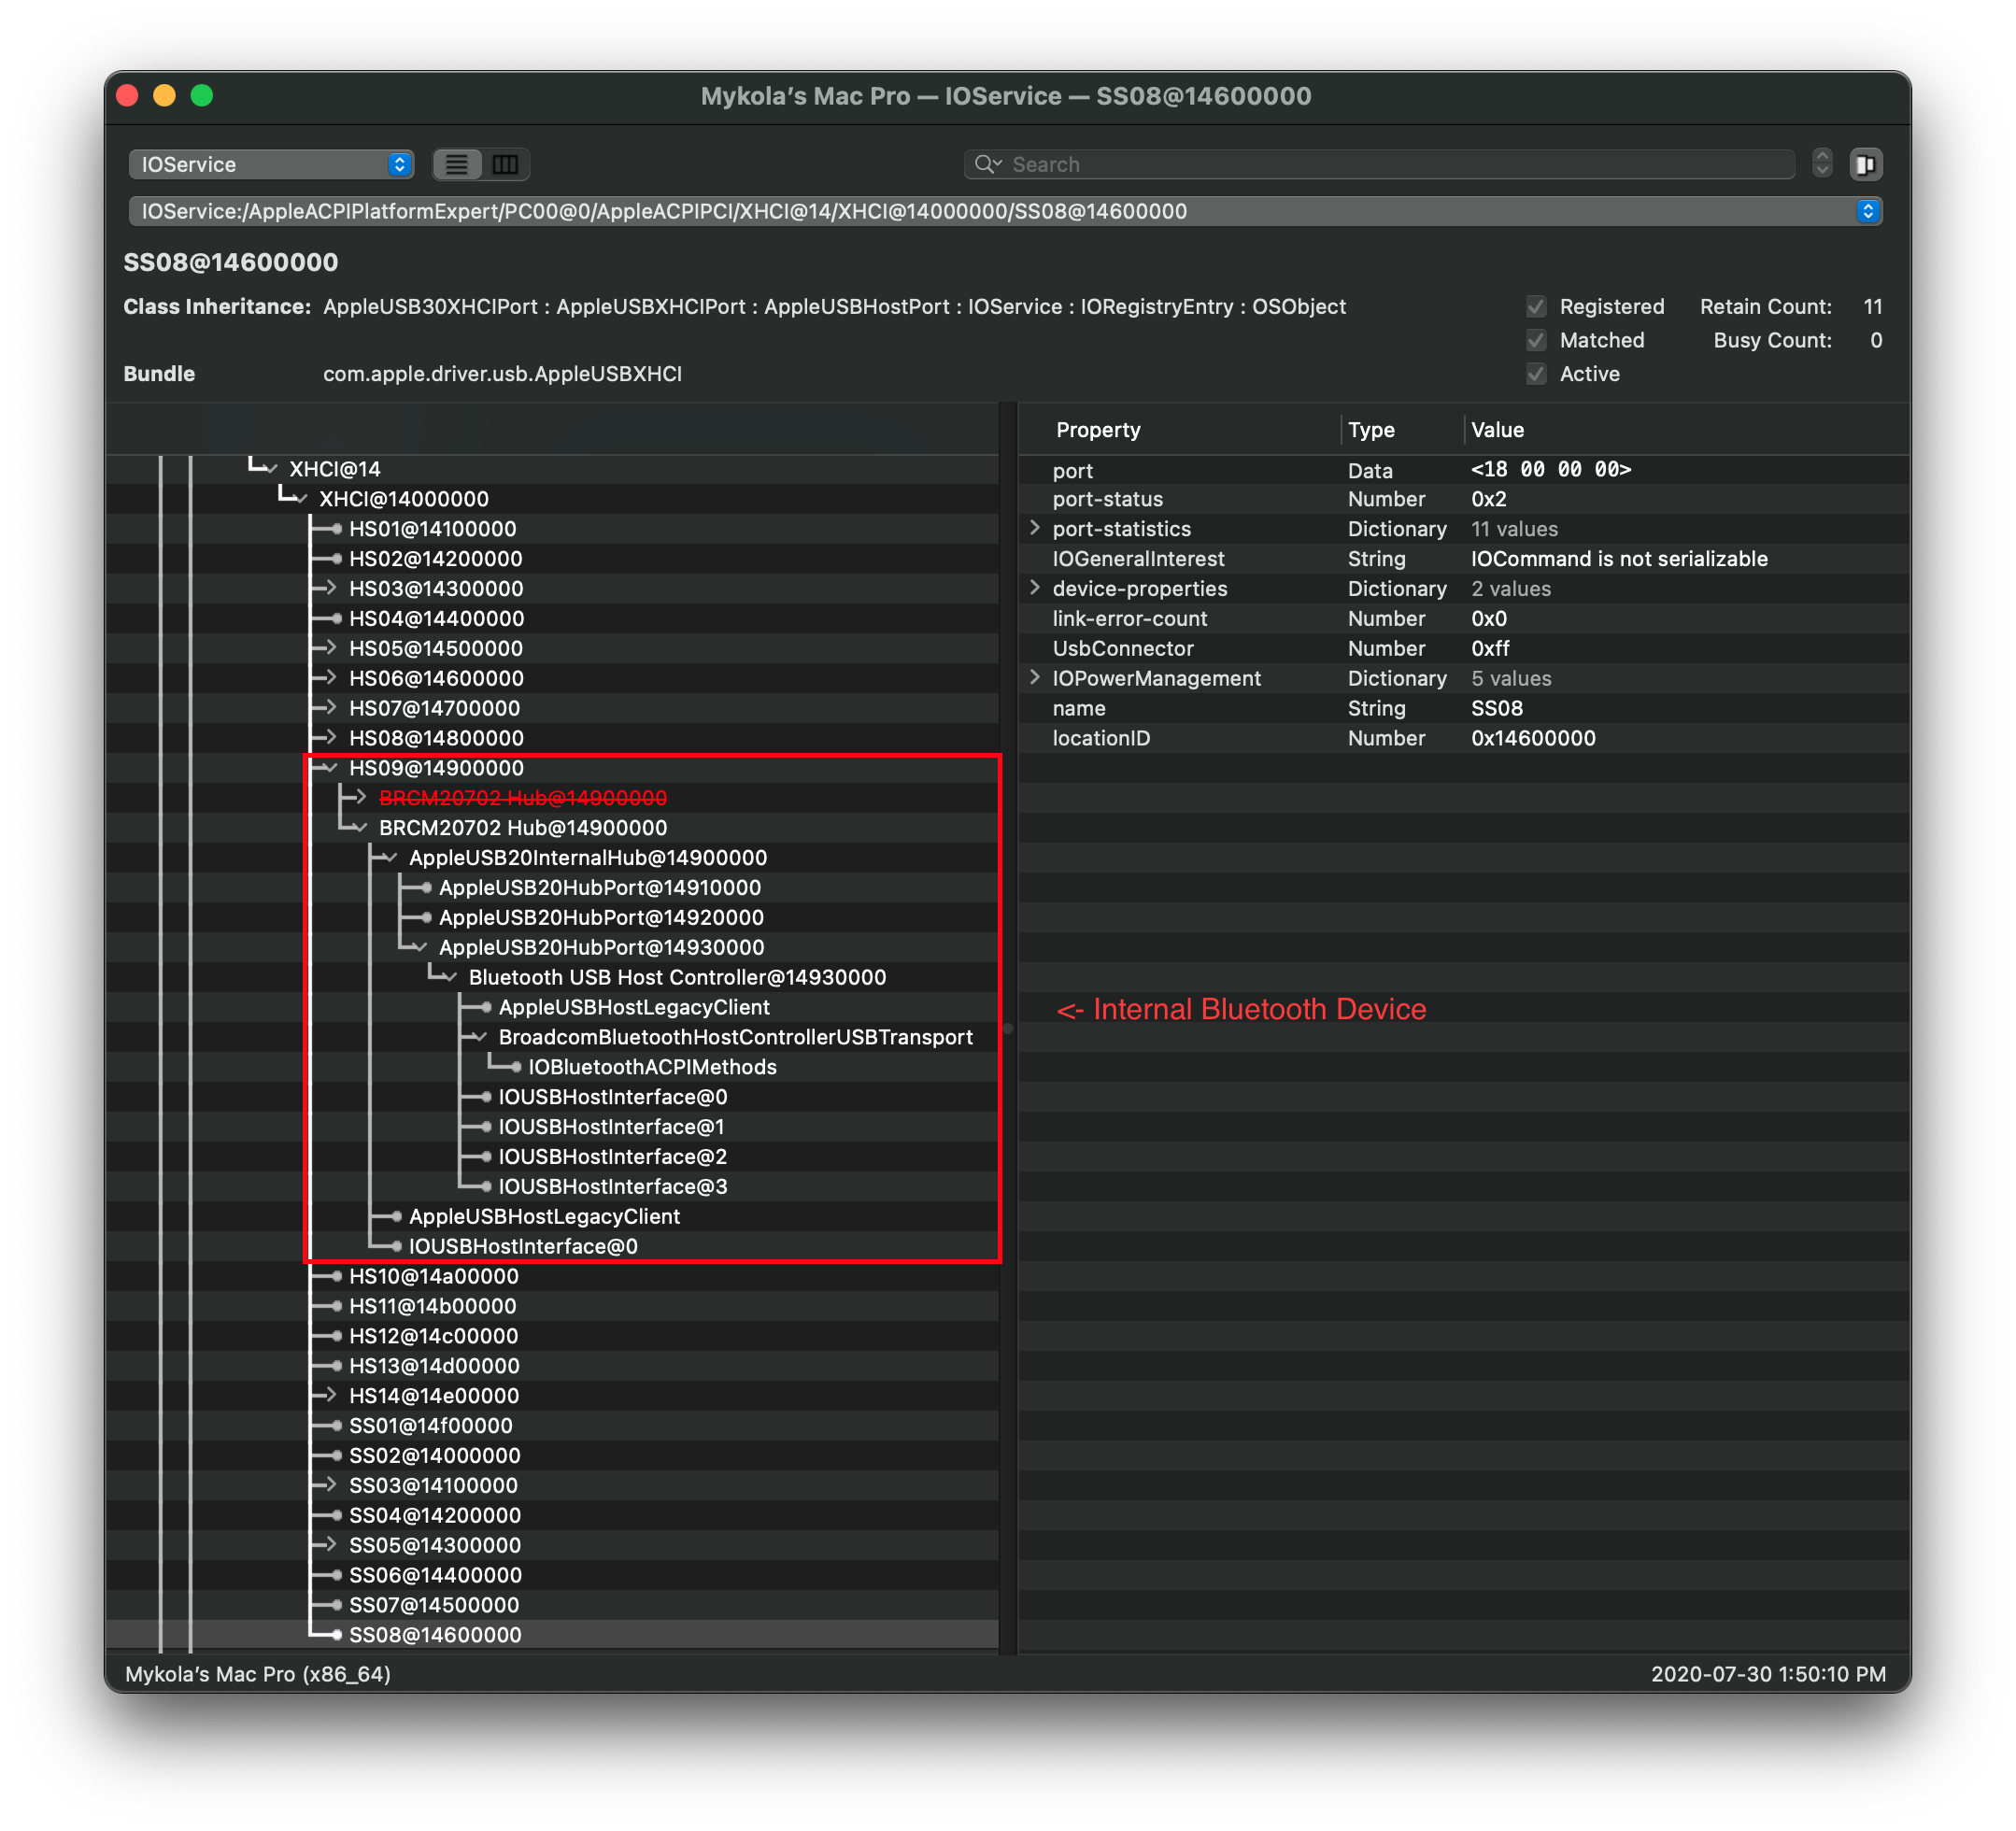
Keep this in mind, as this plays into the Type 255 and getting certain services like handoff working correctly.
# USRx Ports
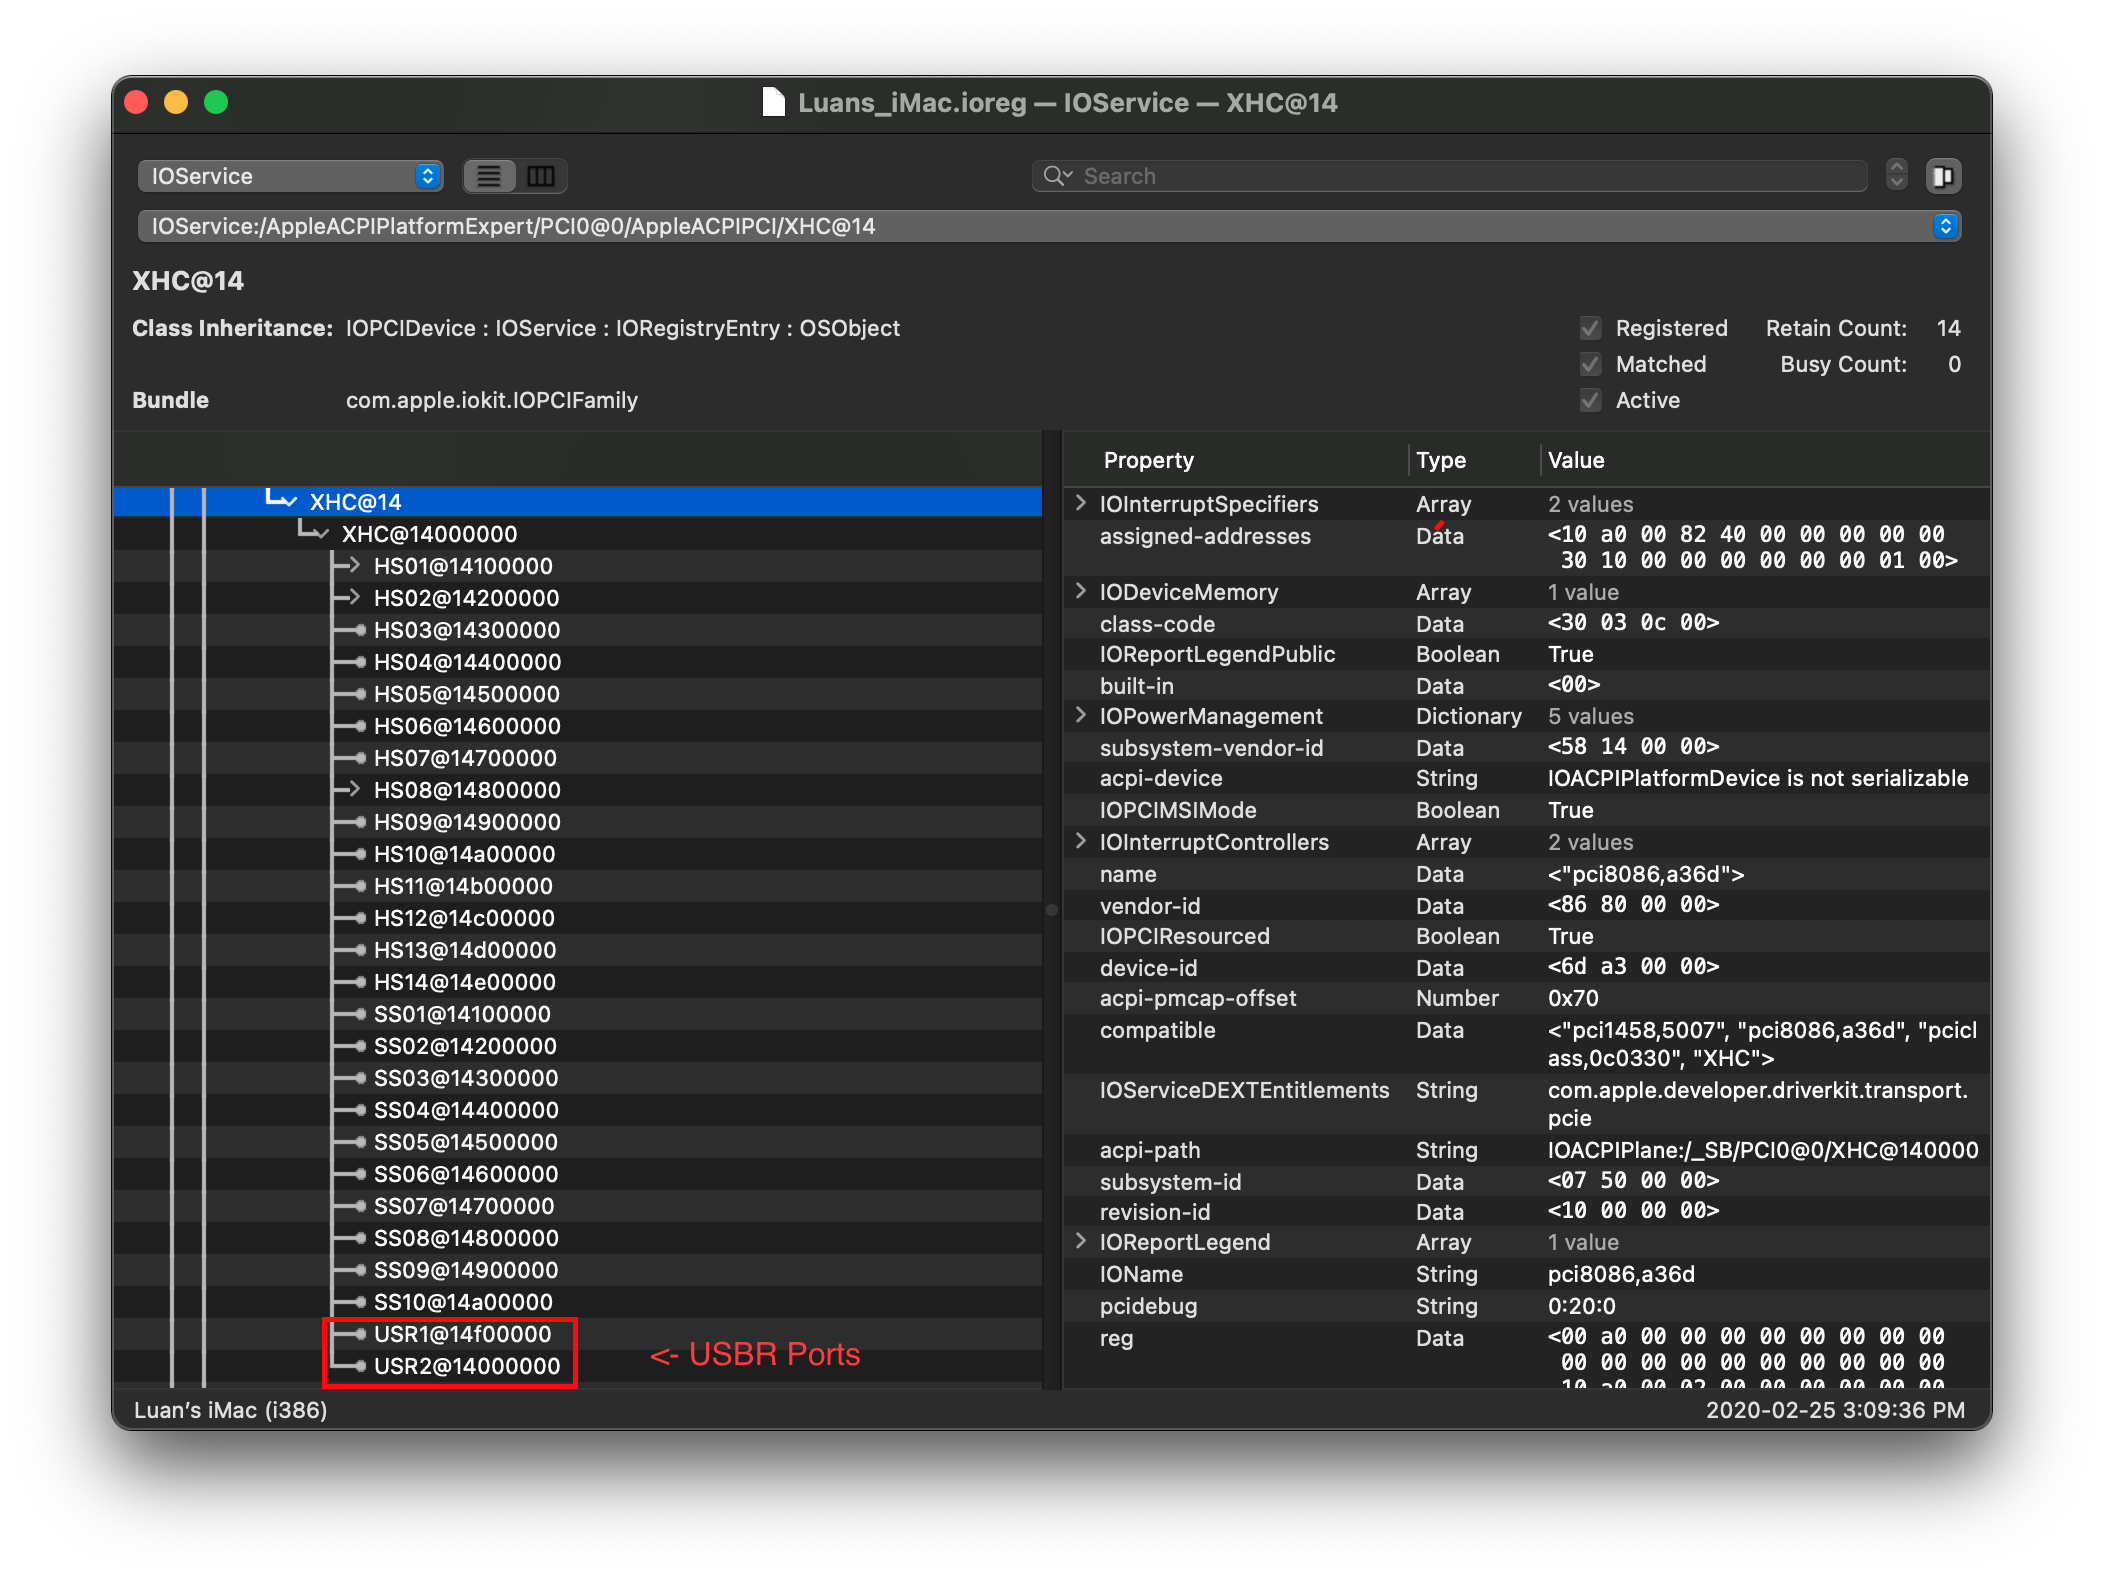
When mapping, you may notice some extra ports left over, specifically USR1 and USR2. These ports are known as "USBR" ports, or more specifically USB Redirection Ports (opens new window). Use of these is for remote management but real Macs don't ship with USBR devices and so has no support for them OS-wise. You can actually ignore these entries in your USB map:
# Missing USB ports
In some rare situations, certain USB ports may not show up in macOS at all. This is likely due to a missing definition in your ACPI tables, and so we have a few options:
- Coffee Lake and older should use USBInjectAll (opens new window)
- Don't forget to add this to both EFI/OC/Kexts and you config.plist's kernel -> Add
- Comet Lake and newer should use SSDT-RHUB
- AMD systems should also use SSDT-RHUB
SSDT-RHUB's purpose is to reset your USB controller, and force macOS to reenumerate them. This avoids the hassle of trying to patch your existing ACPI tables.
To create your own SSDT-RHUB-MAP:
- Grab a copy of the SSDT: SSDT-RHUB.dsl (opens new window)
- Grab maciASL (opens new window)
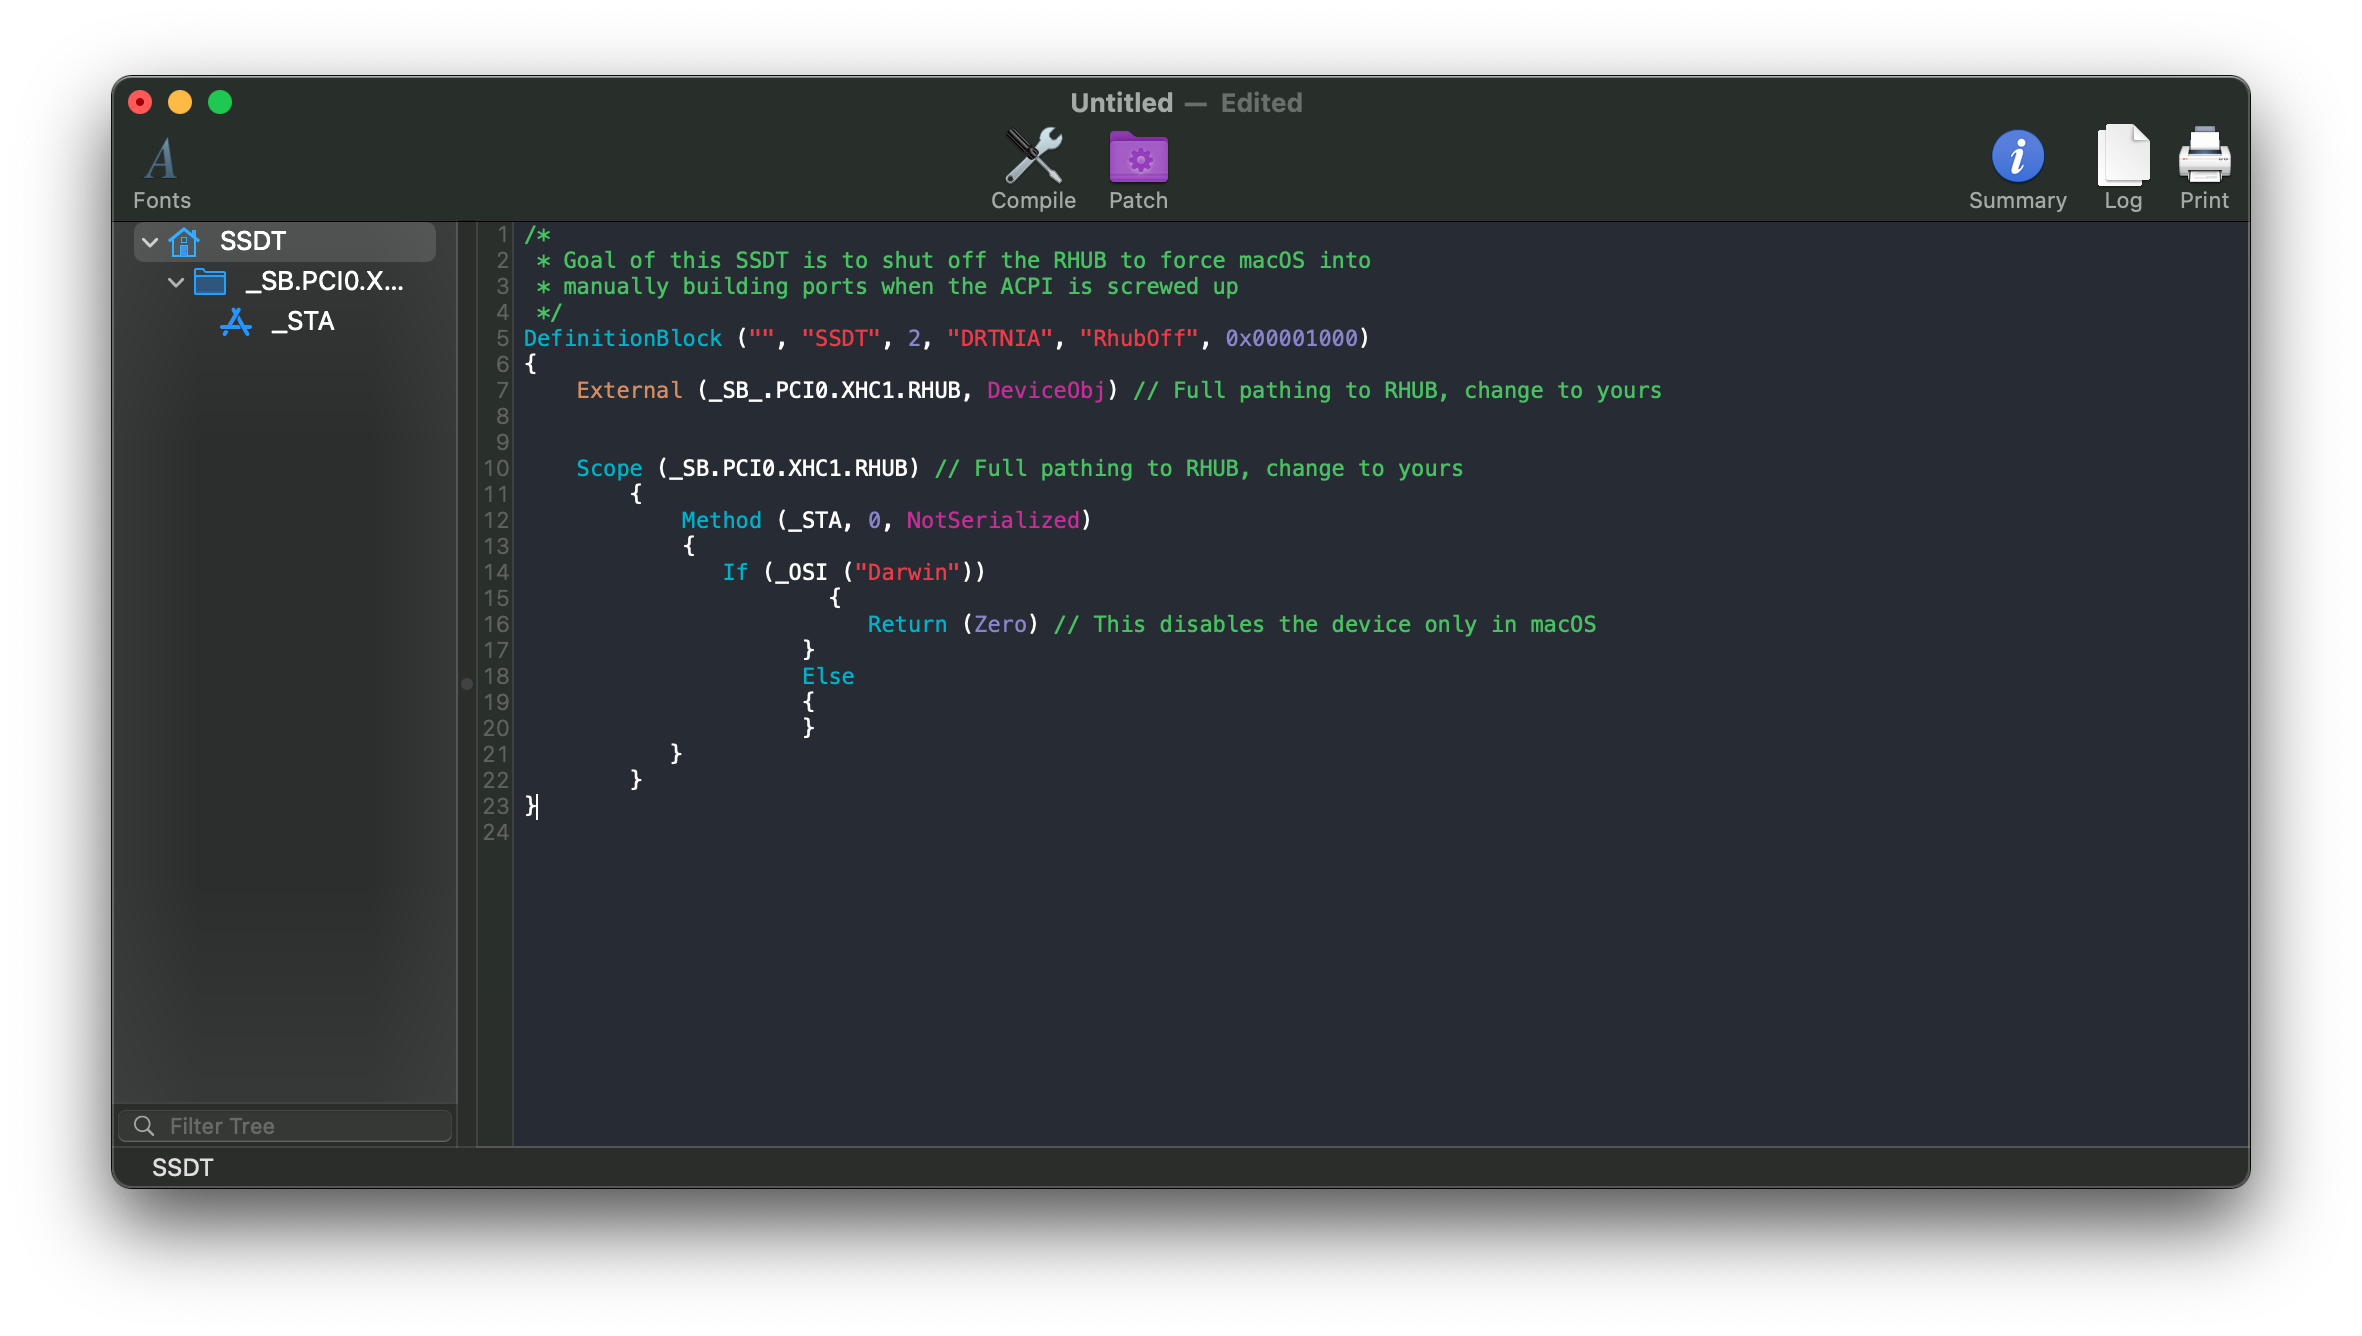
Next, open our newly downloaded SSDT with maciASL, you should be presented with the following:
Now, open IOReg and find the USB controller you want to reset(pay very close attention its the USB controller and not the child RHUB with the same name):
If you look to the right side, you should see the acpi-apth property. Here we're going to need to translate it to something our SSDT can use:
# before modifying
IOService:/AppleACPIPlatformExpert/PC00@0/AppleACPIPCI/RP05@1C,4/IOPP/PXSX@0
Now we'll want to strip out any unnecessary data:
IOService:/AppleACPIPlatformExpert/@##IOPP
Once cleaned up, yours should look similar:
# After modifying
PC00.RP05.PXSX
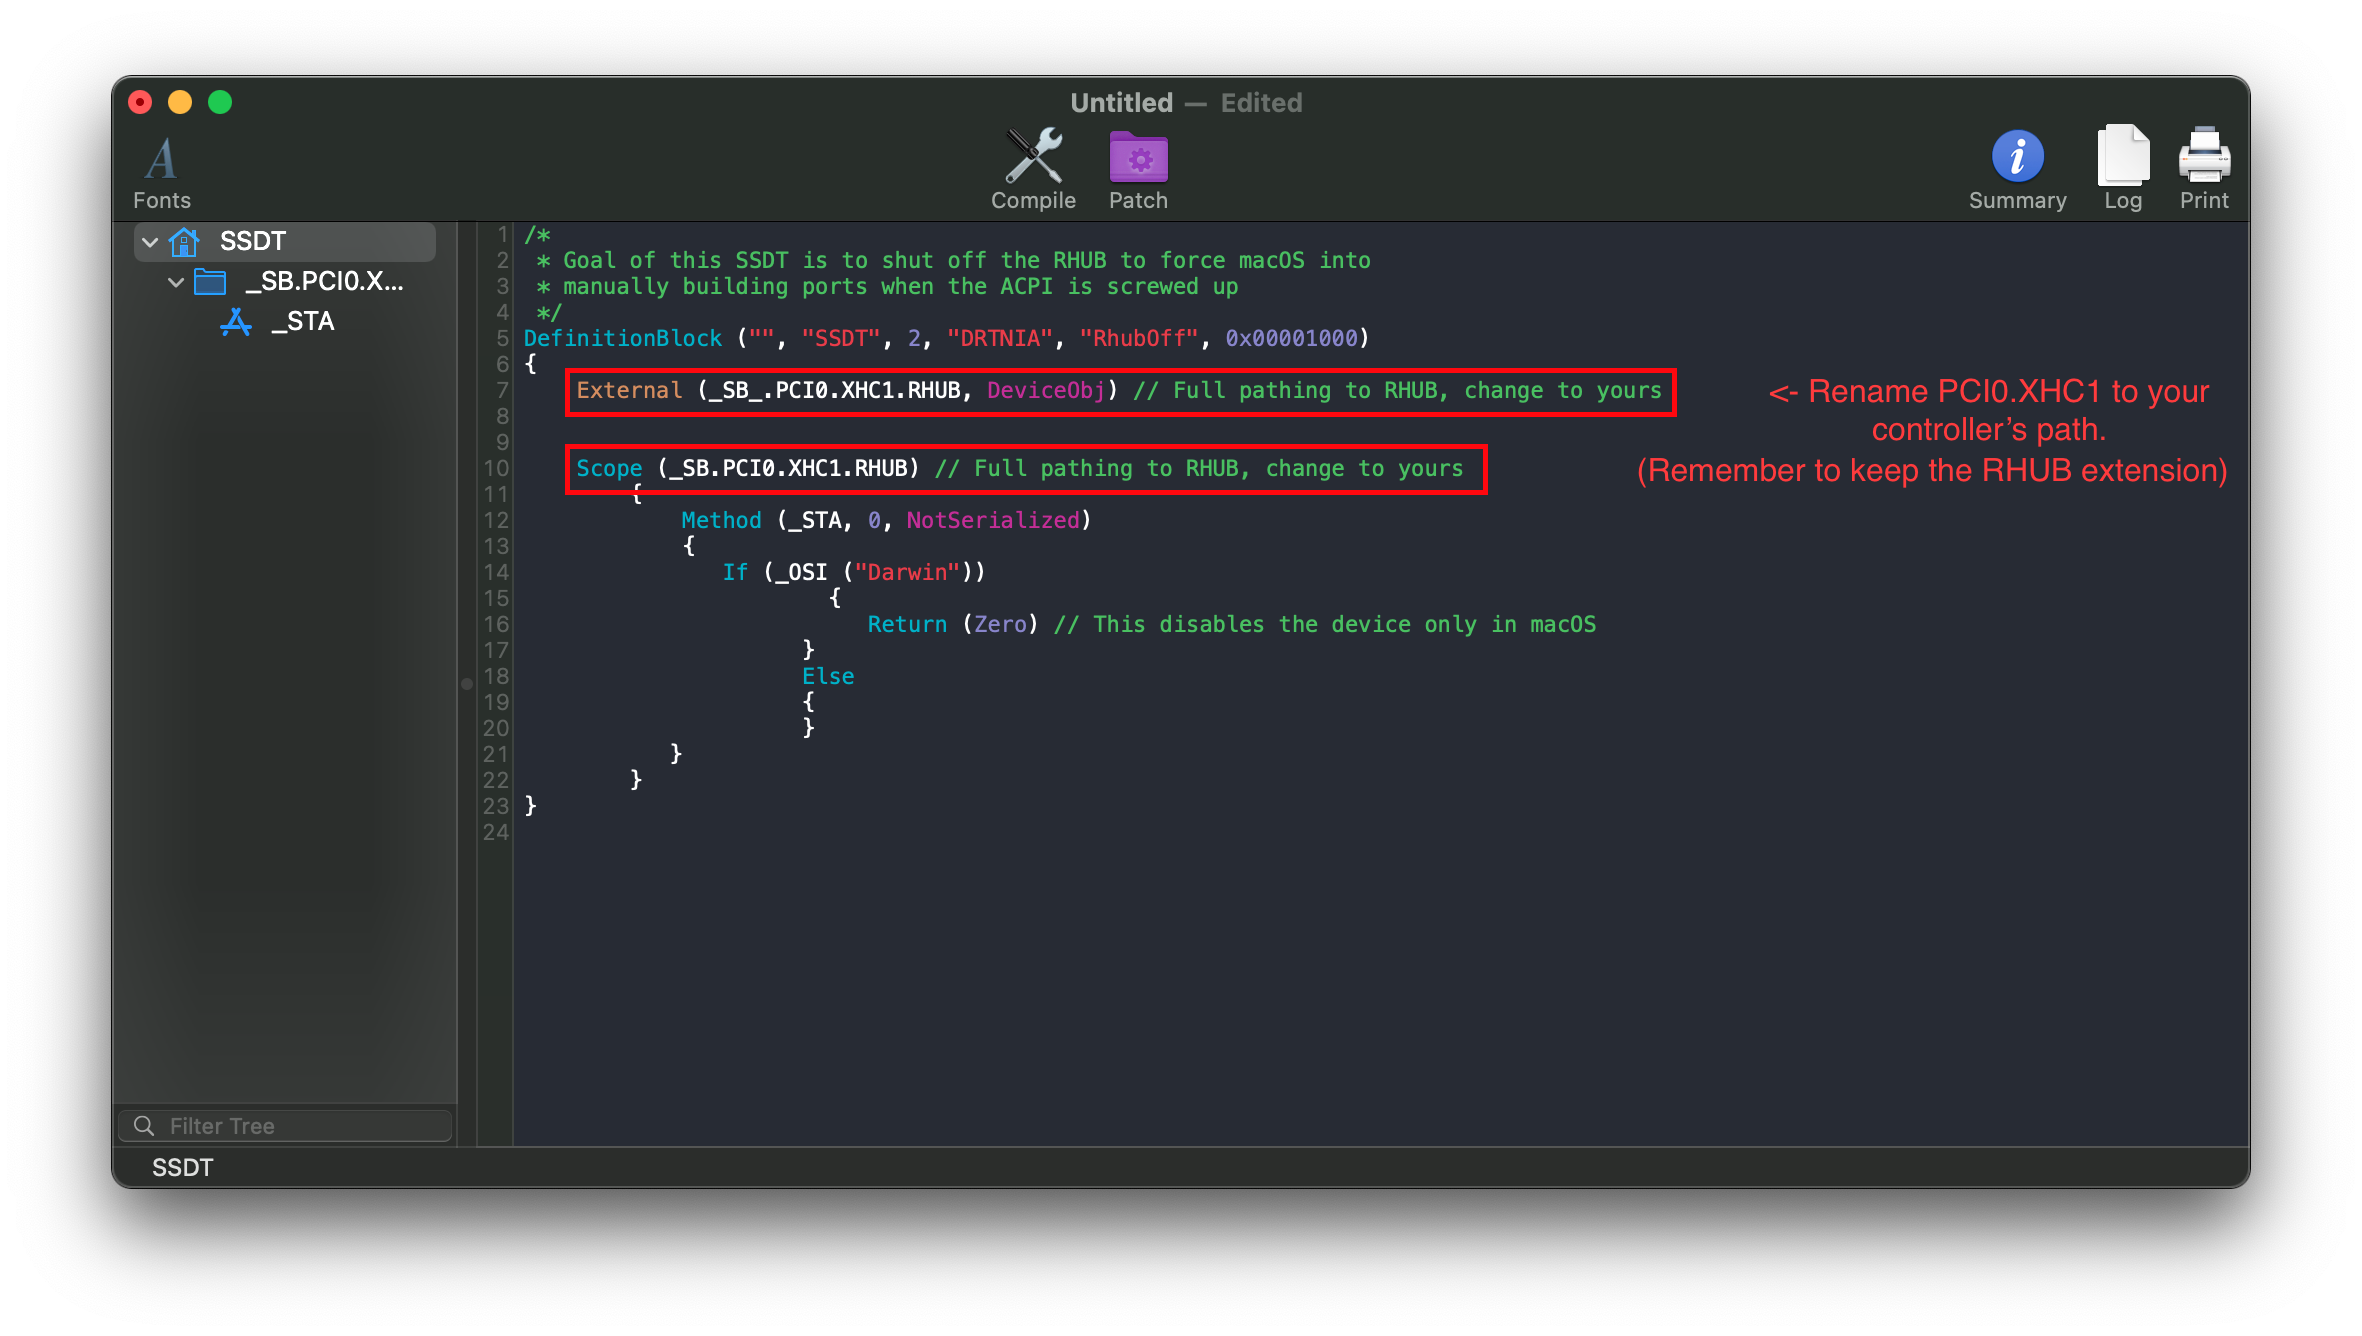
Following the example from above, we'll be renaming PCI0.XHC1.RHUB to PC00.RP05.PXSX.RHUB:
Before:
External (_SB_.PCI0.XHC1.RHUB, DeviceObj) <- Rename this

Scope (_SB.PCI0.XHC1.RHUB) <- Rename this
Following the example pathing we found, the SSDT should look something like this:
After:
External (_SB.PC00.RP05.PXSX.RHUB, DeviceObj) <- Renamed

Scope (_SB.PC00.RP05.PXSX.RHUB) <- Renamed

Once you've edited the SSDT to your USB controller's path, you can export it with File -> SaveAs -> ACPI Machine Language Binary:
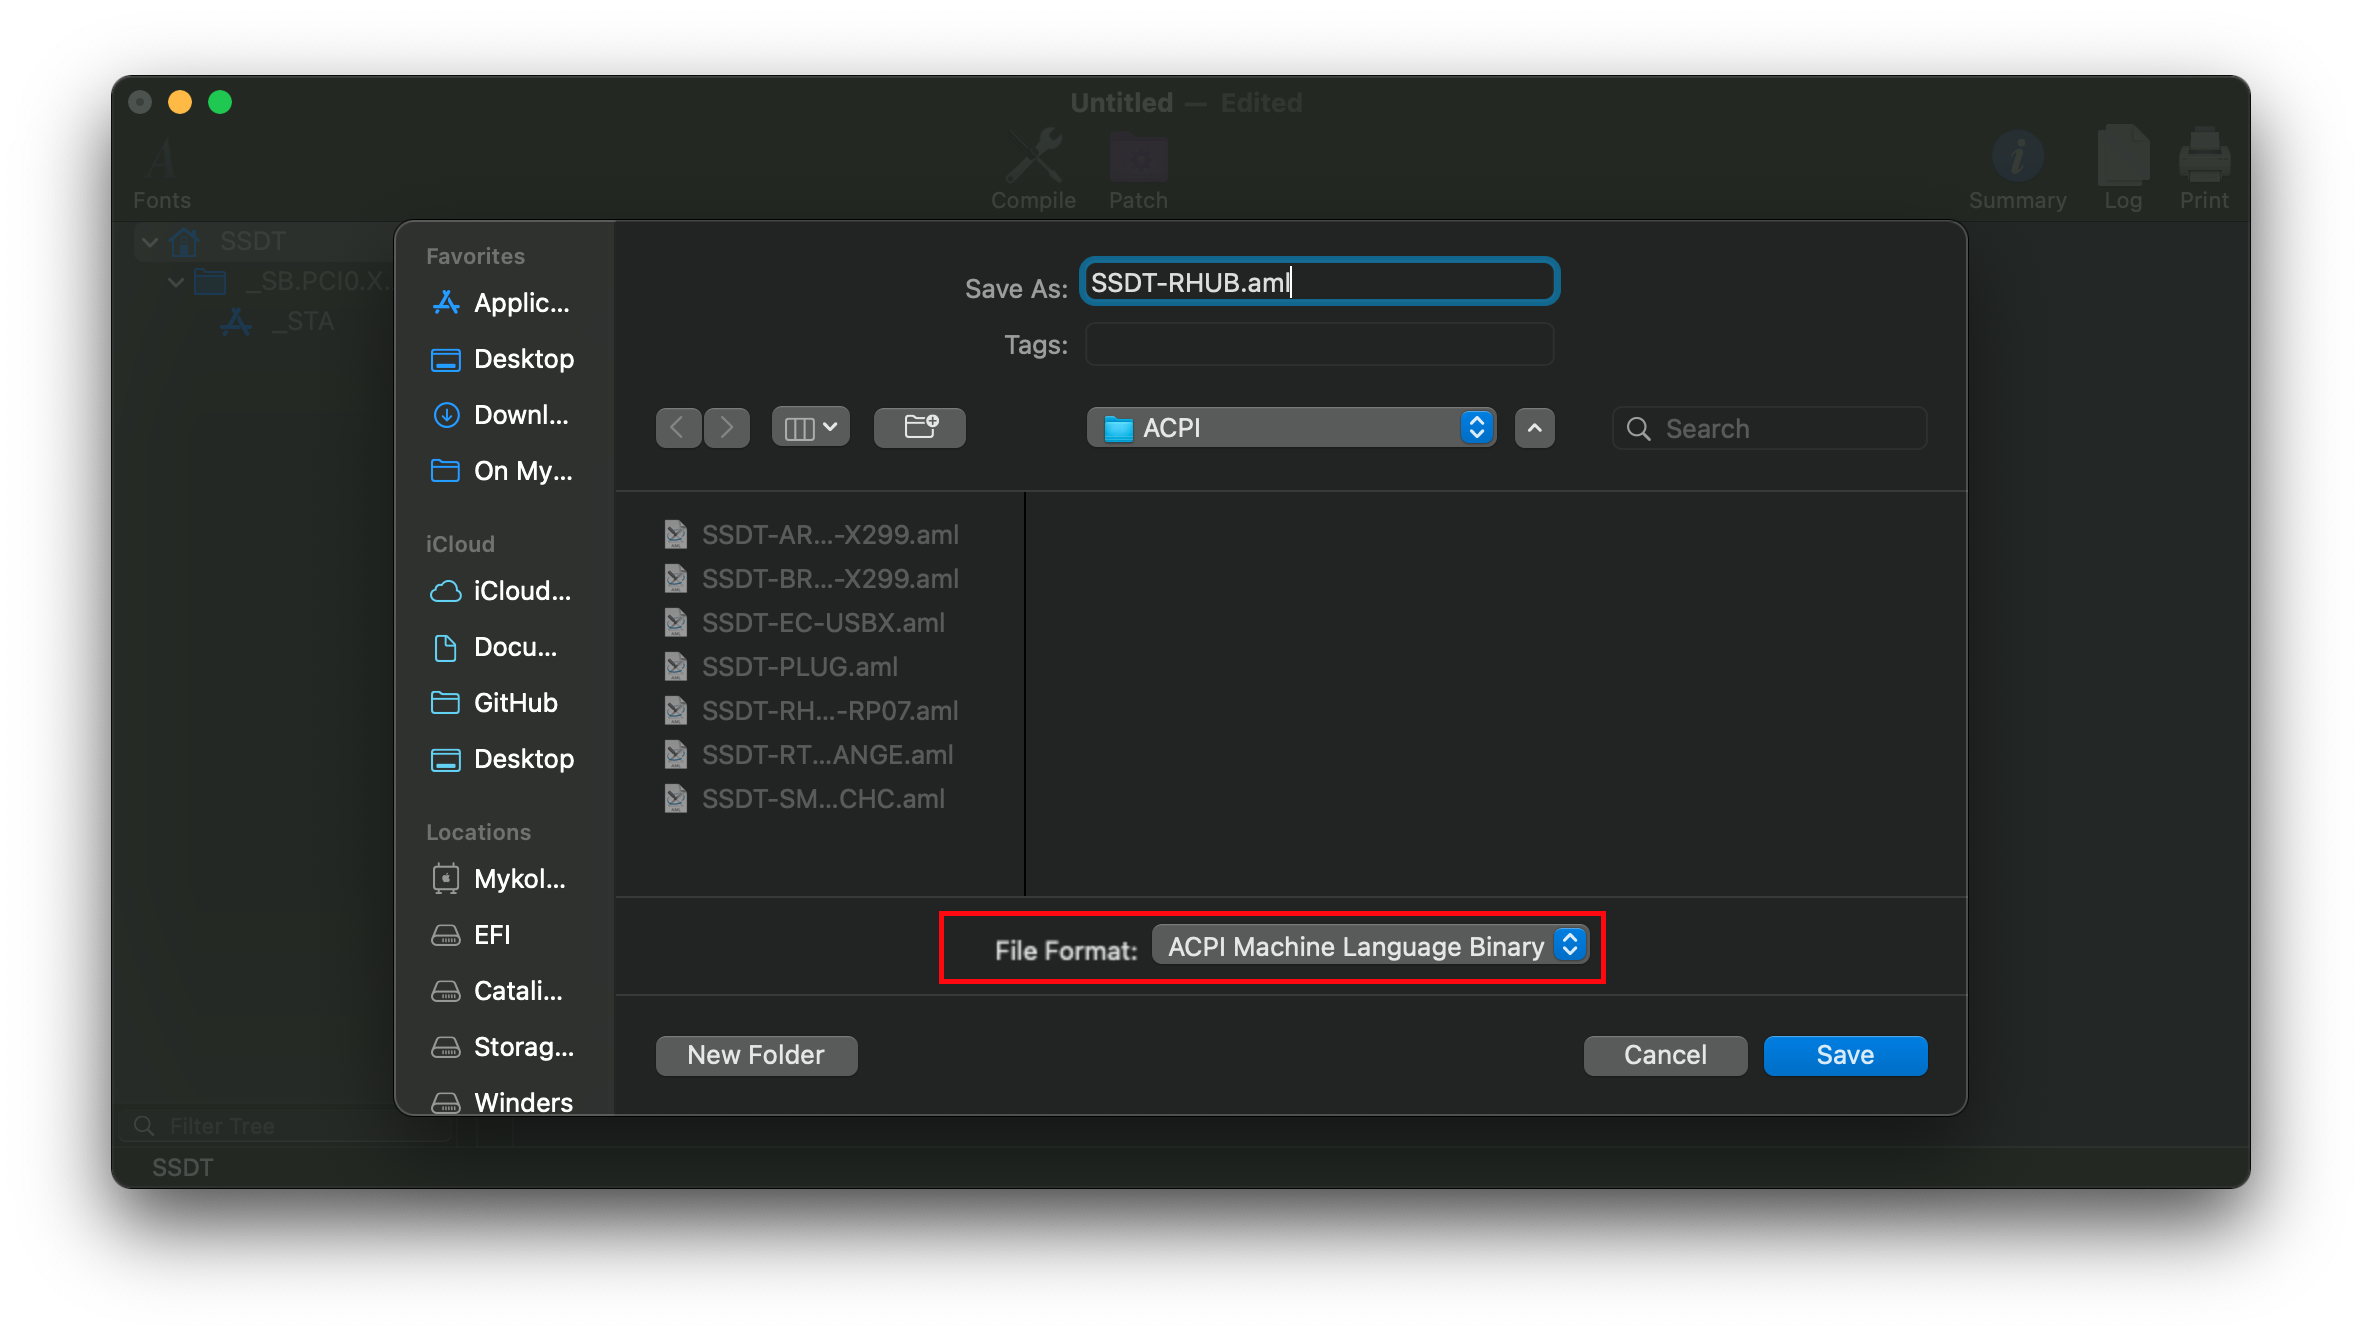
Finally, remember to add this SSDT to both EFI/OC/ACPI and your config.plist under ACPI -> Add.
# Creating our kext
Its the time you've all been waiting for, we finally get to create our USB map!
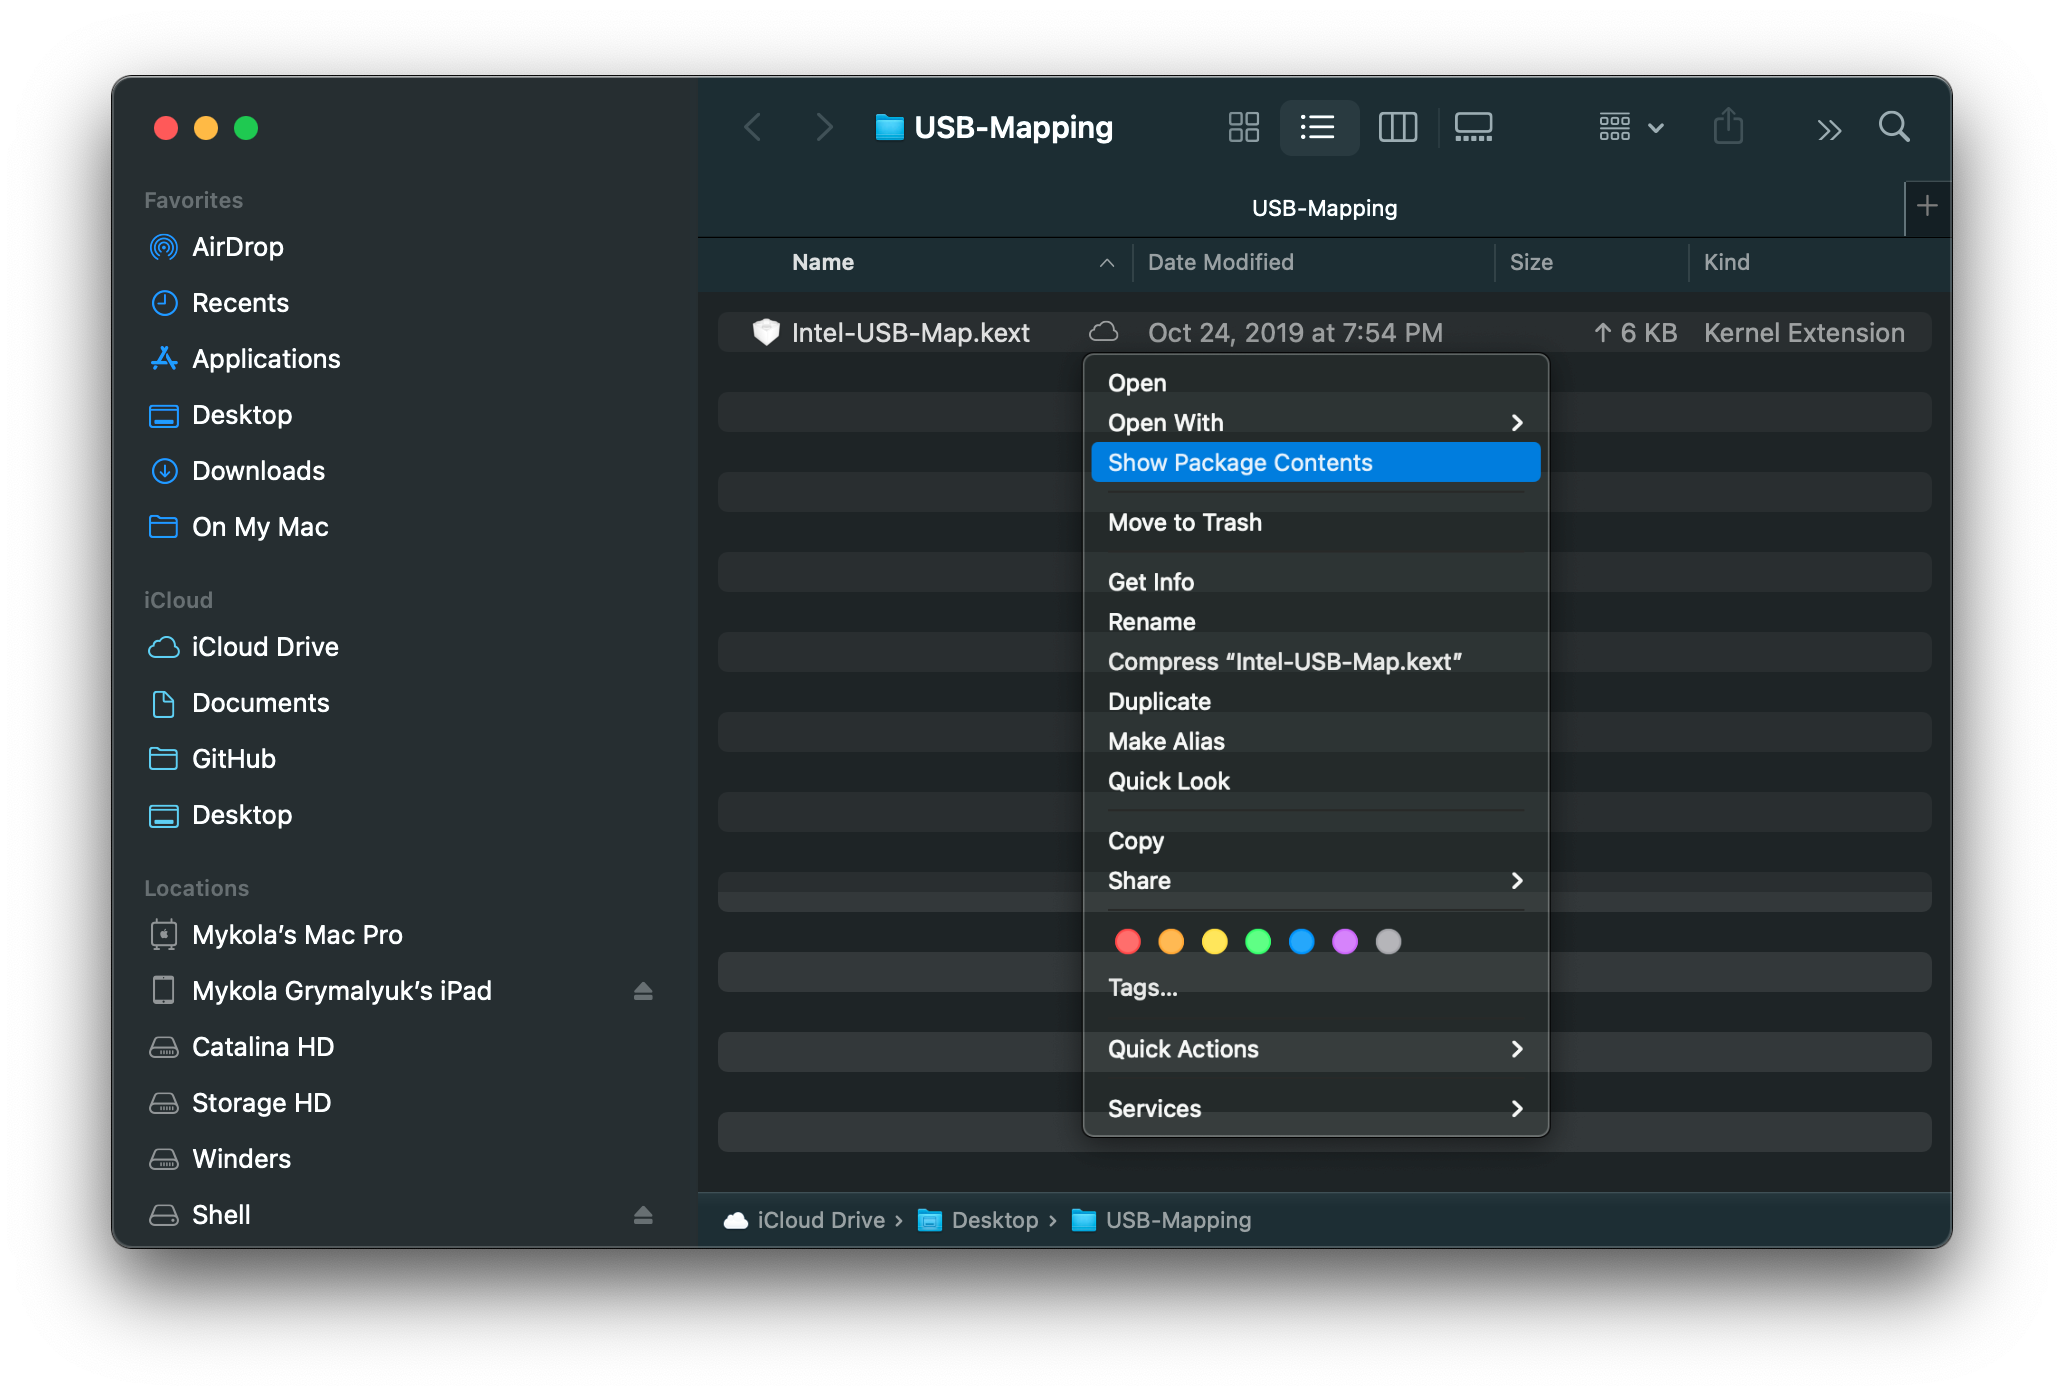
First off, we'll want to grab a sample USB map kext:
Next right click the .kext, and select Show Package Contents. then drill down to the info.plist:
| Show Contents | info.plist |
|---|---|
 |  |
Now lets open ProperTree and look at this info.plist:
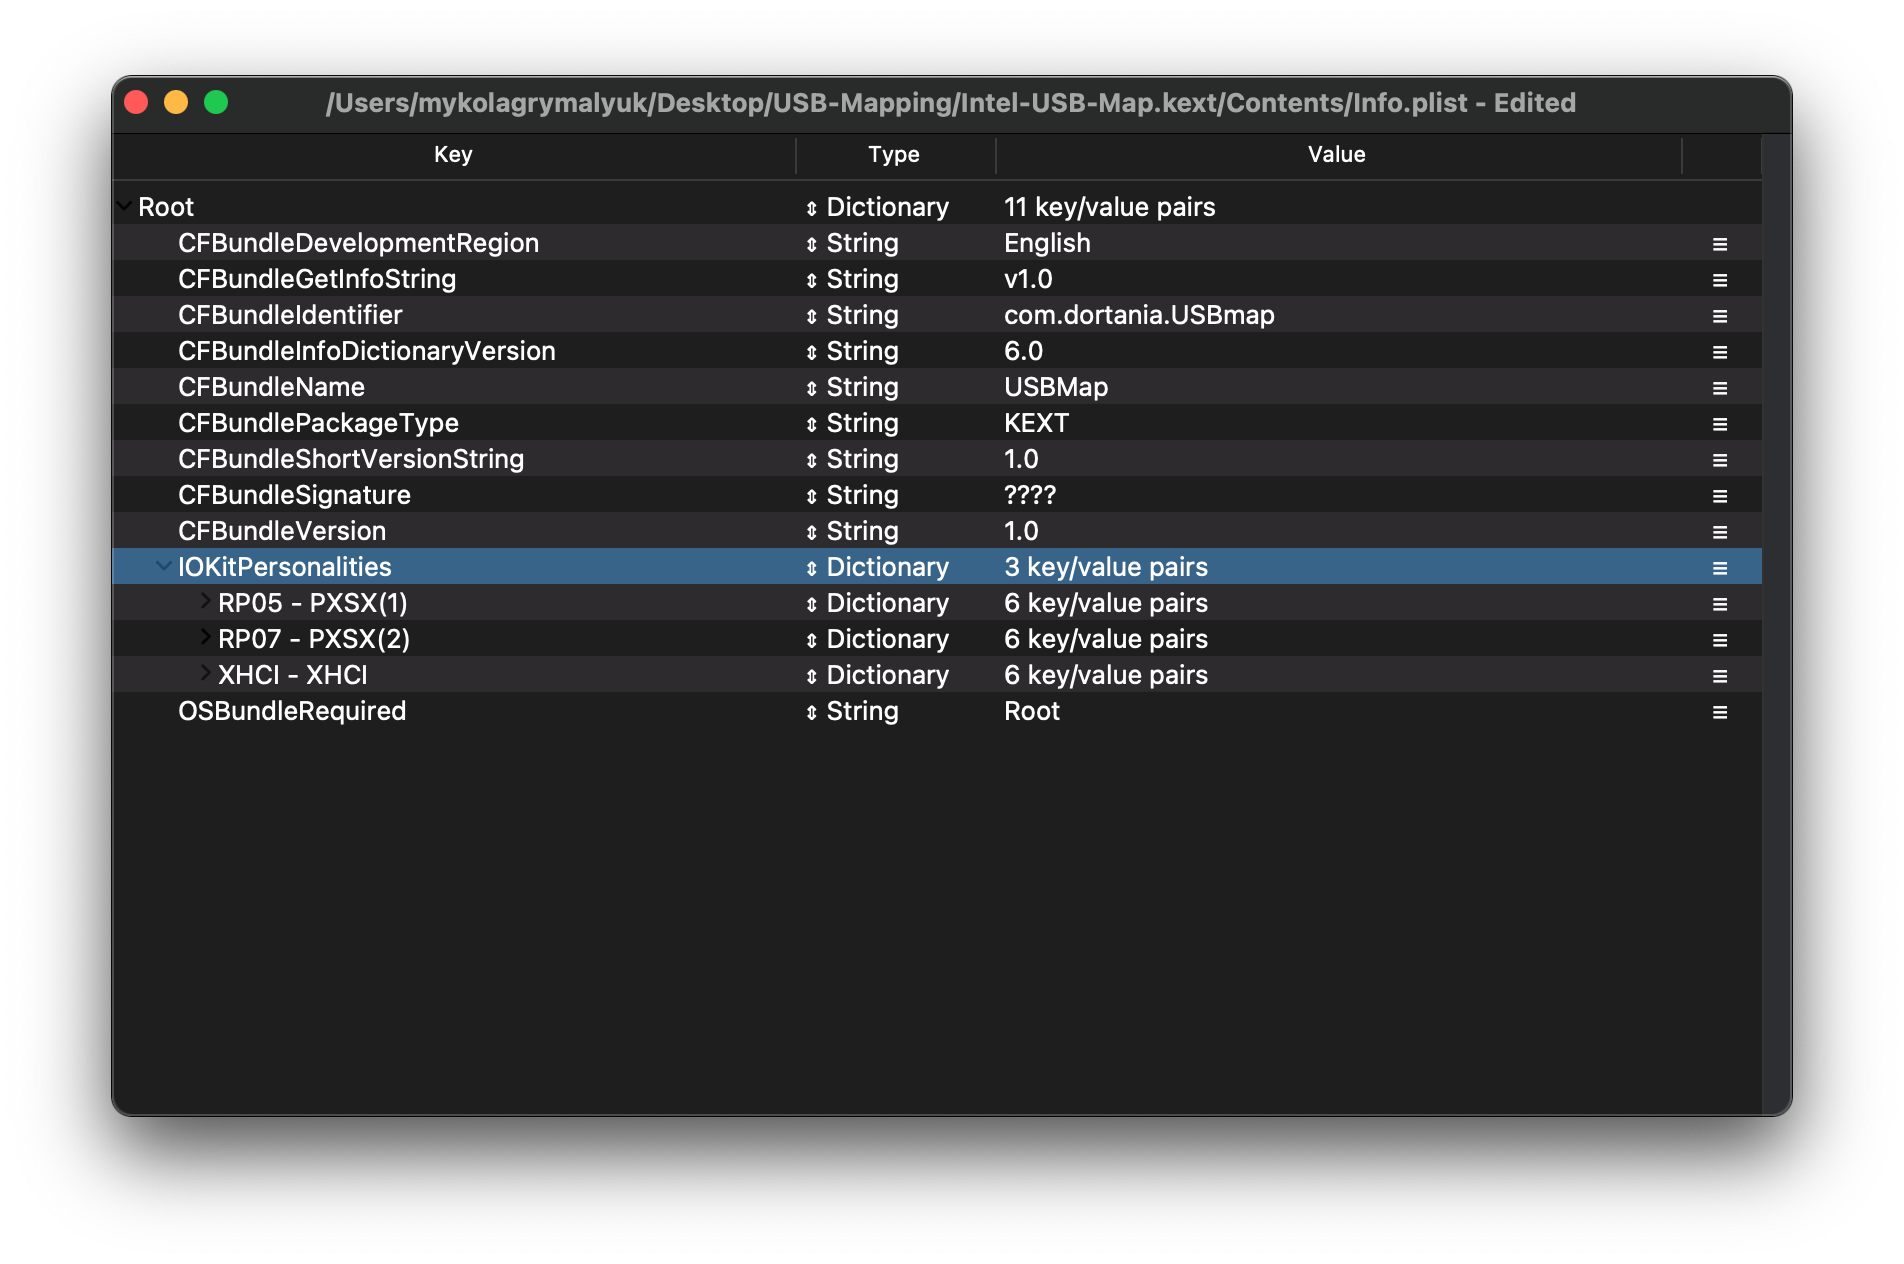
Here we see a few sections, under IOKitPersonalities:
- RP05 - PXSX(1)
- RP07 - PXSX(2)
- XHCI - XHCI
Each entry here represents a USB controller, specifically the map for each controller. The names of the entry don't matter much however, it's more for book keeping so you know which entry to has which USB map.
Next lets head into the RP05 - PXSX(1) entry:
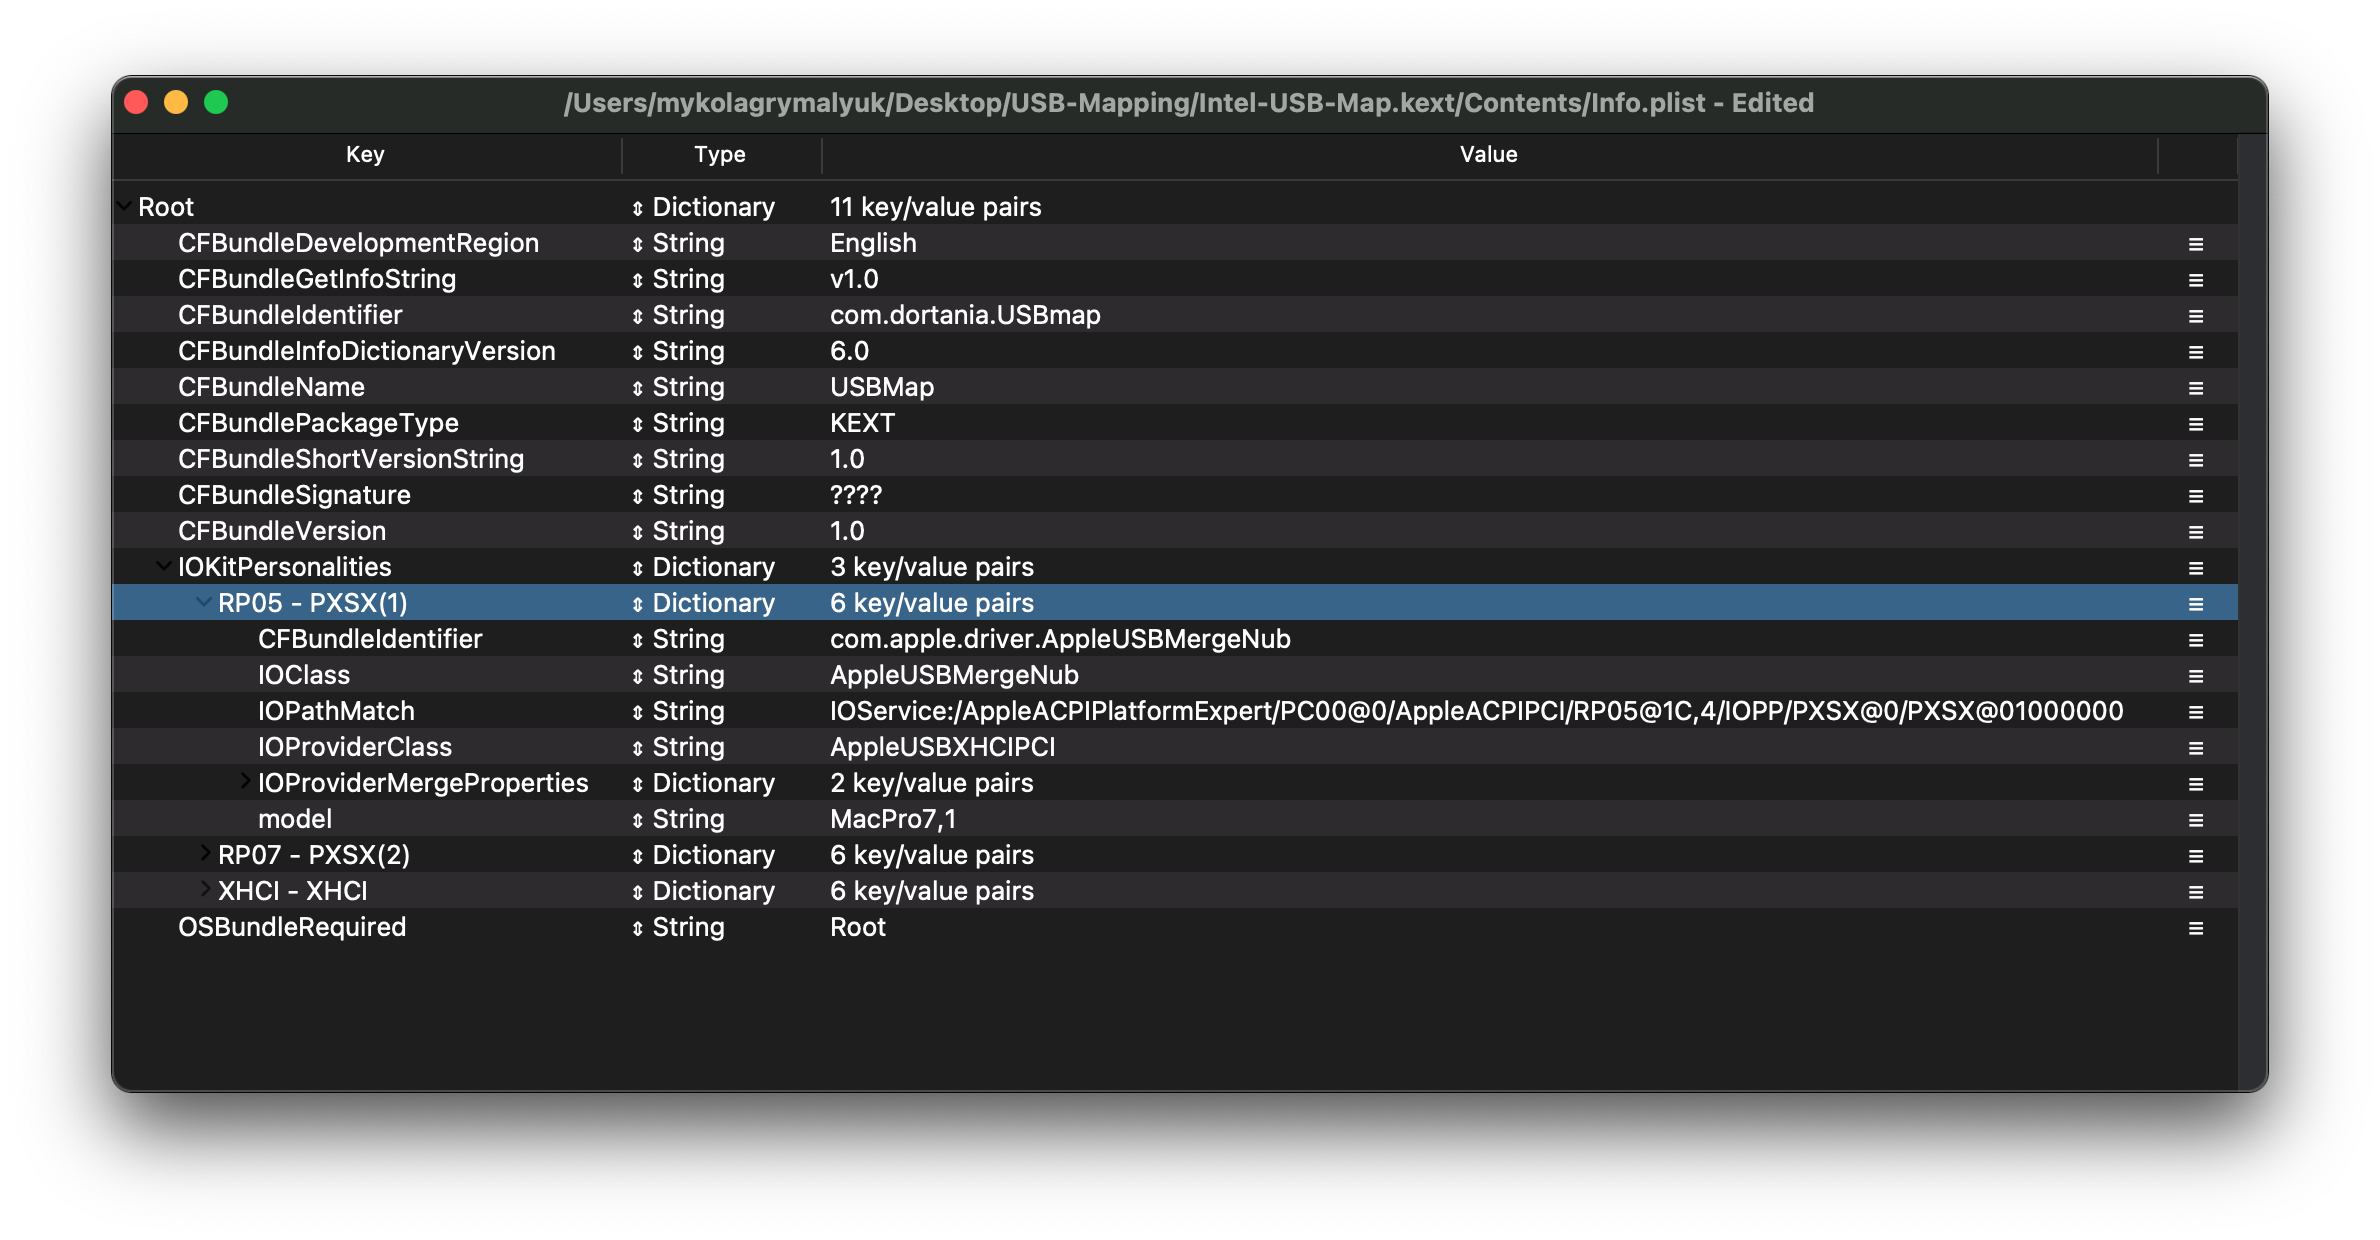
Here we see a few more important properties:
| Property | Comment |
|---|---|
| IOPathMatch | The device macOS will choose to attach the map to |
| IOProviderClass | The USB driver macOS will choose to attach |
| model | The SMBIOS the USB map attaches too |
| IOProviderMergeProperties | The dictionary holding the actual port map |
# Determining the properties
Determining the value for each property is actually quite straight forward:
# IOPathMatch
Finding IOPathMatch is super easy, first find the USB controller you want to map and then select the Root HUB(so the PXSX child with the same name as the parent, don't worry it's less confusing when you look at the image):
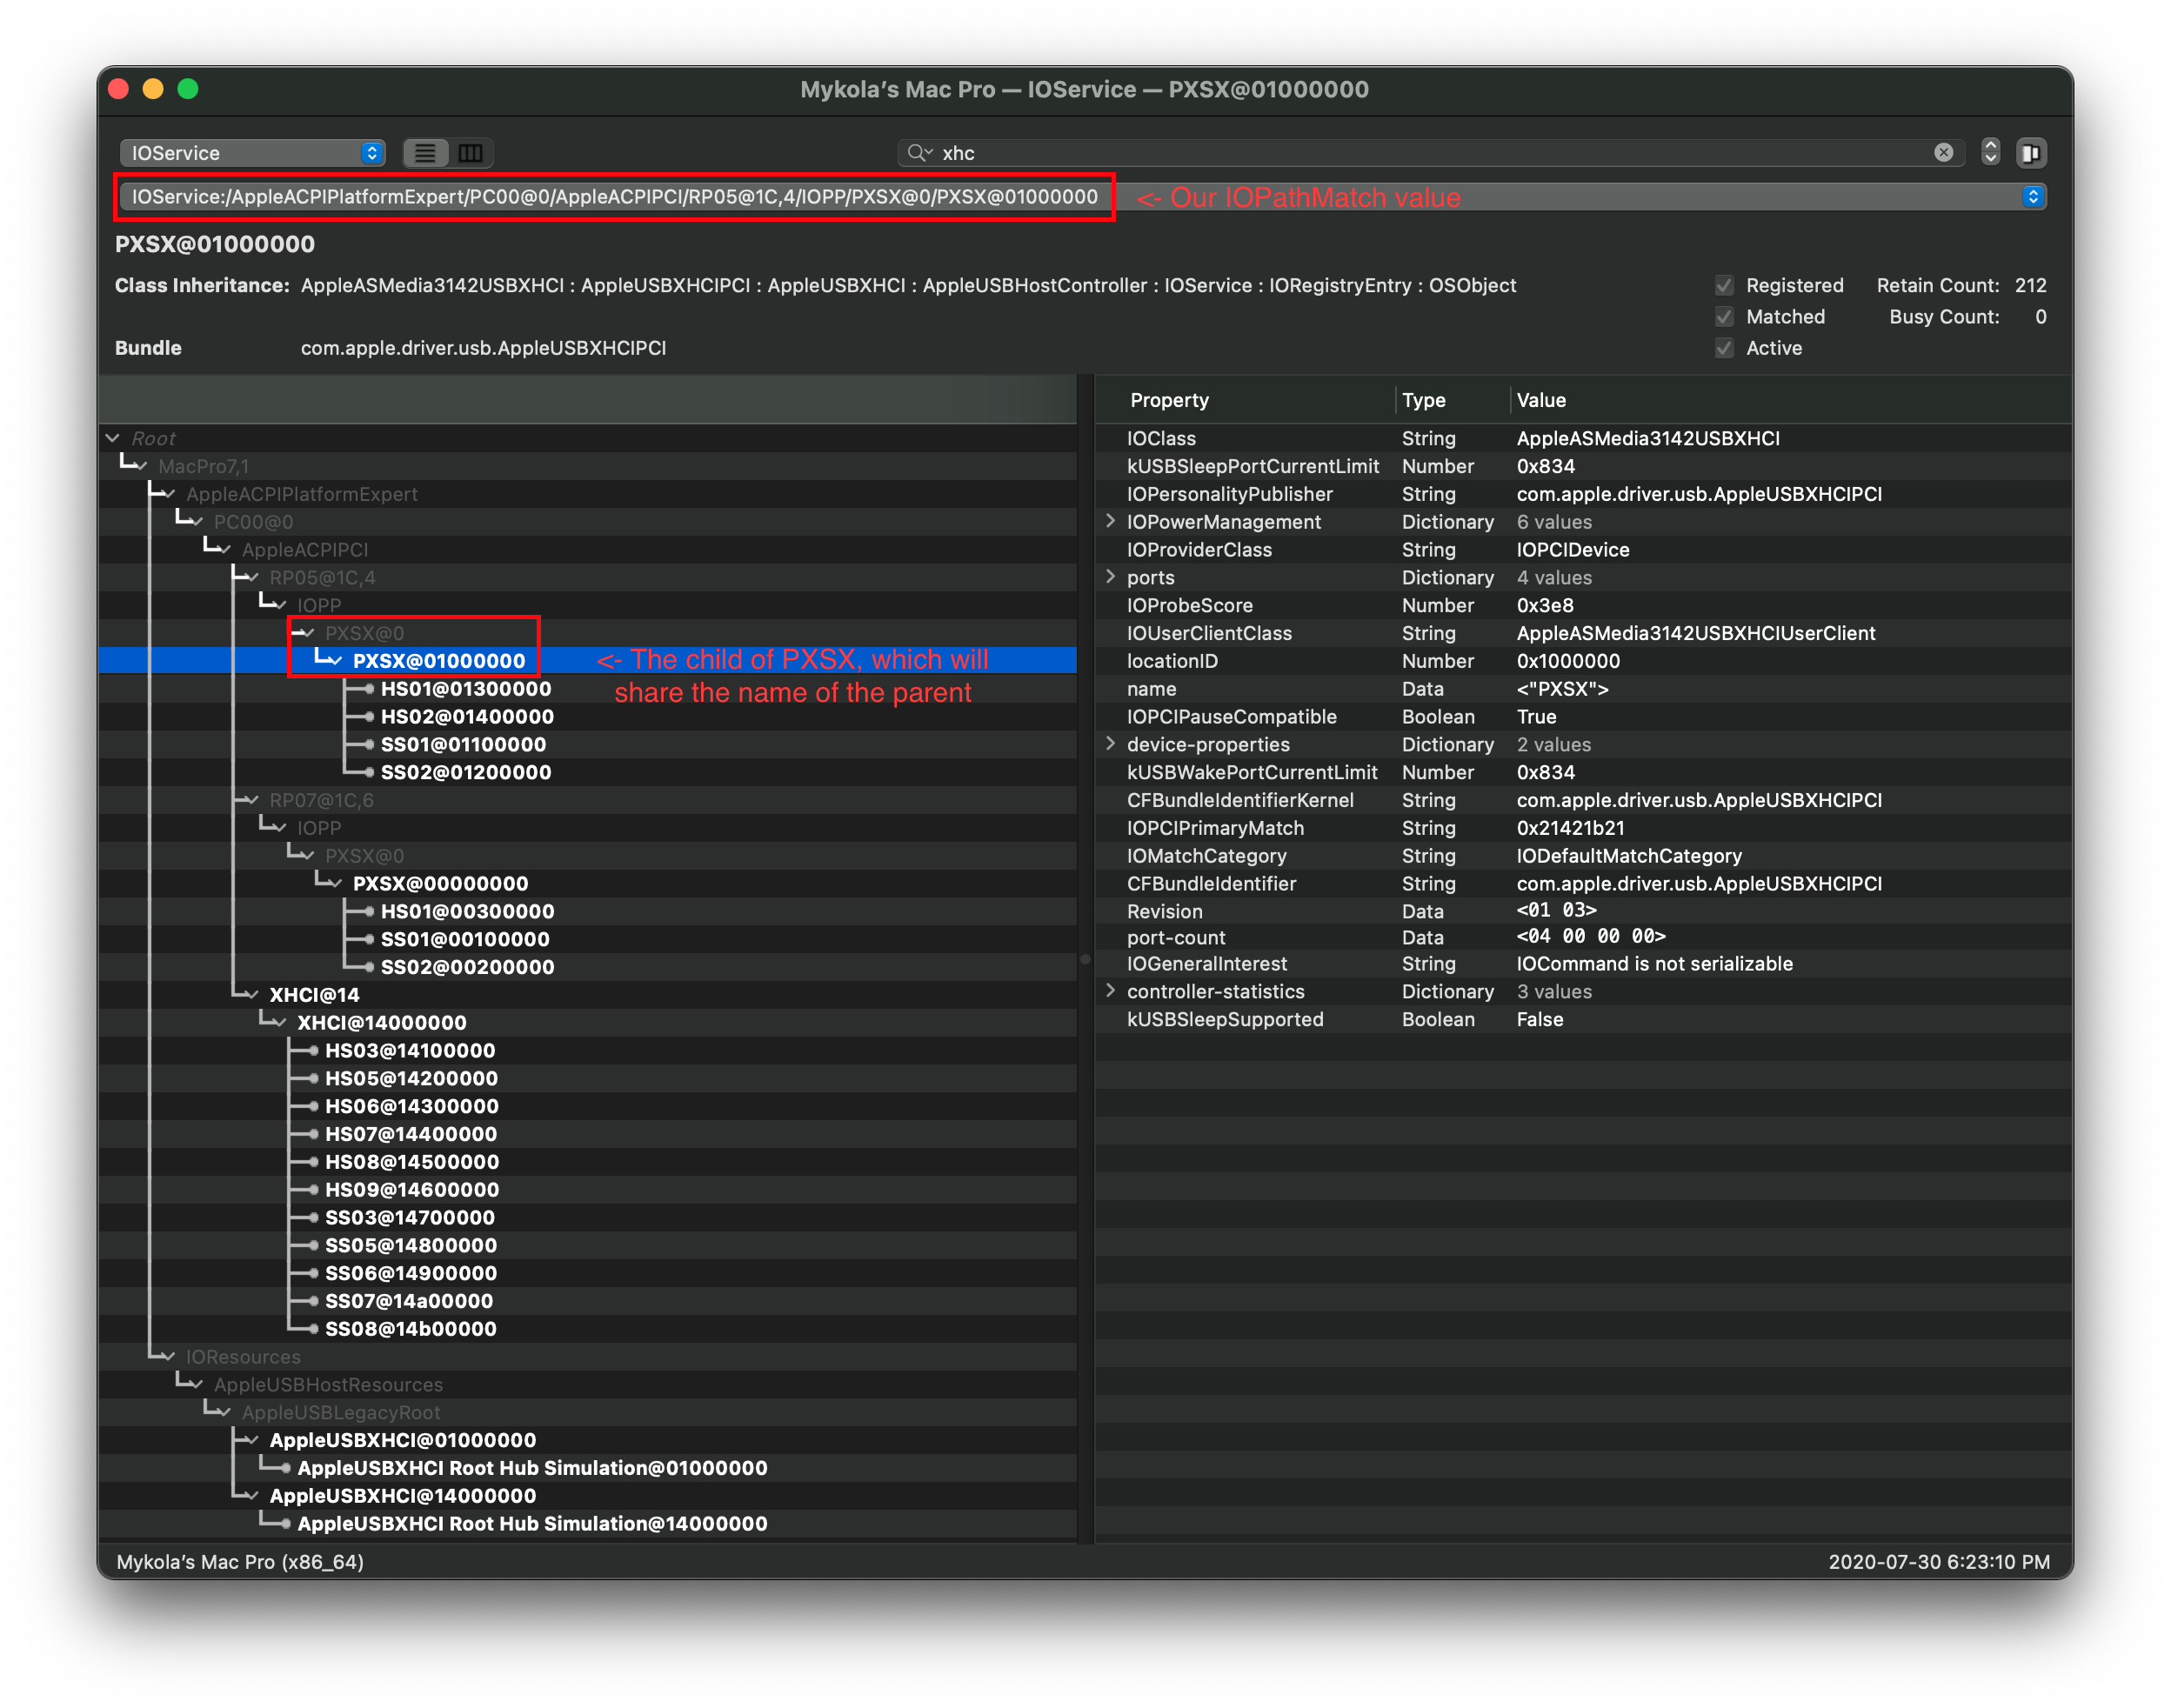
Now with the PXSX entry selected, simply copy(Cmd+C) and paste it into our info.plist. Your property should look similar to the below:
IOService:/AppleACPIPlatformExpert/PC00@0/AppleACPIPCI/RP05@1C,4/IOPP/PXSX@0/PXSX@01000000
Note: Each USB Controller will have a unique IOPathMatch value, keep this in mind if you have multiple controllers of the same name. This Asus X299 board has 2 PXSX USB controllers, so each new USB map dictionary will have a unique entry for IOPathMatch.
# IOProviderClass
Finding IOProviderClass is also easy, select the Root-hub once again and look for the CFBundleIdentifier value:
| IOReg | info.plist |
|---|---|
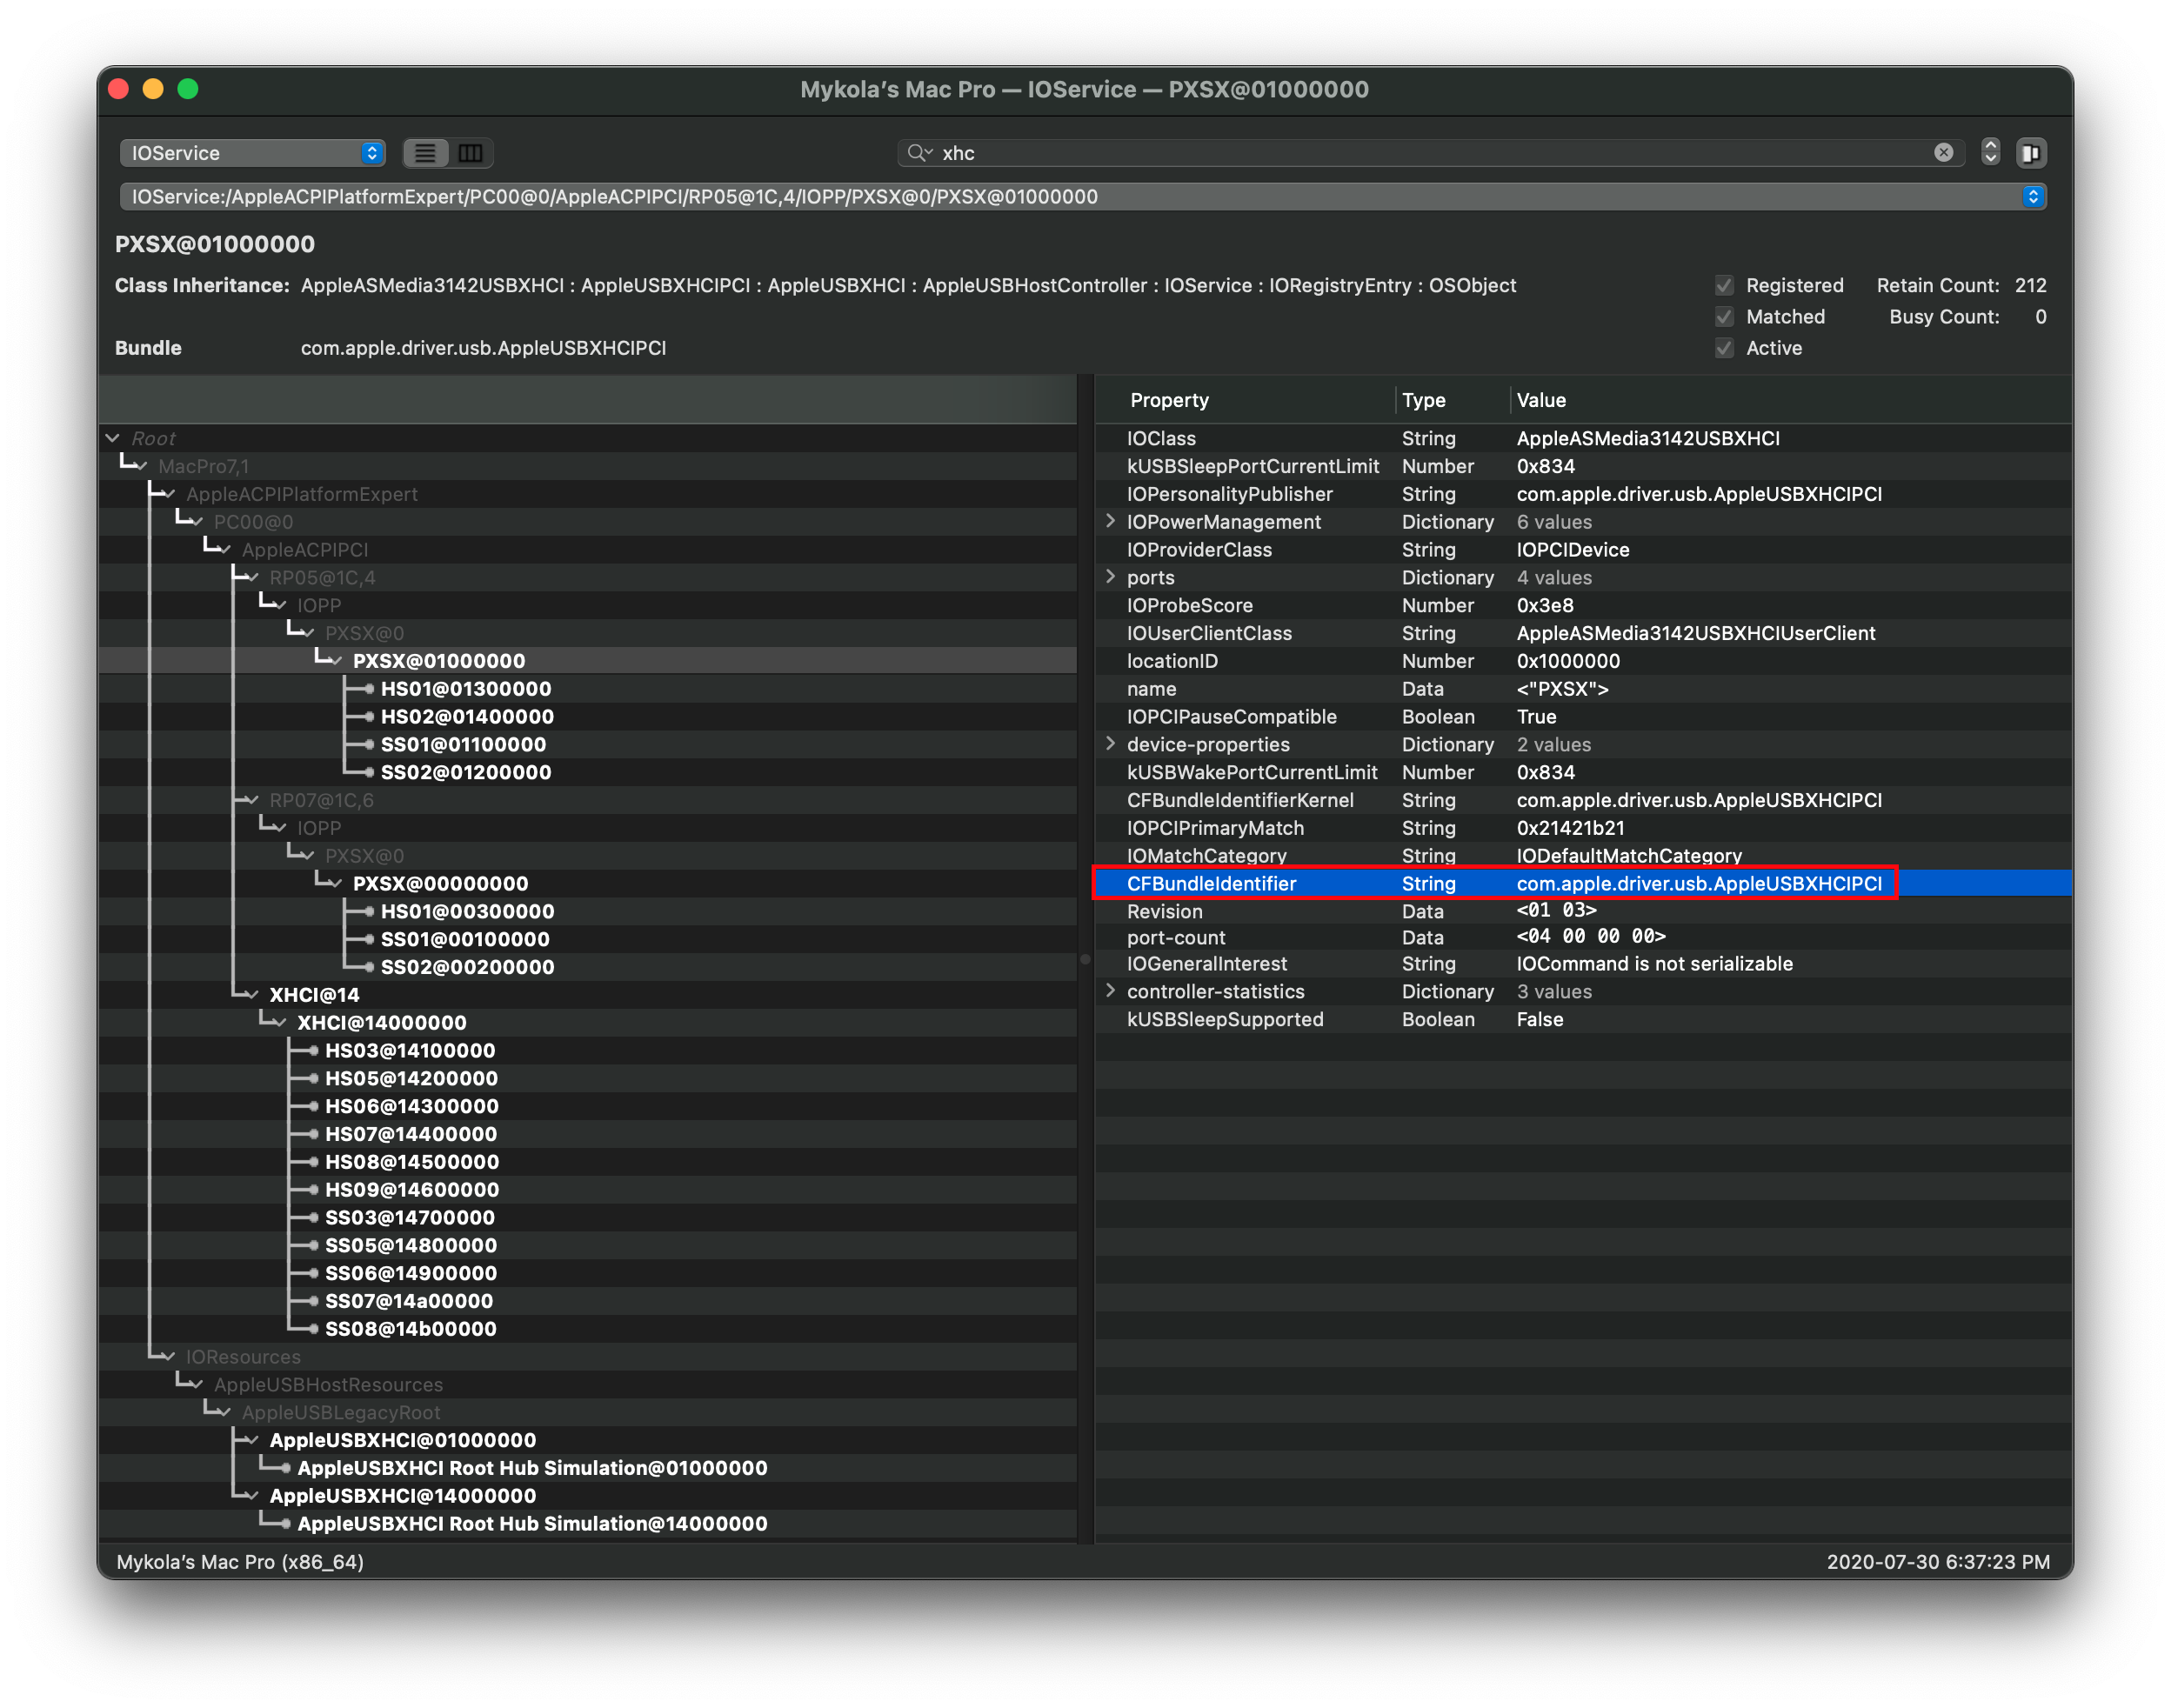 | 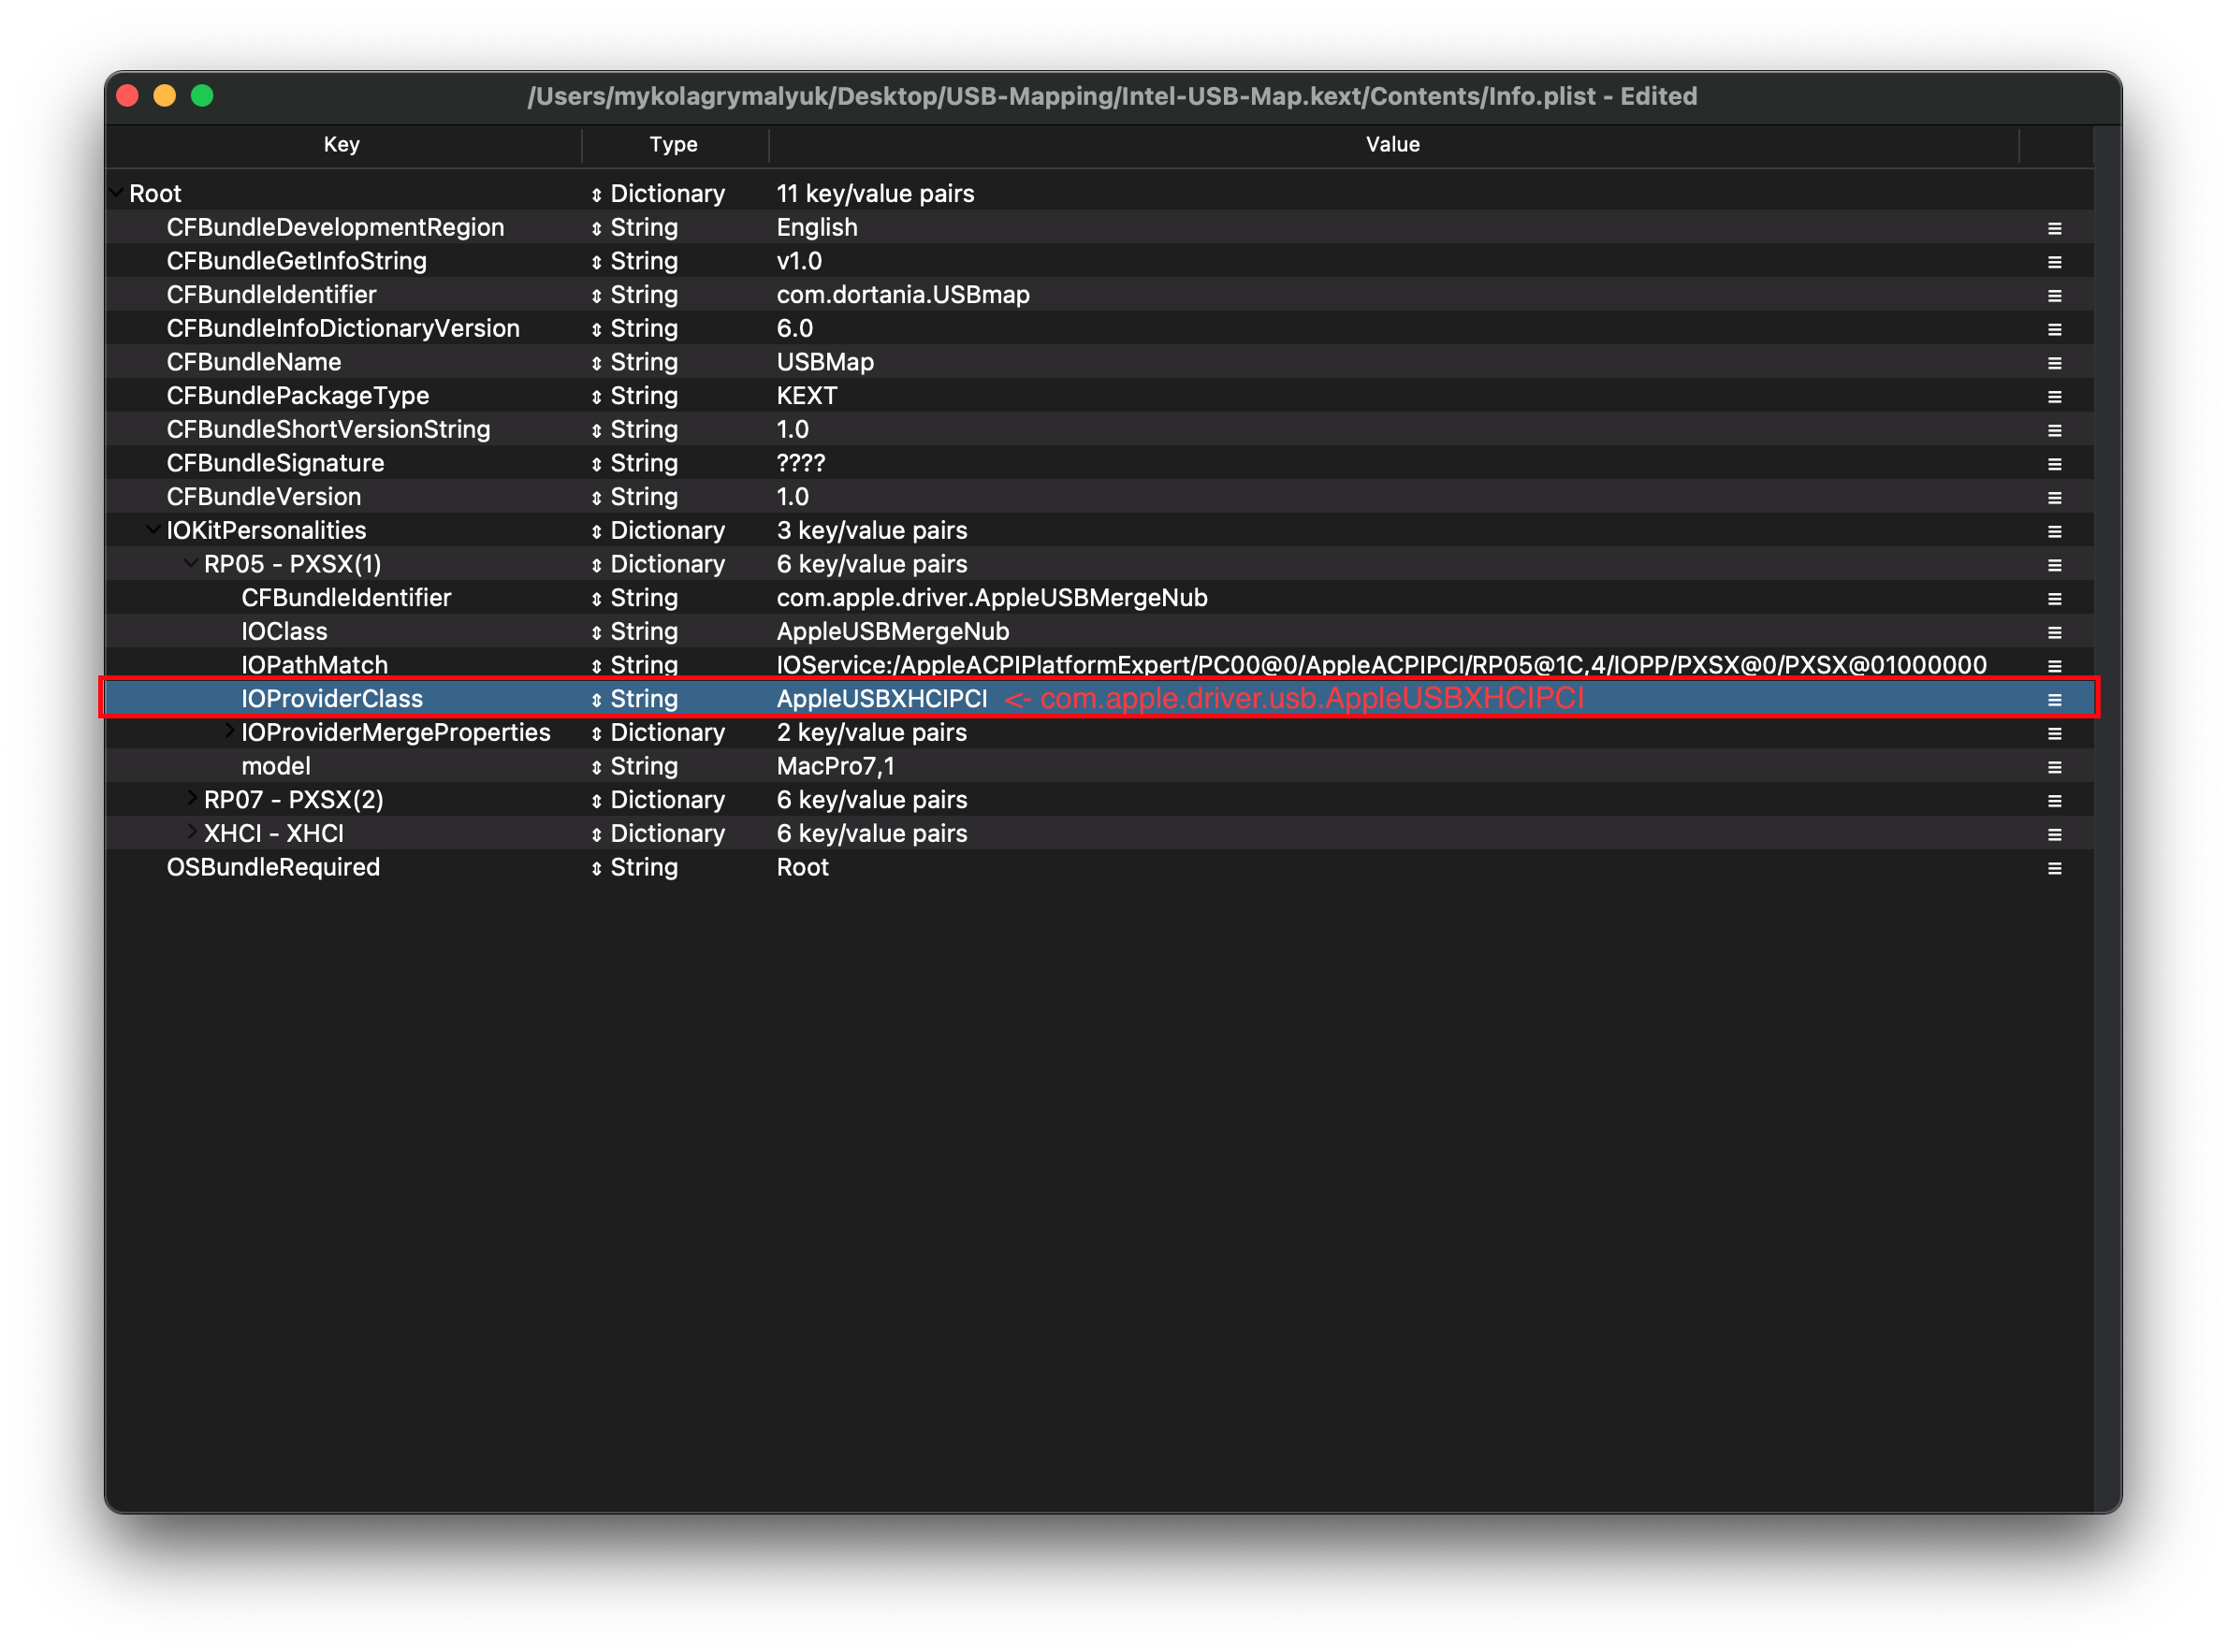 |
Now we can't take that value 1-1, instead we need to trim it to the Kext's short name being AppleUSBXHCIPCI(So we removed com.apple.driver.usb.)
# model
If you've forgotten what SMBIOS you're using, you can simply check the top level device in IOReg:
| IOReg | info.plist |
|---|---|
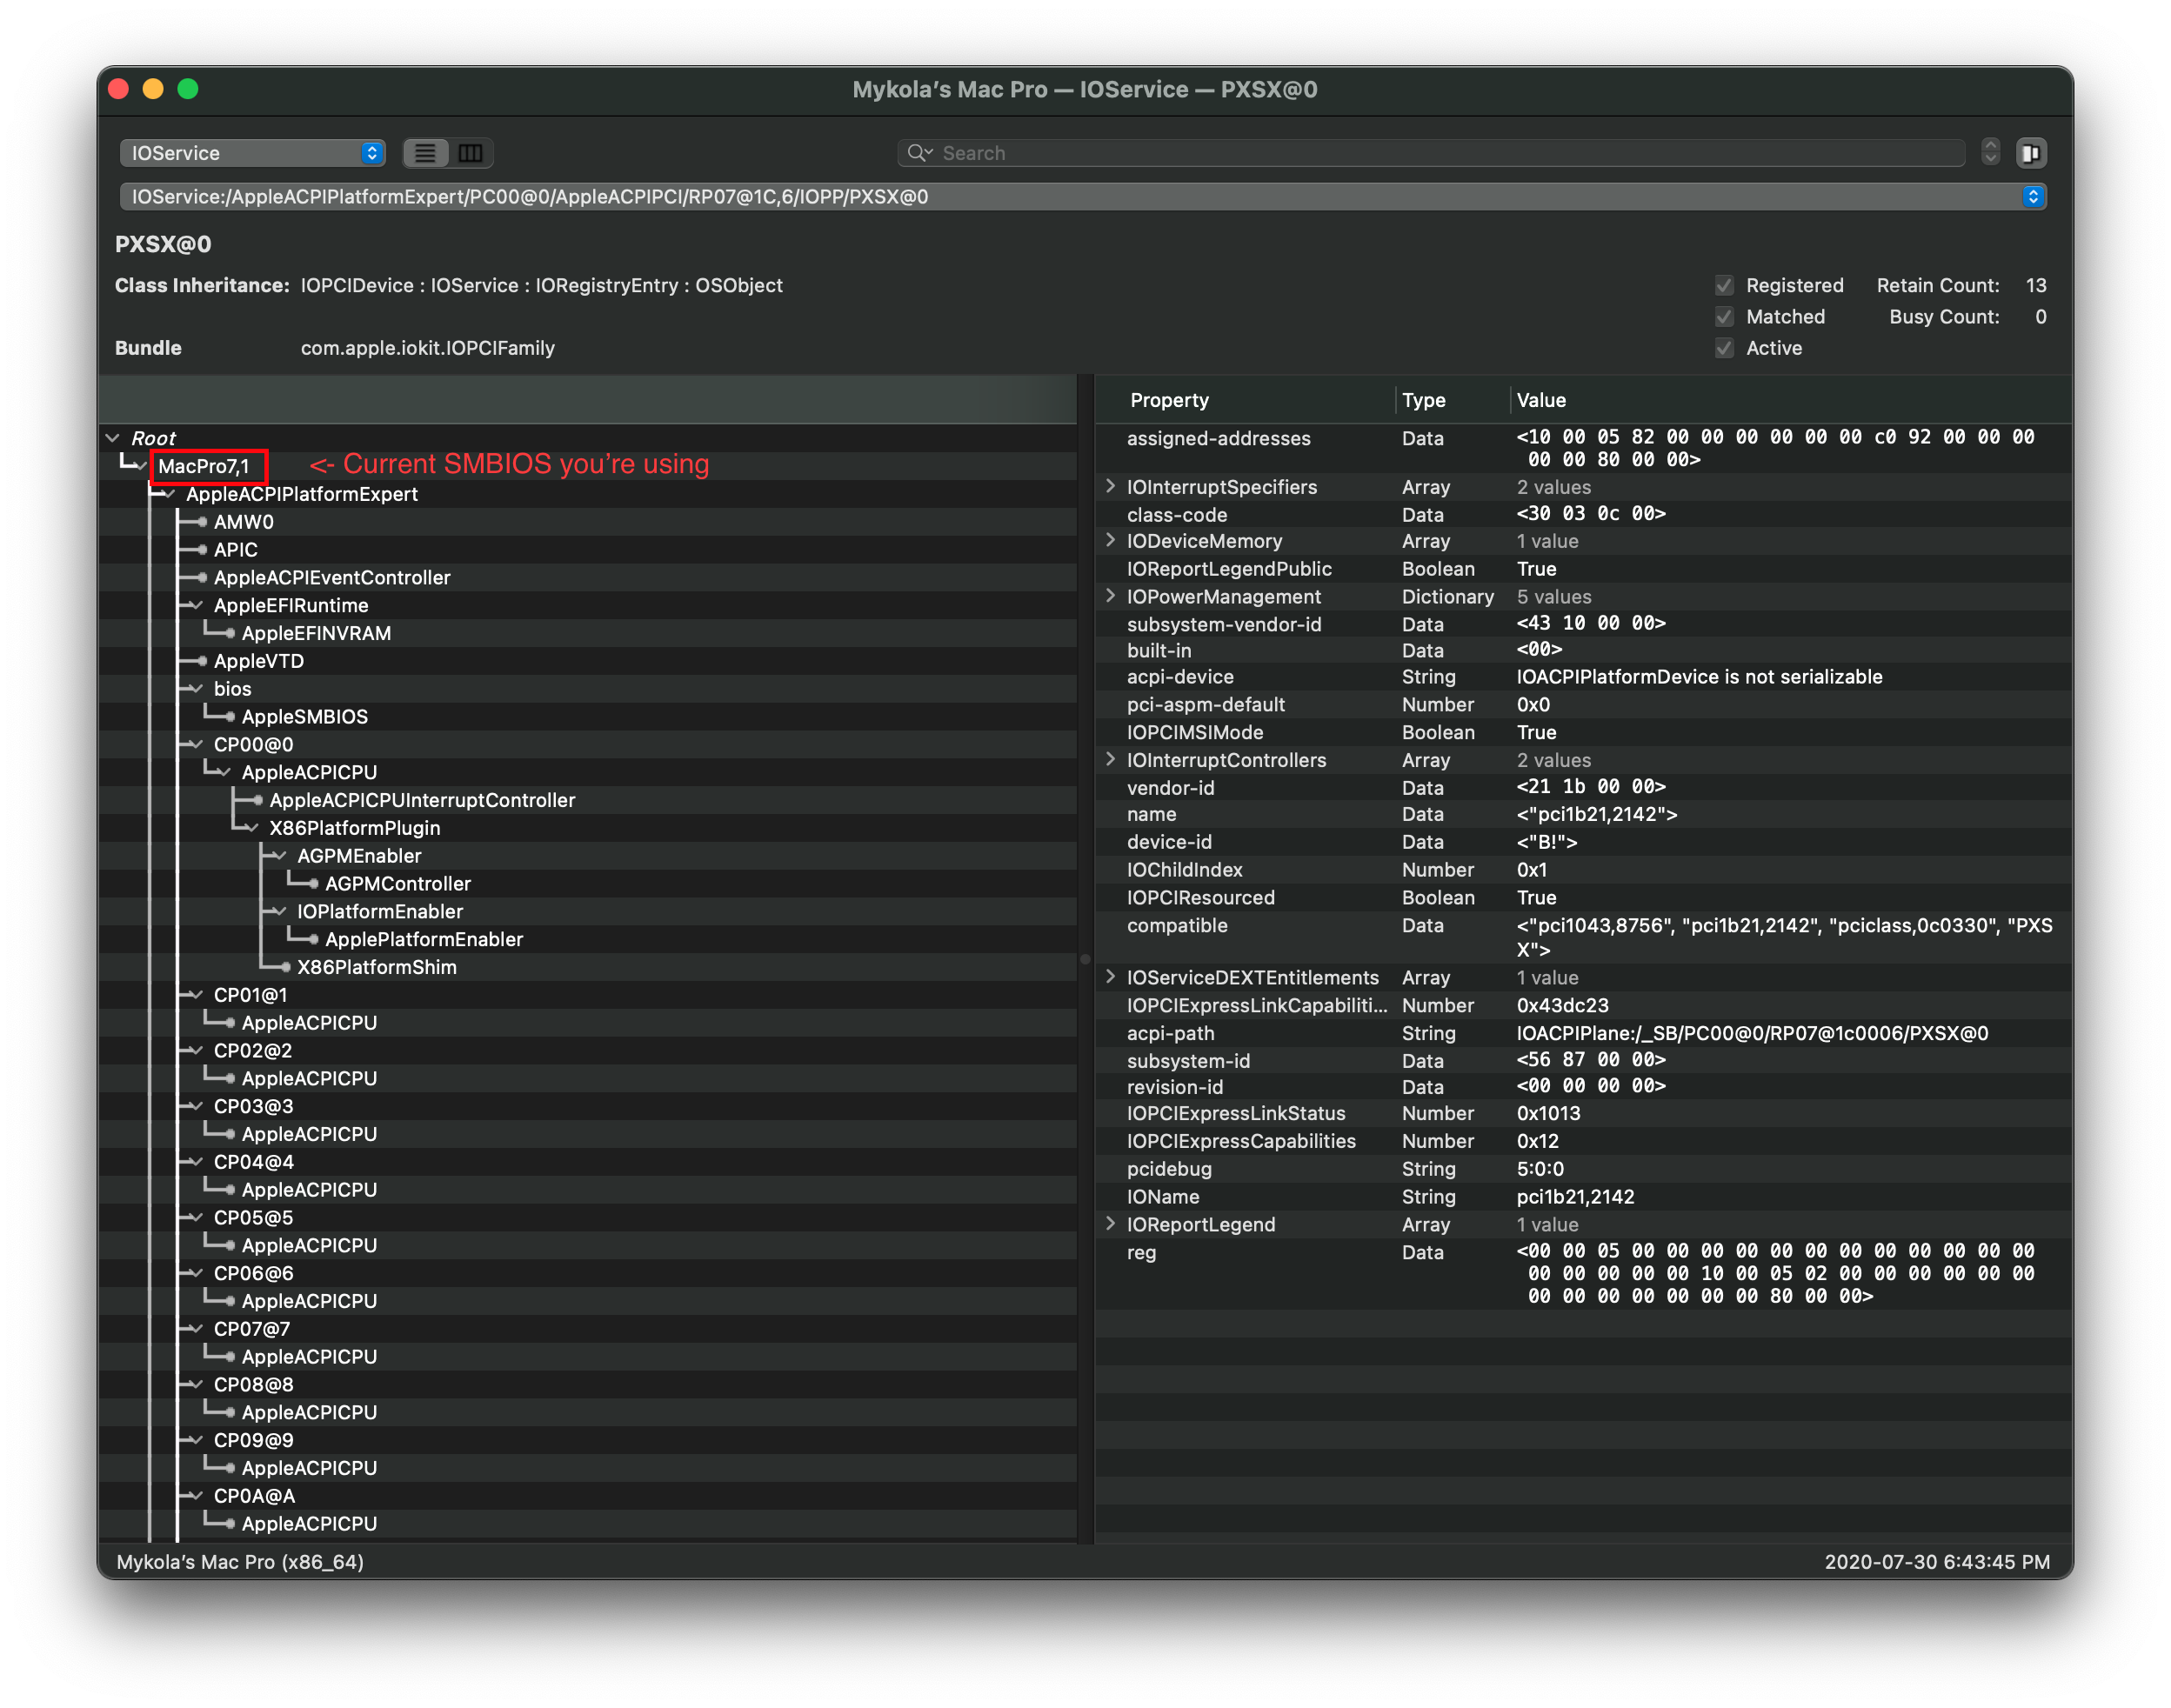 | 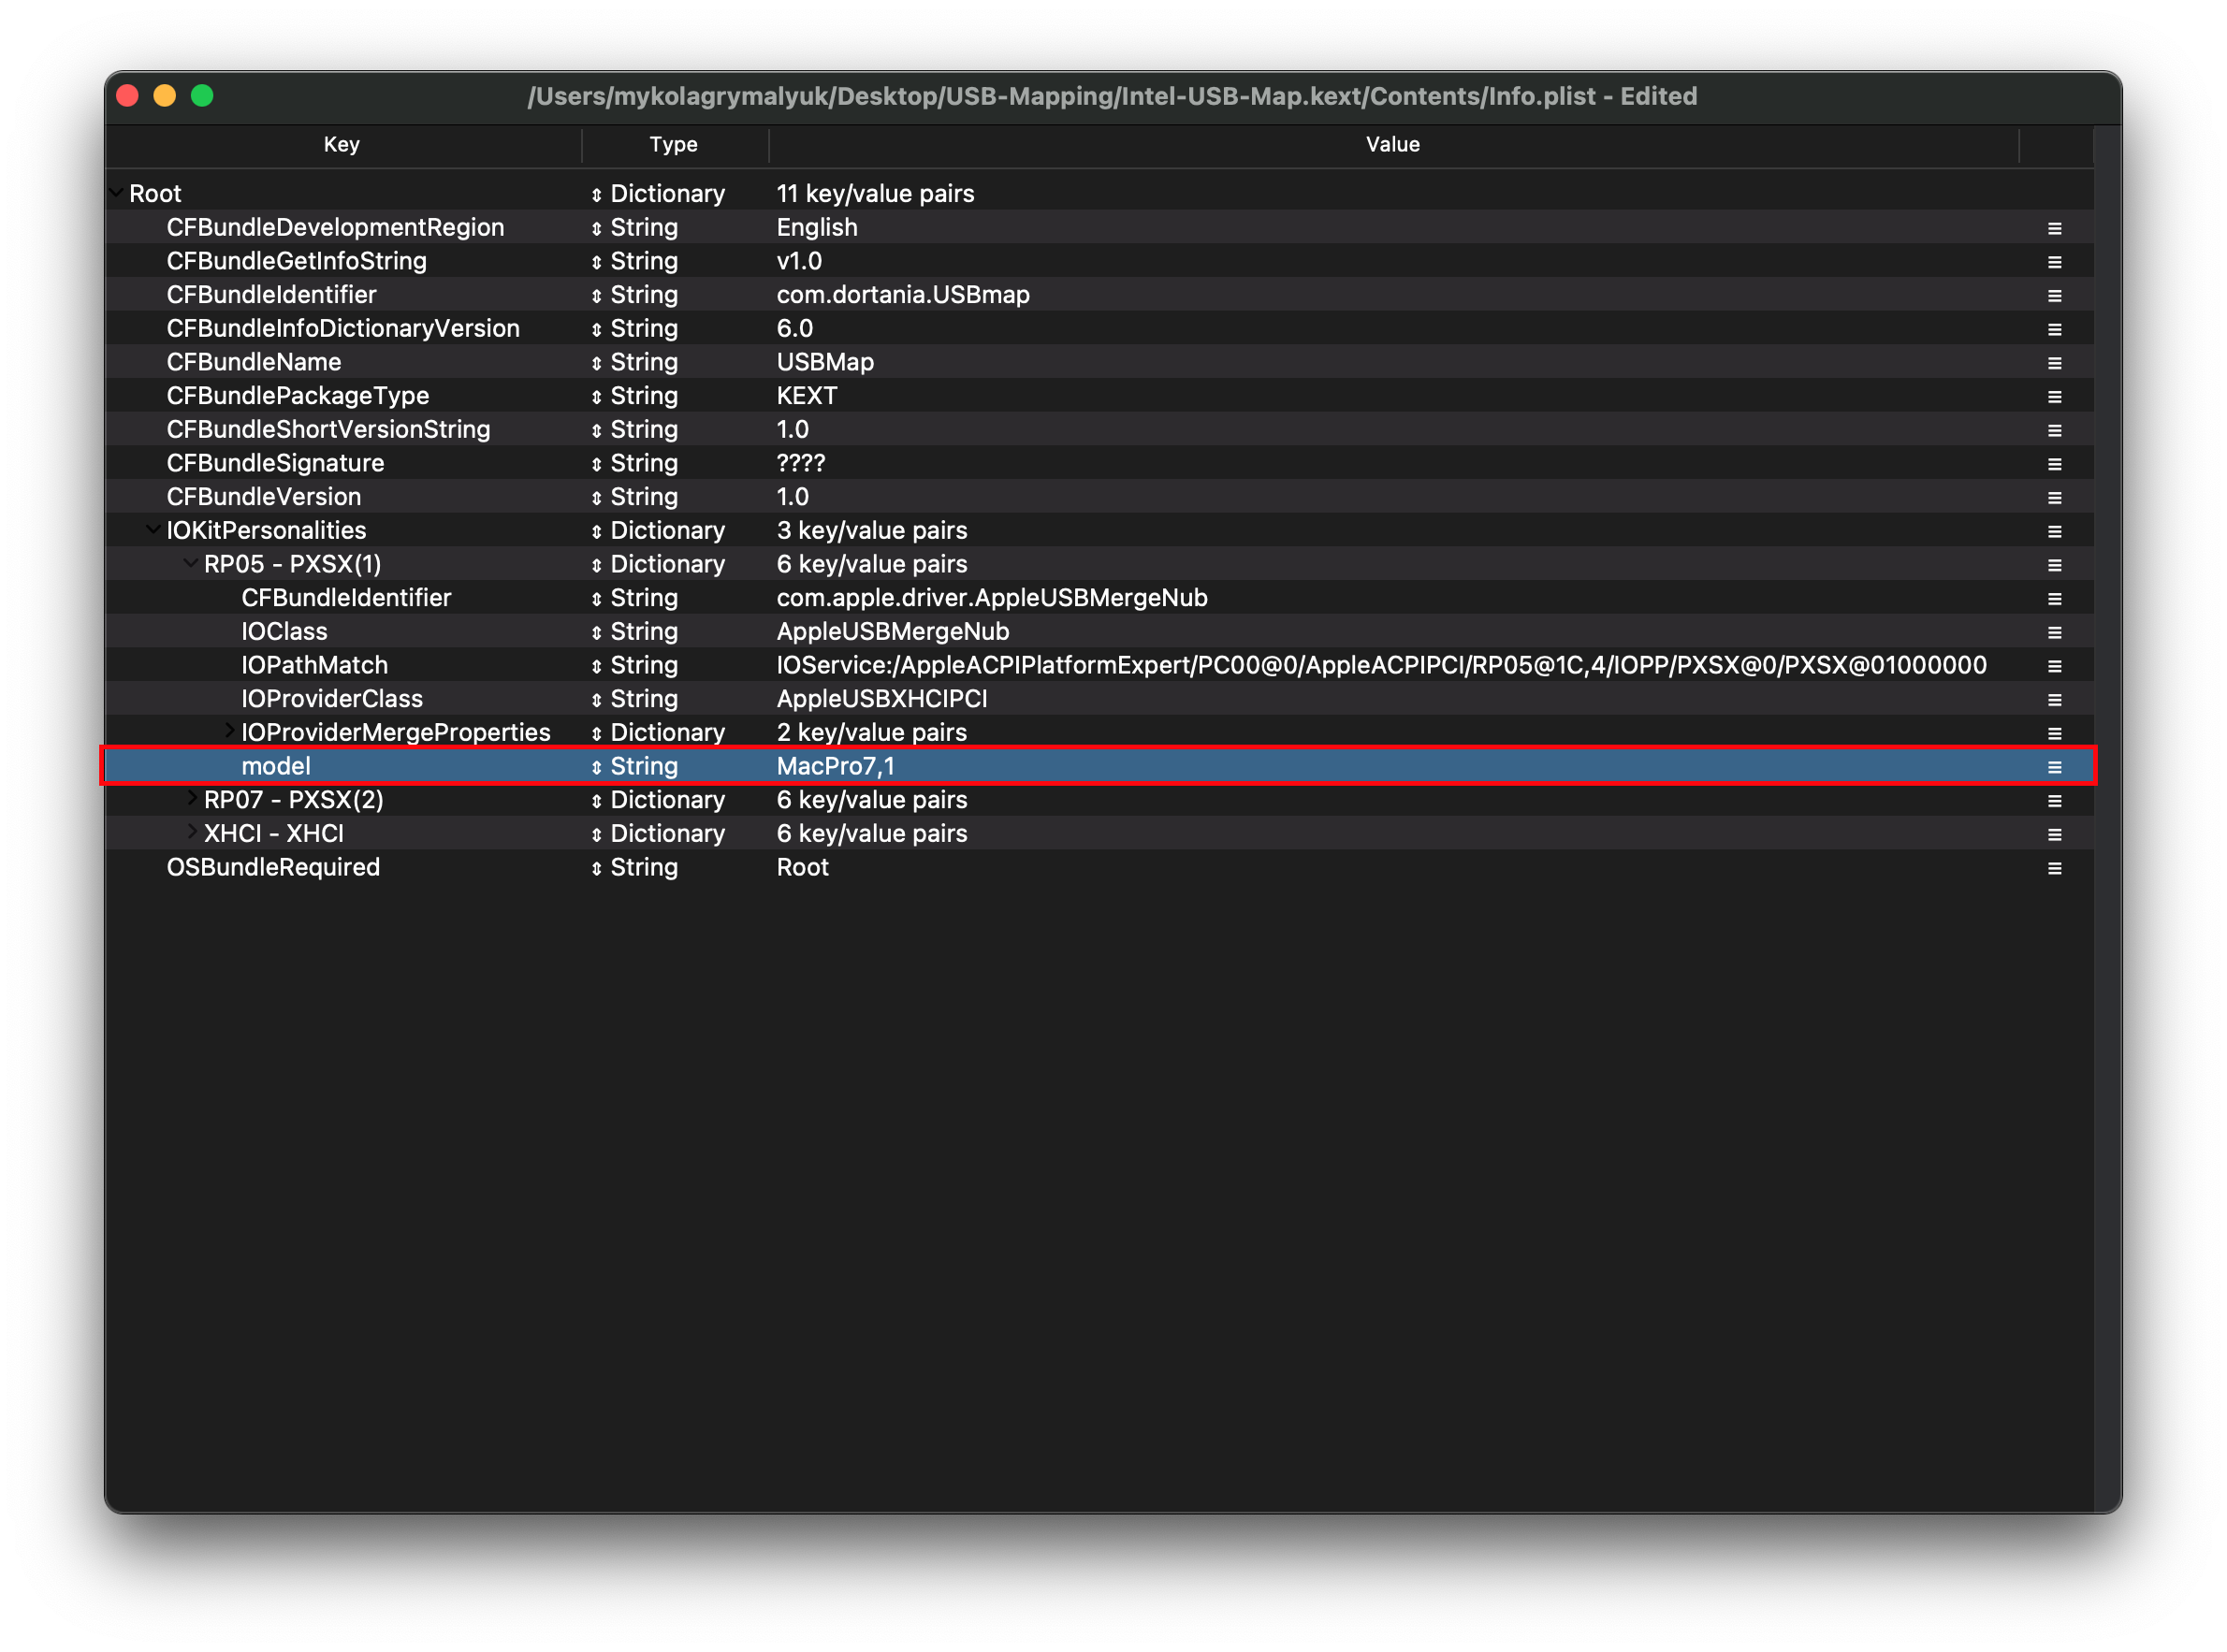 |
# IOProviderMergeProperties
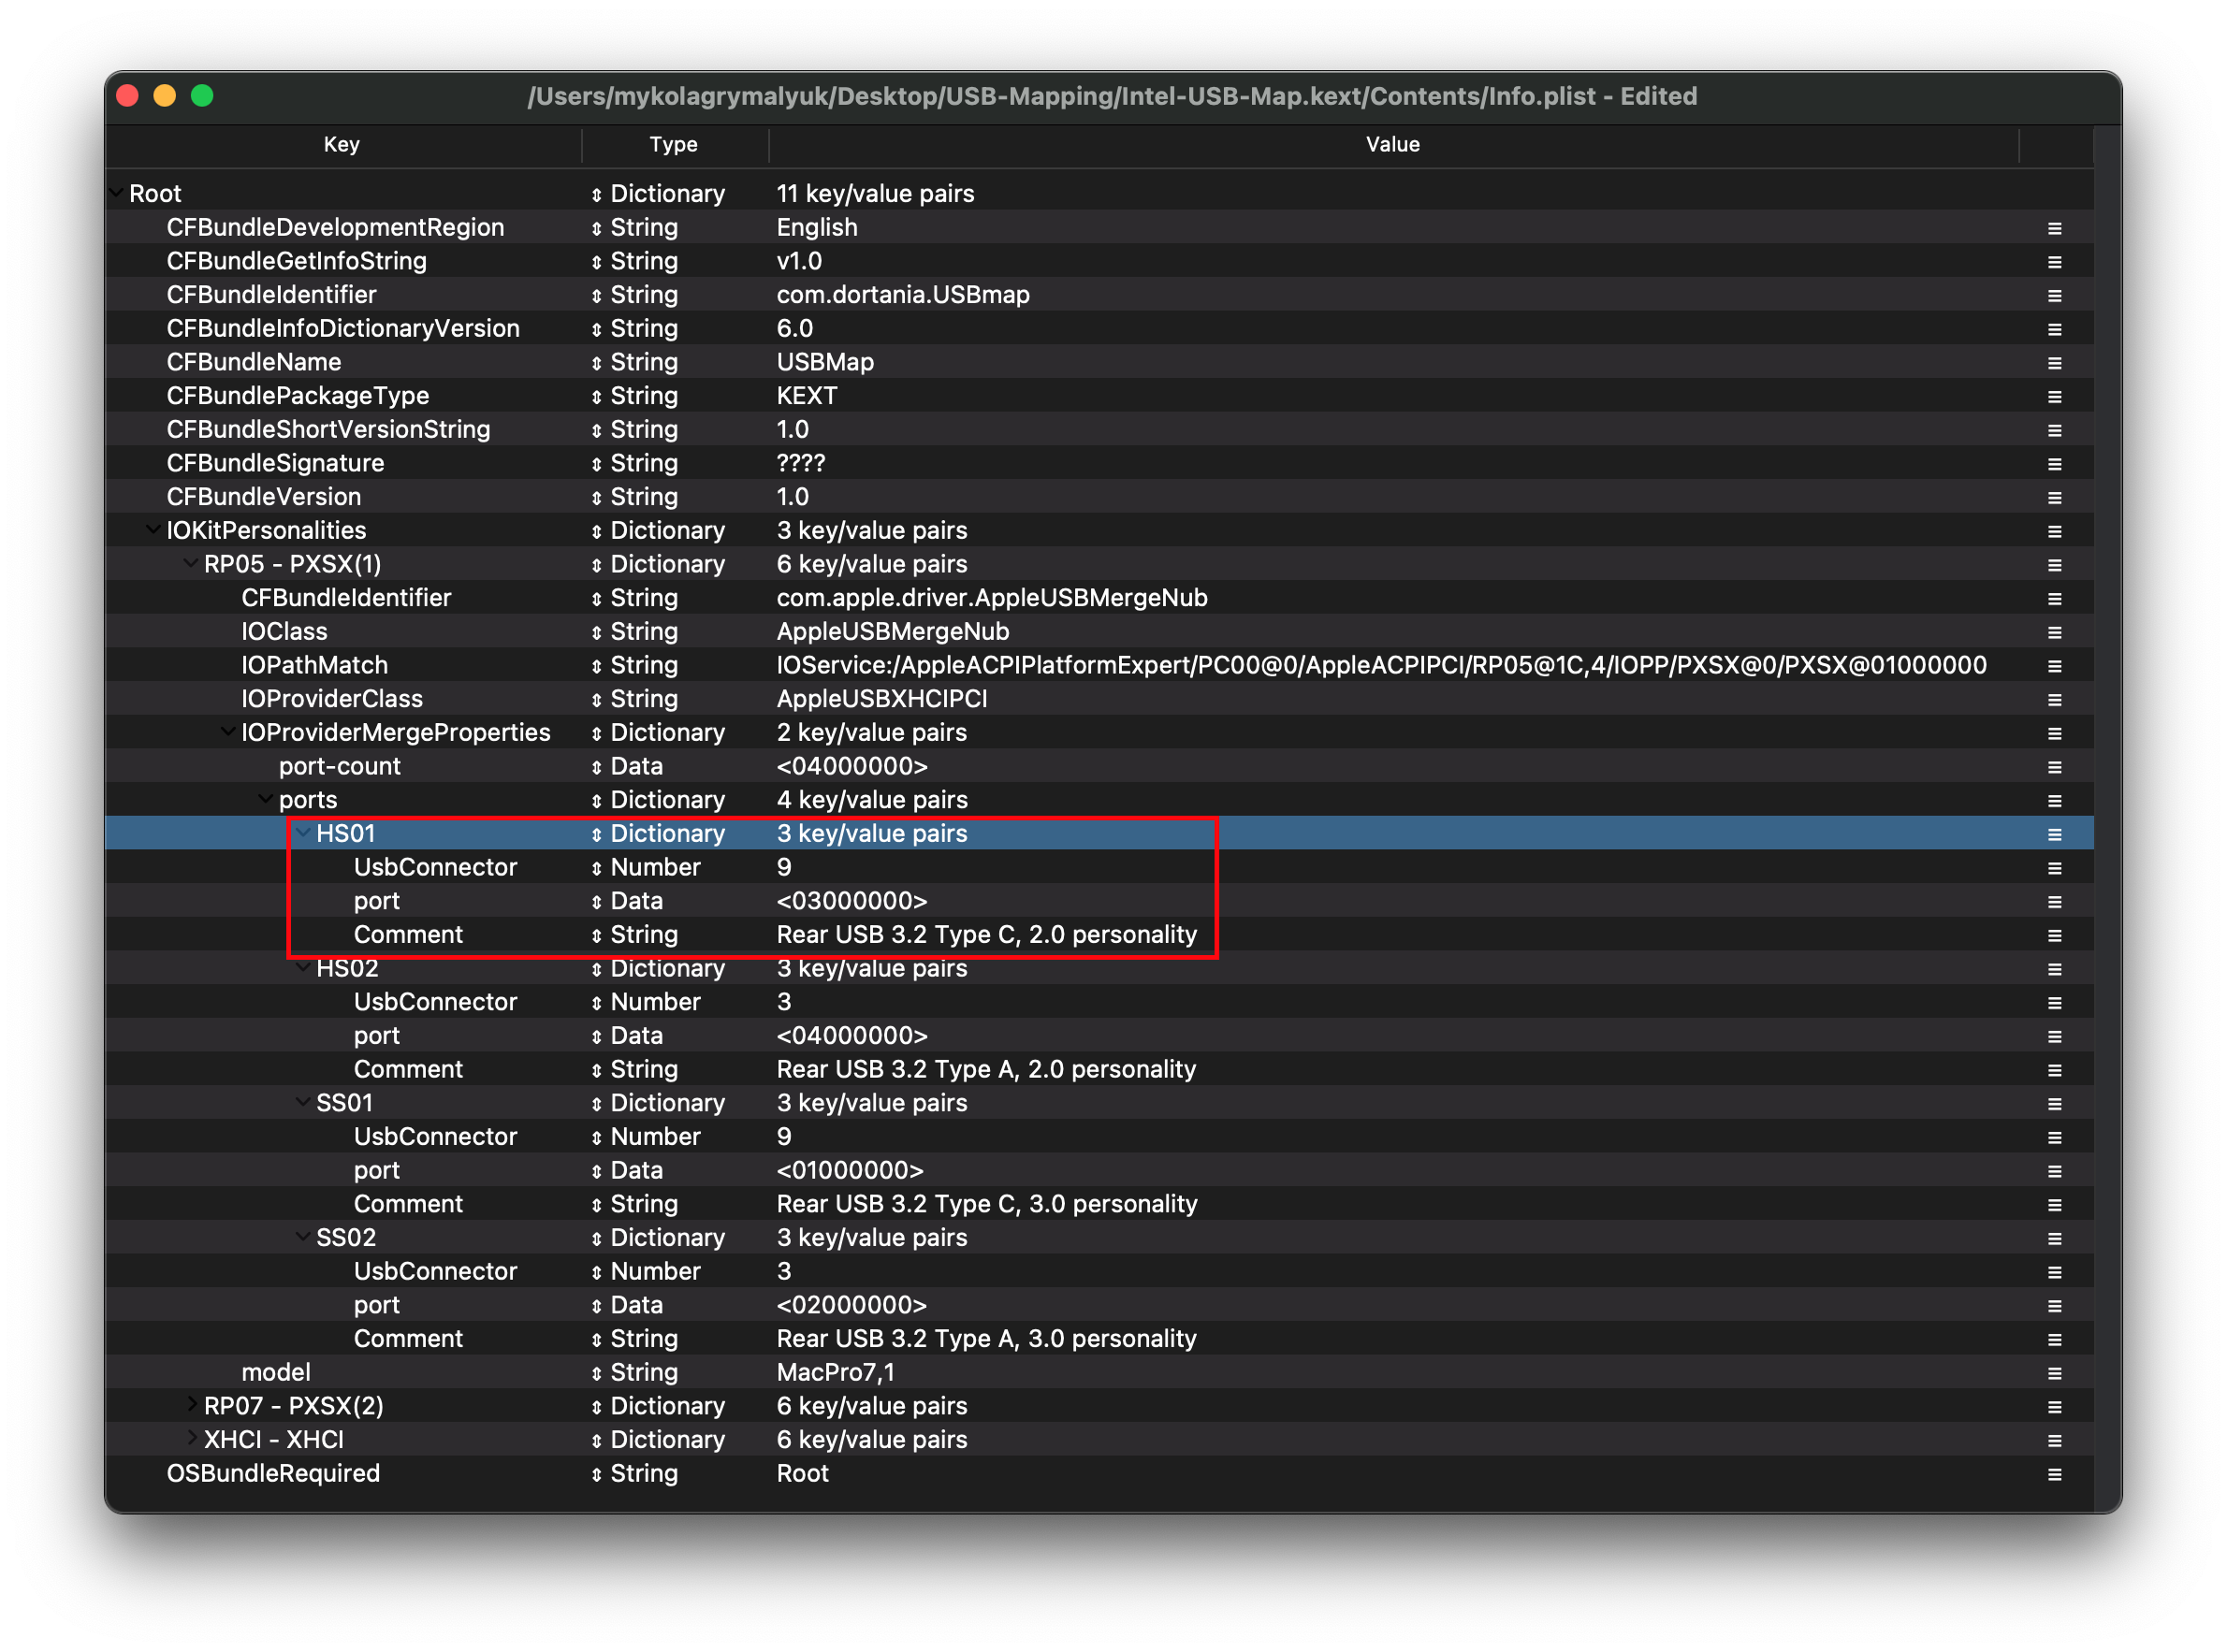
Now lets open the IOProviderMergeProperties dictionary:
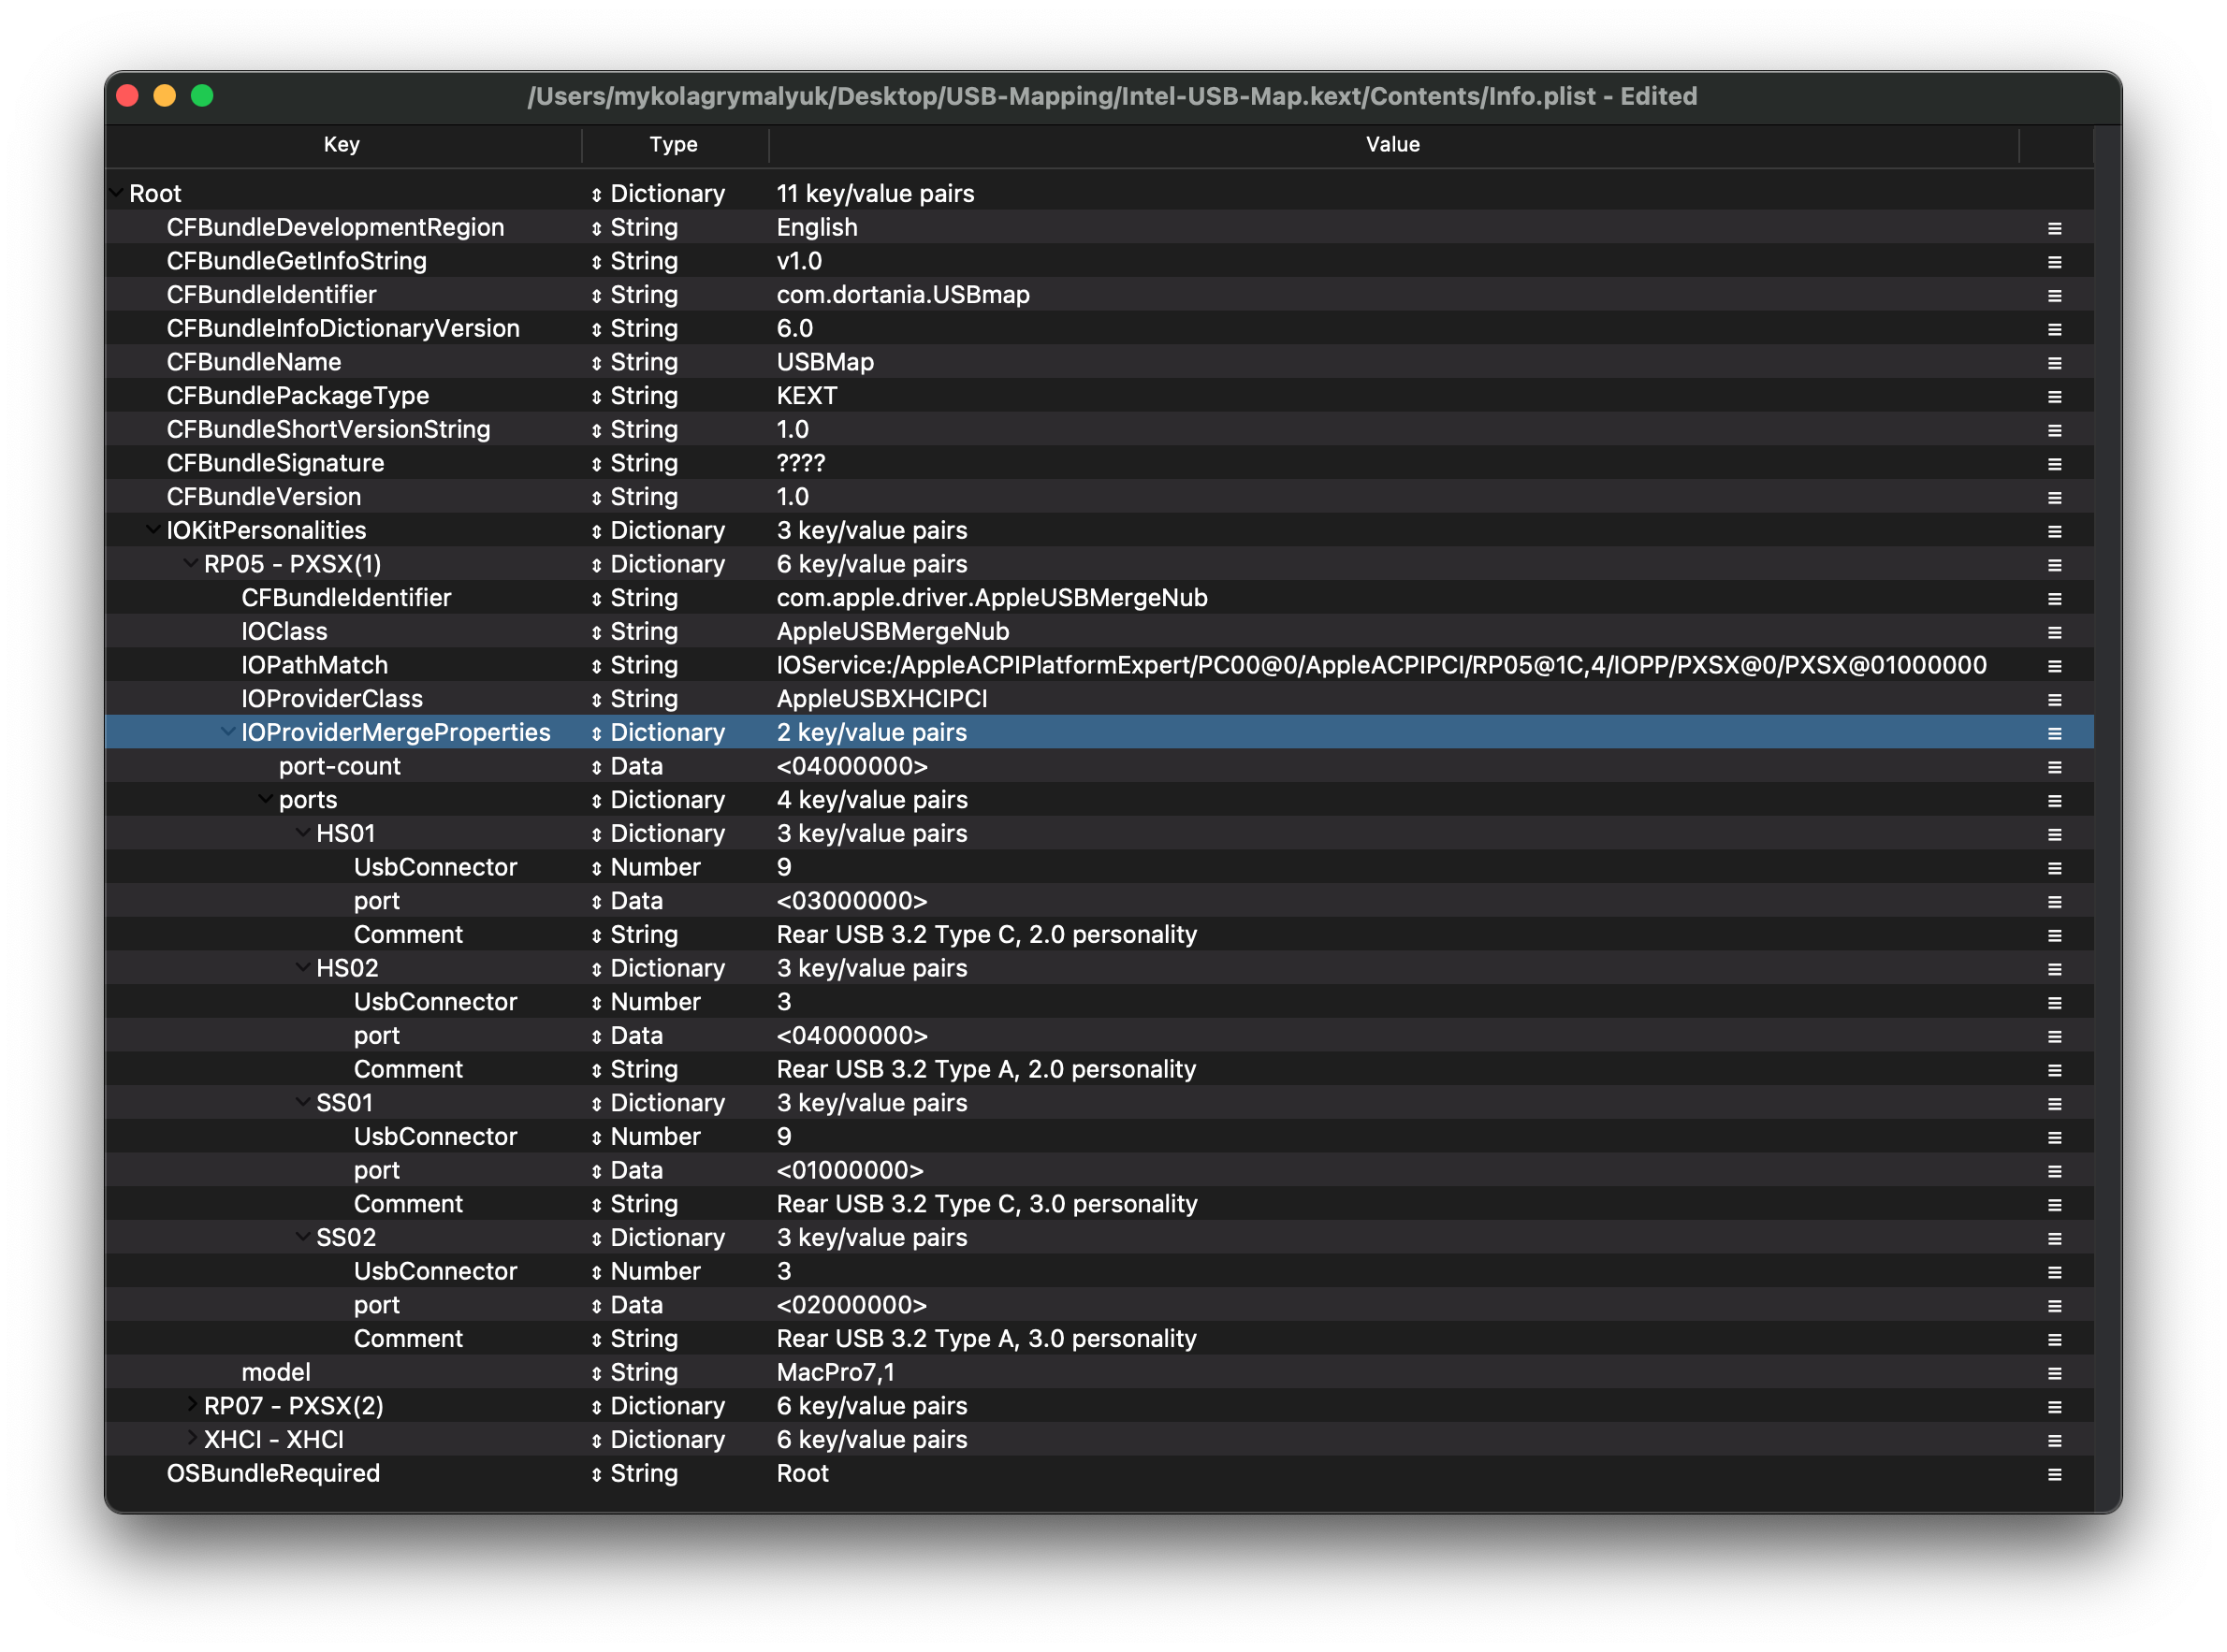
Here we have a lot of data to work through:
| Property | Comment |
|---|---|
| name | The name of the USB port's dictionary |
| port-count | This is the largest port value you're injecting |
| UsbConnector | This is the type of USB port as mentioned in the ACPI 9.14 section |
| port | The physical location of your USB port in ACPI |
| Comment | An optional entry to help you keep track of all your ports |
And a reminder of all possible port types:
| Type | Info | Comments |
|---|---|---|
| 0 | USB 2.0 Type-A connector | This is what macOS will default all ports to when no map is present |
| 3 | USB 3.0 Type-A connector | 3.0, 3.1 and 3.2 ports share the same Type |
| 8 | Type C connector - USB 2.0-only | Mainly seen in phones |
| 9 | Type C connector - USB 2.0 and USB 3.0 with Switch | Flipping the device does not change the ACPI port |
| 10 | Type C connector - USB 2.0 and USB 3.0 without Switch | Flipping the device does change the ACPI port. generally seen on 3.1/2 motherboard headers |
| 255 | Proprietary connector | For Internal USB ports like Bluetooth |
It should be coming full circle now, as you can see how our previous work with mapping out our ports works.
# Name
The name property is actually the name of the USB port's dictionary, and is used solely for house keeping. Keep in mind every USB port you want to use needs to have its own unique USB port dictionary.
The name itself holds no value besides showing up in IOReg and so this can be whatever you like. To keep this sane, we use the name already given by our ACPI tables(in this case HS01) but the name can be any 4 character entry. However do not go over this 4 char limit, as unintended side effects can happen.
- Note: Those with AppleUSB20XHCIPort or AppleUSB30XHCIPort names for USB ports, you should choose a name easy to identify. On Intel, this is HSxx for 2.0 personalities and SSxx for 3.0 personalities
# port
To find the port value, simply select your USB port in IOReg and look for the port entry:
| IOReg | info.plist |
|---|---|
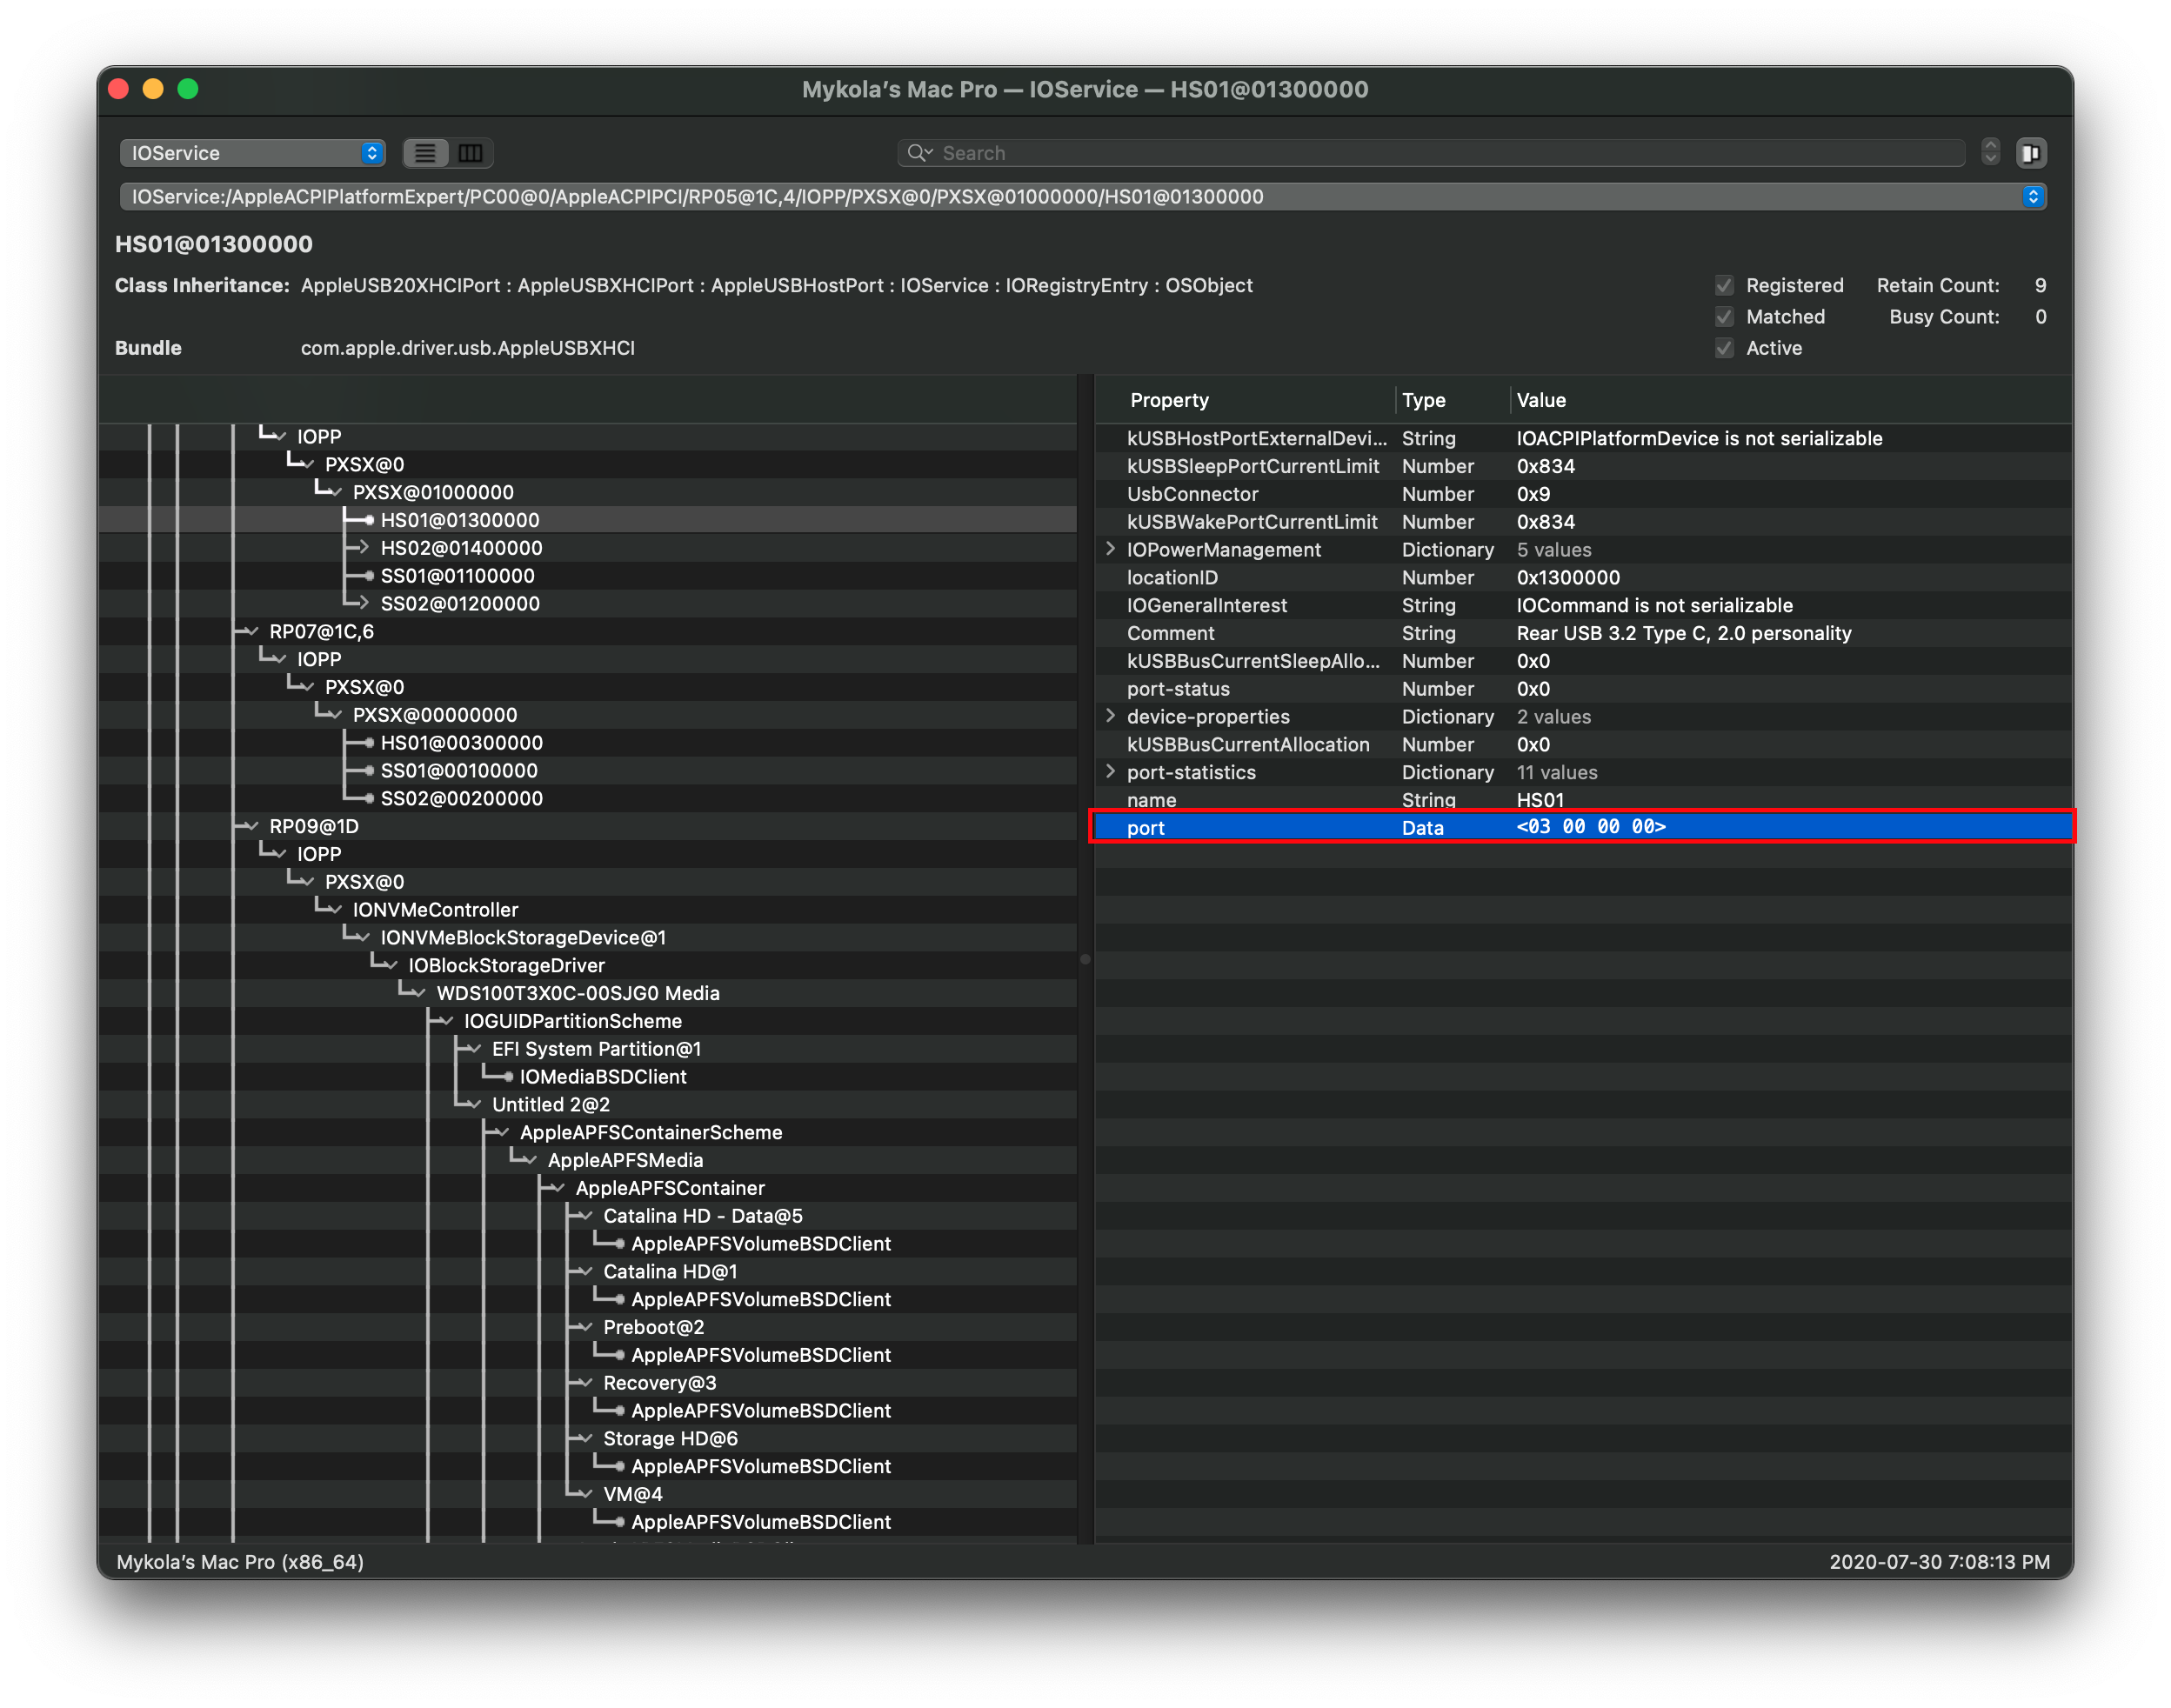 | 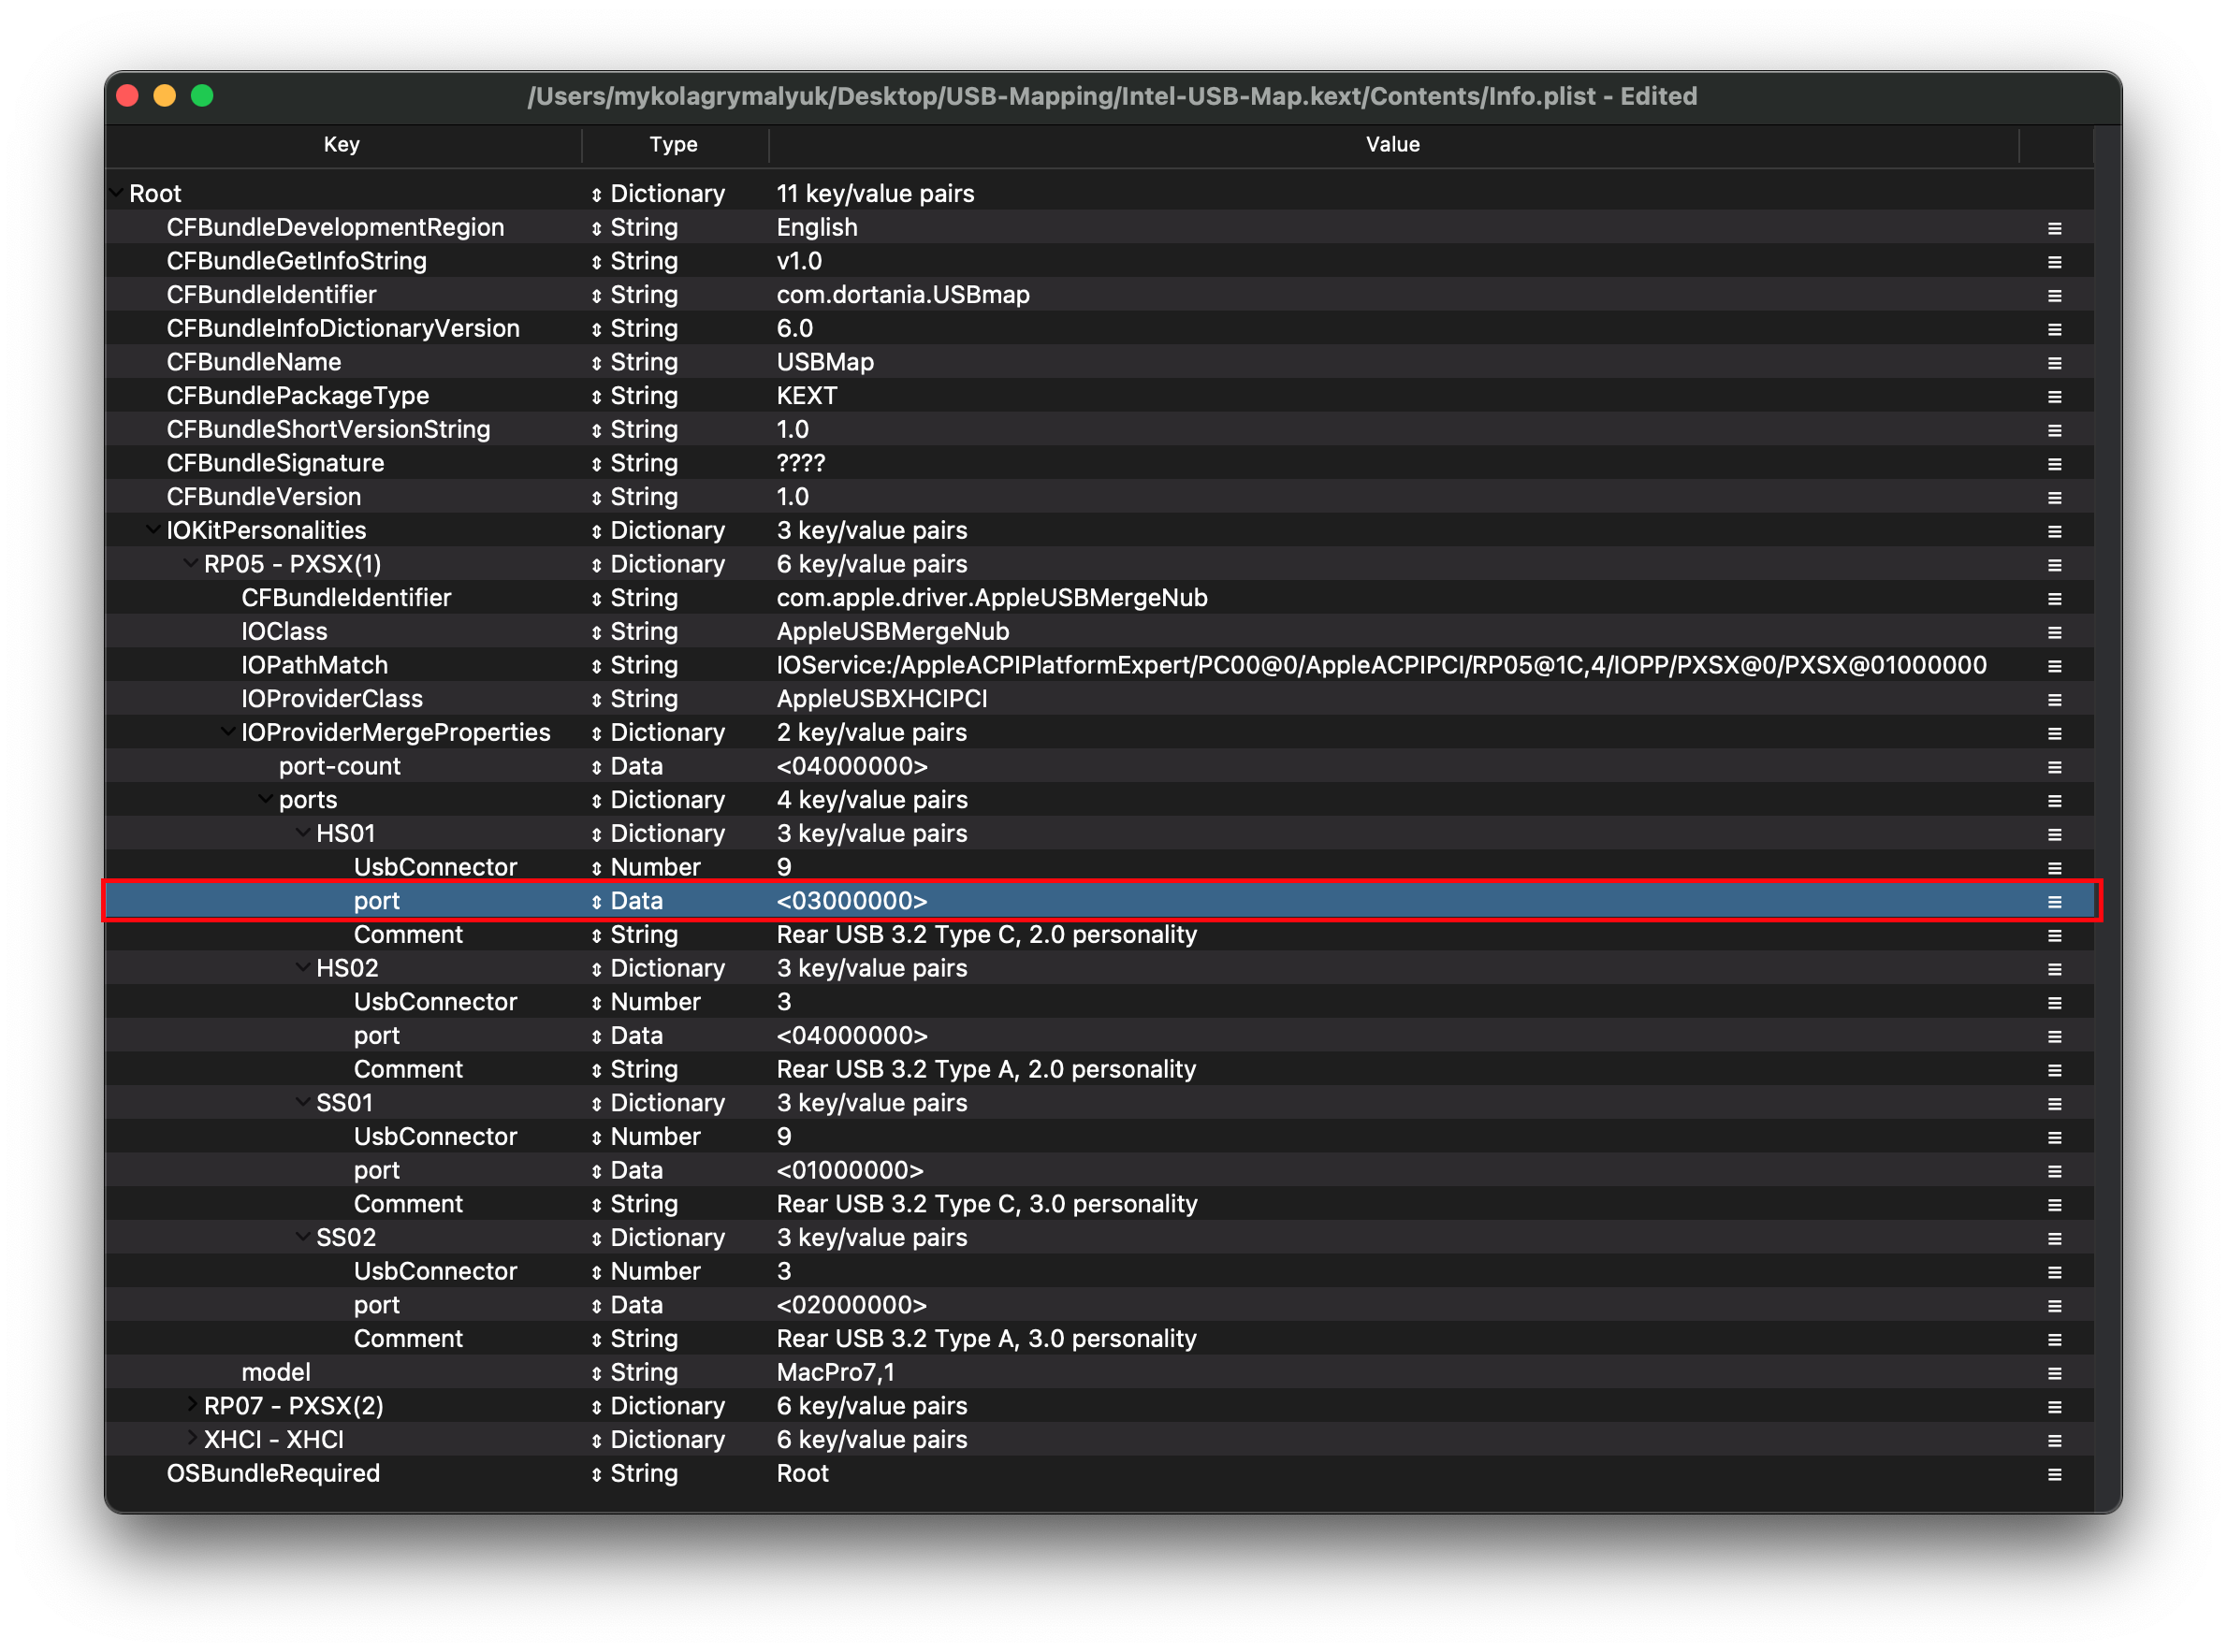 |
From here we get <03 00 00 00>, you can simply remove any spaces and add it to your USB map
# port-count
The final value remaining, look back at your USB map and see which port entry is the largest:
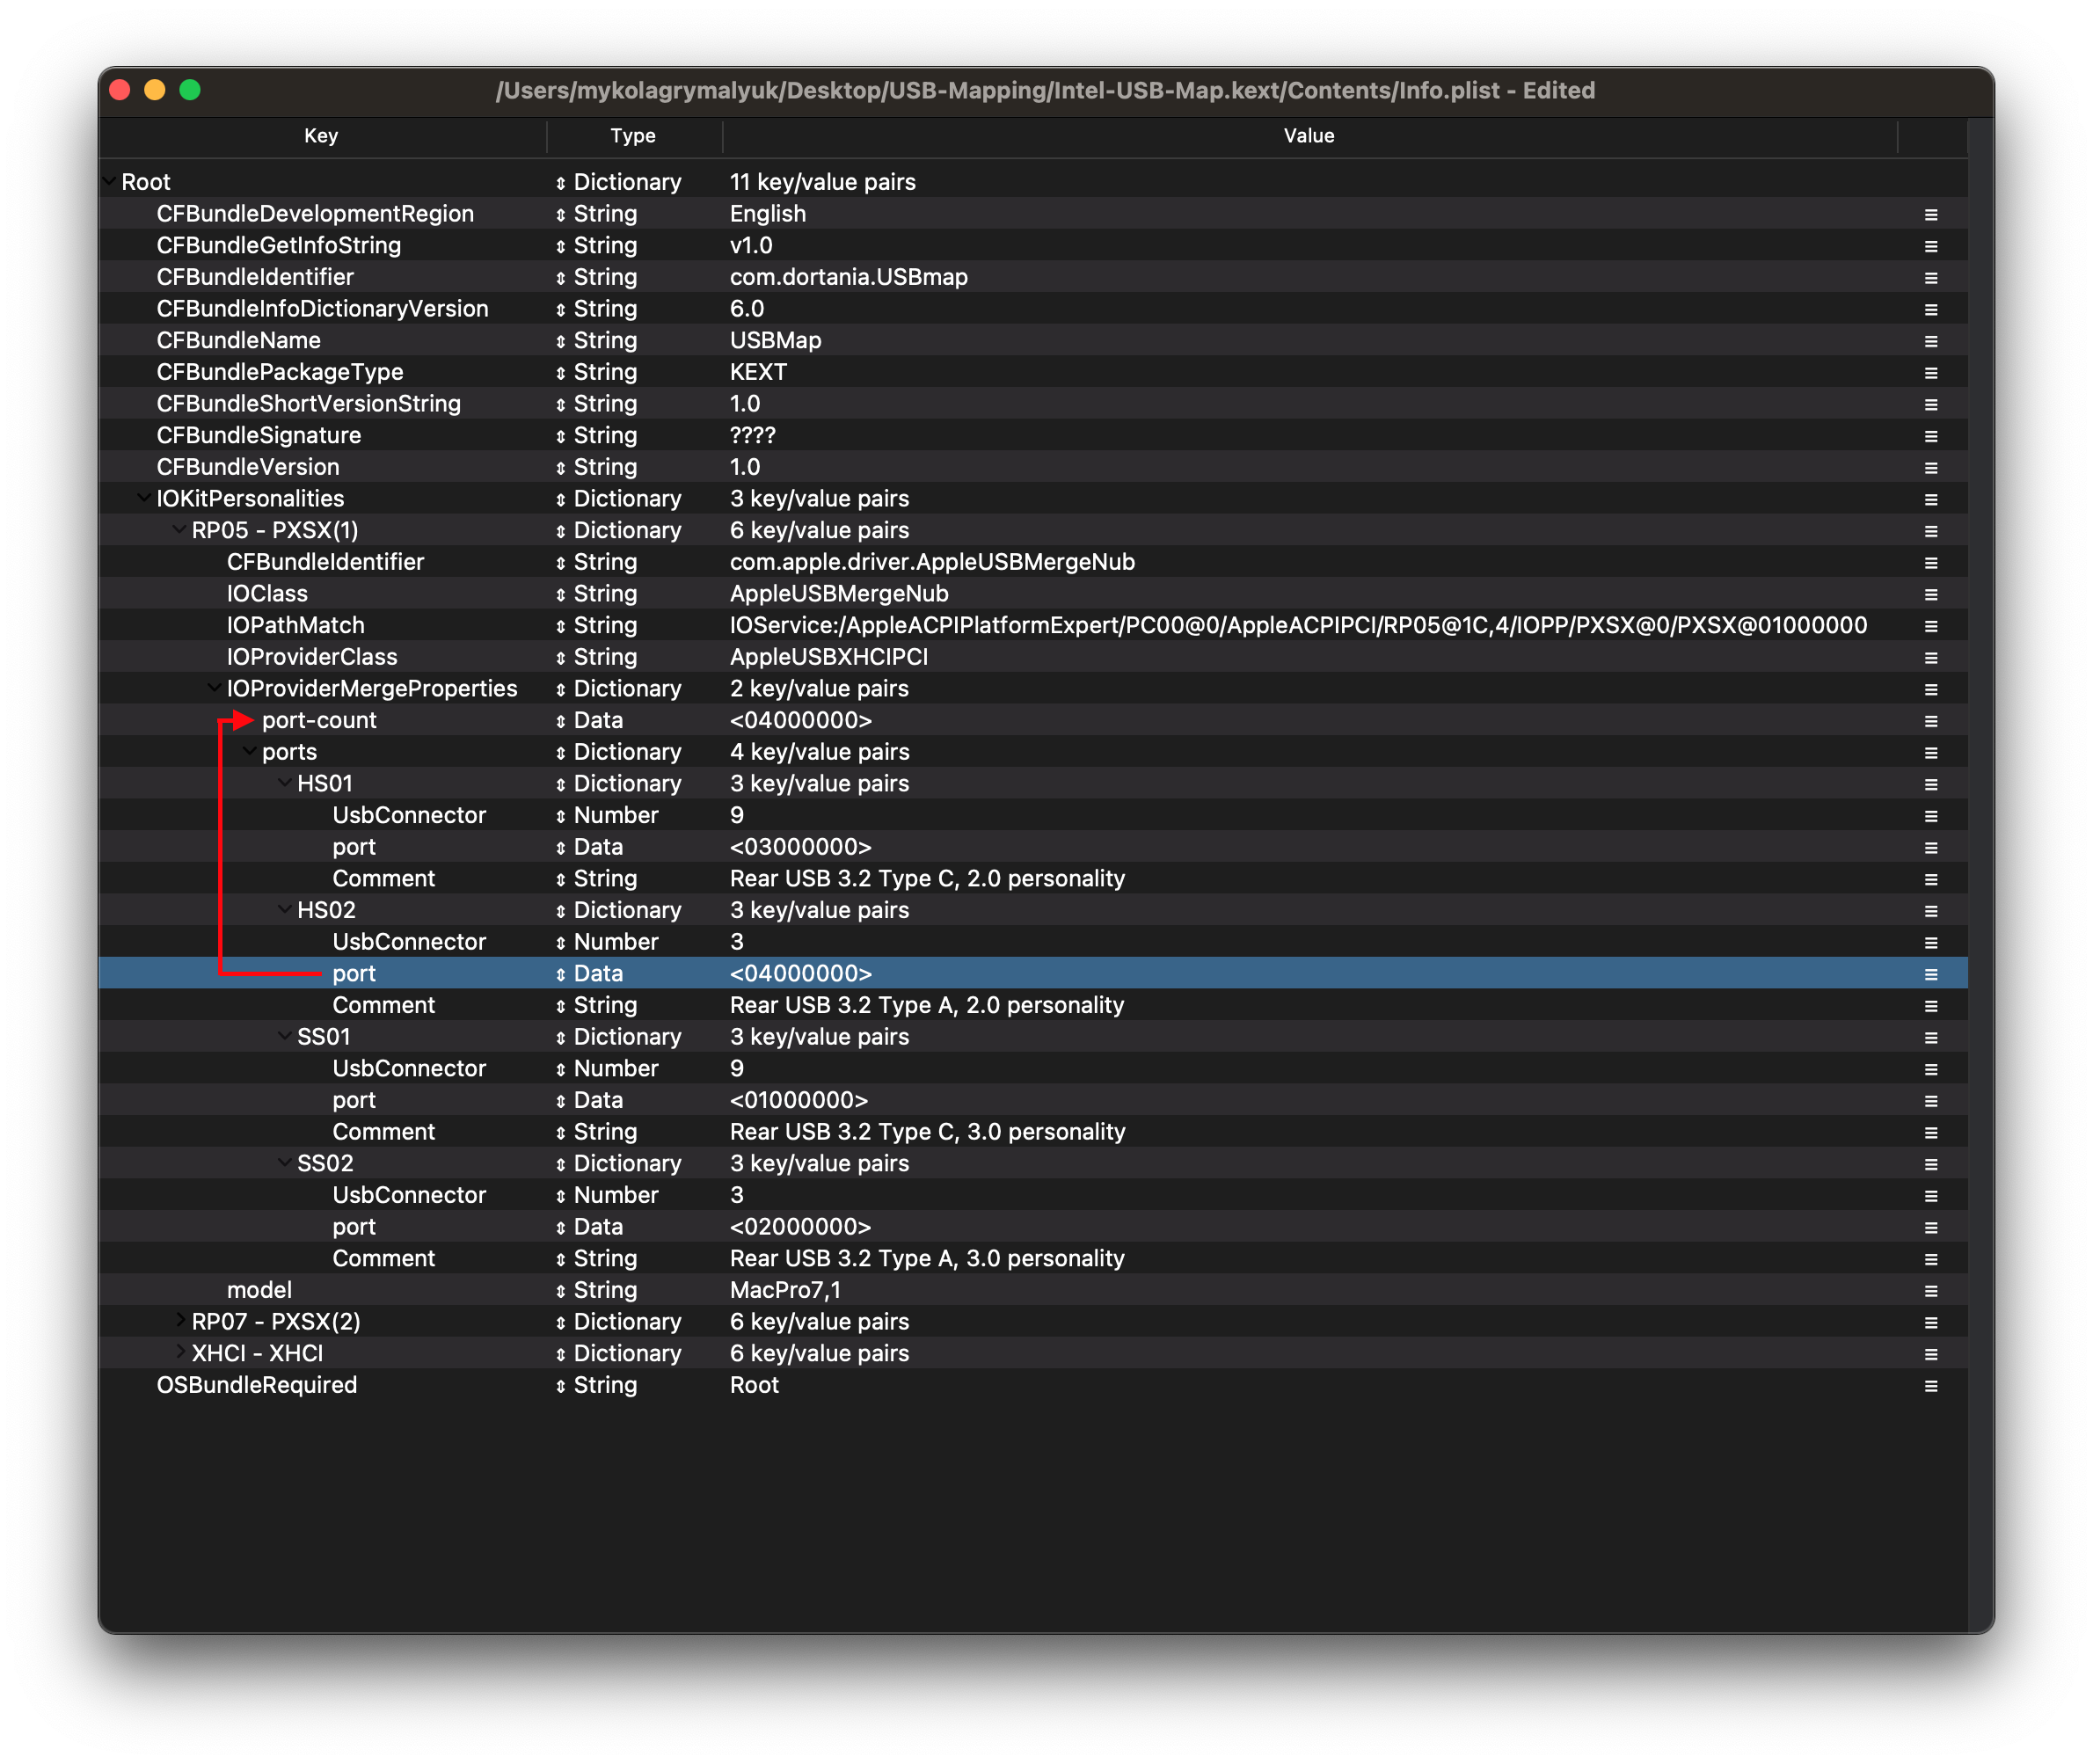
Here we see the largest in PXSX(1) is <04000000>, do keep in mind that port uses hexadecimal if you get any letters in your USB map.
# Continuing on
Now that we've gone over how to map your USB ports for a specific controller, you should have enough understanding to map more controllers. The sample USB-Map.kext I provided has 3 USB controllers listed in it(PXSX-1, PXSX-2 and XHCI). Remember to edit accordingly and to remove any unnecessary maps.
# Cleaning up
Once your saved your USB map's info.plist, remember to add the kext to both your EFI/OC/Kexts and under you config.plist's Kernel -> Add(ProperTree's snapshot can do this for you)
Next, remove/disable:
- USBInjectAll.kext(if you're using it)
- Reason for this is USBInjectAll actually breaks how Apple builds port maps. So while it's great for initial port mapping, it can break you final USB map
- Kernel -> Quirks -> XhciPortLimit -> False
- Now that we're finally under the 15 port limit, we no longer need this hacky fix
Then reboot, and check IOReg one last time:
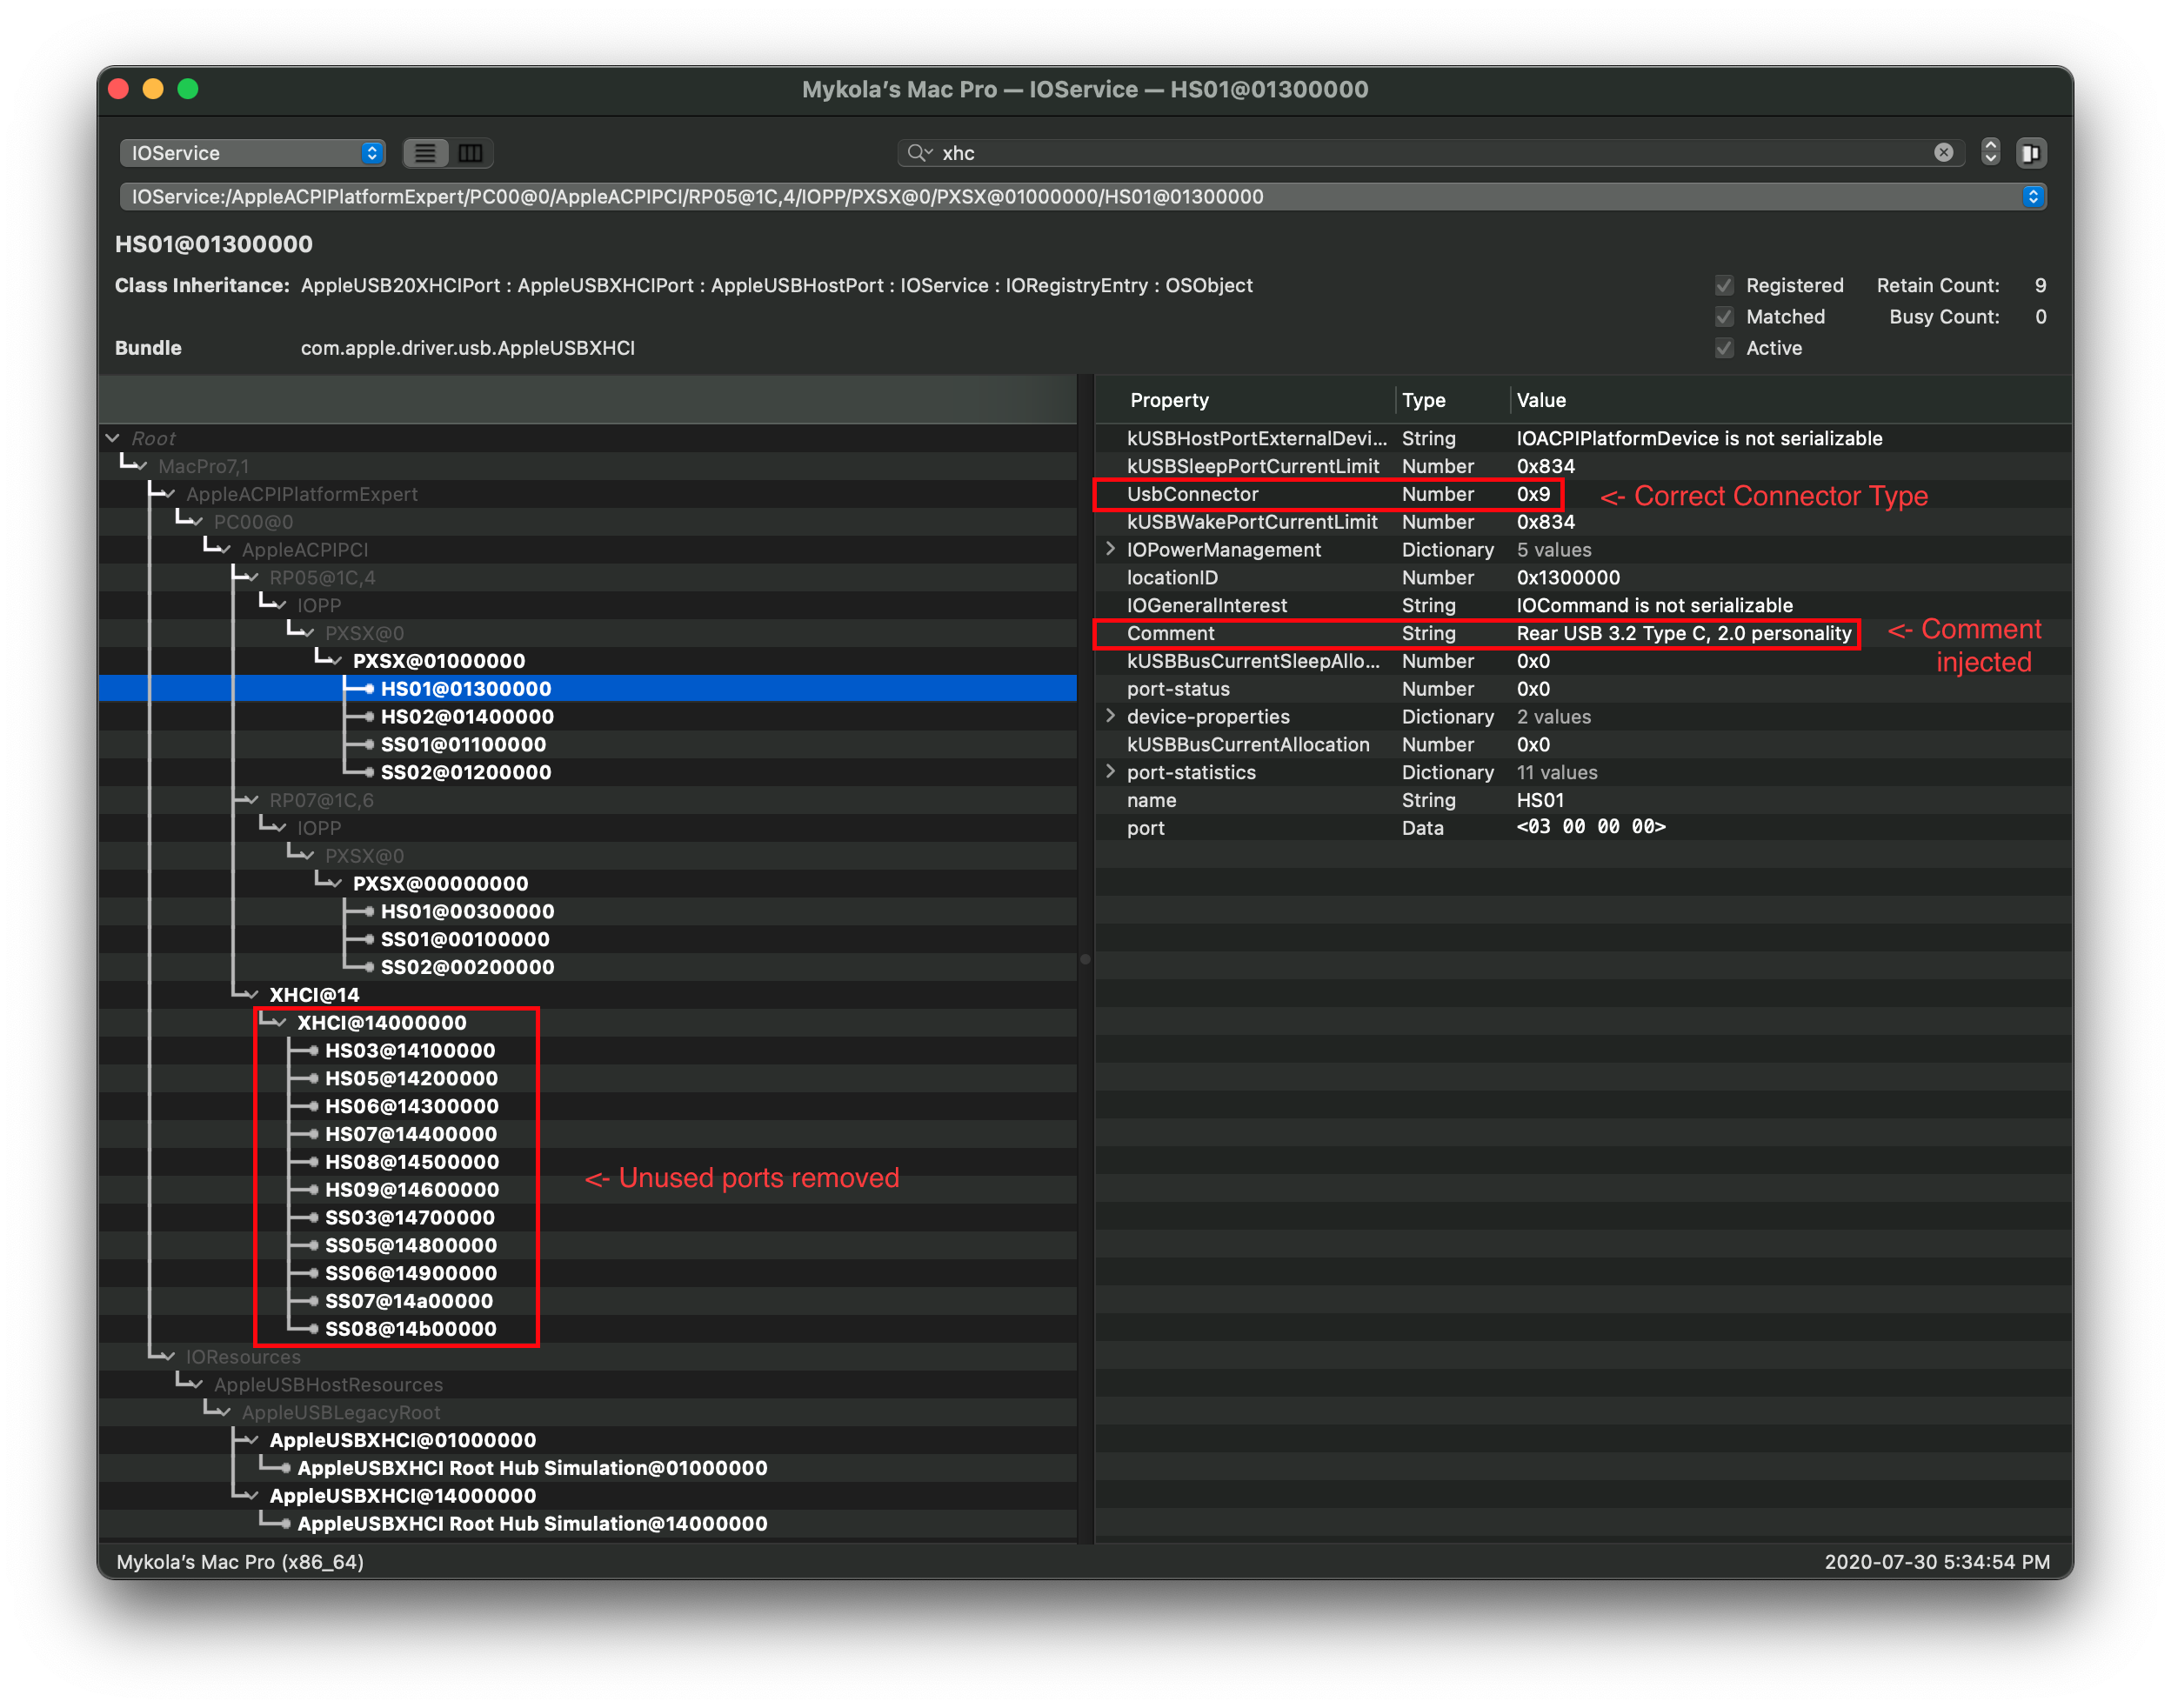
Voila! As you can see, our USB map applied successfully!
The main properties to verify are:
- Correct UsbConnector property on your USB ports
- Comment applied(if injected)
- Unused ports were removed